Back in late September this year, the Raspberry Pi foundation released a new operating system named PIXEL for their, you guessed it, Raspberry Pi. PIXEL OS is based on Debian Linux and is power-packed with productivity software and programming tools like Libre Office Suite, BlueJ Java IDE and Geany’s programmer editor. It also comes with utilities like RealVNC and SenseHat emulator. In an interesting turn of events, the company announced that their Debian-based OS can be tried on macOS and Windows. So, if you are interested in trying out PIXEL OS on your MacBook or Windows PC/laptop, here are the steps to run PIXEL OS on macOS or Windows 10:
Note: Before we begin, it must be noted that PIXEL OS is still in a very early development phase and things may or may not work as expected.
Running PIXEL OS using VirtualBox
We’ll be running the PIXEL ISO file inside an emulator. I recommend using VirtualBox, as it’s free and lightweight, but feel free to use any other alternatives. Here, I’ll demonstrate the process using VirtualBox on macOS Sierra 10.12, but the same applies to Windows 10 or any other macOS or Windows version too.
First, grab the ISO (~1.3GB) from Raspberry Pi’s official website and meanwhile, also download and install VirtualBox (~90MB) for your platform. Open up VirtualBox and you’ll be greeted with a welcome screen.
1. Click on the “New” button in the top left of the VirtualBox window.
![]()
This opens up the wizard to quickly set-up a virtual machine. Make the following changes, so that it looks like exactly as shown in the following picture:
- Name: PIXEL
- Type: Linux
- Version: Debian (64-bit)
![]() 2. Next, it’ll ask the amount of memory to allocate. Whilst this is entirely case-dependent, a general rule of thumb is to allocate no more than half of the RAM your system has. But PIXEL isn’t very resource intensive, so we can do away with a little less allocation. For instance, you may want to allocate 1024 MB if you’ve 4 GB of RAM installed. This could be bumped up to 2 GB if you’ve 8 GB RAM and so on. Click “Continue“.
2. Next, it’ll ask the amount of memory to allocate. Whilst this is entirely case-dependent, a general rule of thumb is to allocate no more than half of the RAM your system has. But PIXEL isn’t very resource intensive, so we can do away with a little less allocation. For instance, you may want to allocate 1024 MB if you’ve 4 GB of RAM installed. This could be bumped up to 2 GB if you’ve 8 GB RAM and so on. Click “Continue“.
![]() 3. Next, select the “Create a virtual hard disk now” option and click on “Create“.
3. Next, select the “Create a virtual hard disk now” option and click on “Create“.
![]() 4. Then, select “VirtualBox Disk Image” (VDI) in the hard disk file type window and click “Continue“.
4. Then, select “VirtualBox Disk Image” (VDI) in the hard disk file type window and click “Continue“.
![]() 5. On the next screen, select “Dynamically allocated” and “Continue“.
5. On the next screen, select “Dynamically allocated” and “Continue“.
![]() 6. Next, type in any name you would like and set the size of virtual HDD (recommended 8 GB). Lastly, click on “Create“.
6. Next, type in any name you would like and set the size of virtual HDD (recommended 8 GB). Lastly, click on “Create“.
![]() 7. Now that you’ve successfully configured your new VM, you should see it listed on the left-hand sidebar. Select this VM from the sidebar and click on “Start” at the top of the window.
7. Now that you’ve successfully configured your new VM, you should see it listed on the left-hand sidebar. Select this VM from the sidebar and click on “Start” at the top of the window.
![]() 8. Now, click on the “Browse” icon and select the ISO file you downloaded before and click on “Start“.
8. Now, click on the “Browse” icon and select the ISO file you downloaded before and click on “Start“.
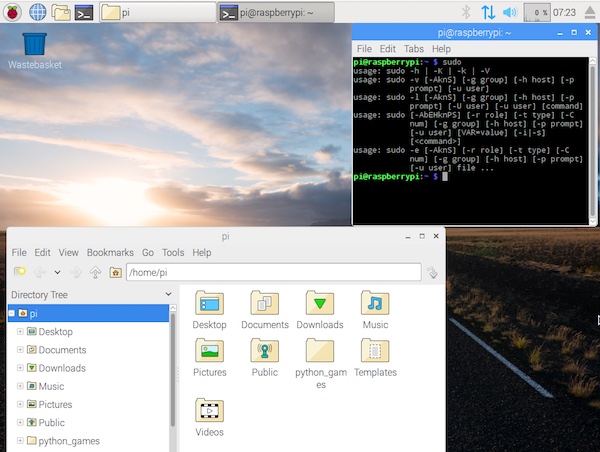
![]() It should start booting now and in about a couple of minutes, you’ll see PIXEL OS up-and-running, like shown below.
It should start booting now and in about a couple of minutes, you’ll see PIXEL OS up-and-running, like shown below.
After you are done tinkering around, click on the close button (red stop-bar on mac)->Save the machine state->OK. This ensures that the current machine state (all your open working directories) shall be resumed when you next power on this virtual machine. If you feel like you’re not likely to use PIXEL in the near future, you may as well select the “Send the Shutdown signal” option which ensures that PIXEL OS will cold boot the next time you start it up (think of it as hibernate vs shut down in Windows).
Running PIXEL OS using a Live Bootable USB
Creating a live bootable USB requires you to have a USB drive of at least 4 GB. (It may work with flash drives below 4 GB, but there’s no guarantee). It is important to back up any important files you may have on the drive, as it’ll be formatted and all the data will be erased.
Before you proceed, grab the necessary tools you’ll require. If you’re on Mac, consider downloading Etcher (free). Windows users should check out Rufus (free).
Setting up on Windows
1. Open Rufus and select the USB drive you want to install PIXEL OS on, in the “Device” tab.
2. Next, check the box where it says “Create a bootable disk using” and select “ISO image“.
3. Browse and select the downloaded ISO file.
4. Click “Start“.

Note: Leave all the other boxes to their default settings.
The process took a little more than a minute to complete on my PC, yours may vary. Now that we have successfully made a live USB, it’s time that we should boot from the USB drive.
For this, you need to boot into the BIOS and change the boot order. Typically, hitting the F12 button on your keyboard continuously while your PC is booting, presents you with a boot order similar to shown below. You should select your USB drive at this point and press Enter. An important thing to note that given the myriad of Windows devices, your key may be different. In that case, Google for “How to change boot priority on <Your model name>”

After you press Enter, you should be greeted with a welcome screen:
 Setting up on Mac
Using Etcher on Mac is pretty straightforward. In step 1, select the ISO file. Next plug-in the USB drive and it should automatically appear on “Select drive“. Then, click on “Flash!“. The process shouldn’t take more than a minute or two.

Now restart your Mac. This time, hold down the Option key (⌥) on your keyboard as soon as you hear the start-up chime. You should see an EFI/PIXEL option alongside “Macintosh HDD”. Selecting the same will boot you straight to the PIXEL OS. After you are done exploring, shut down PIXEL OS and you can boot to MacOS as normal.

Note: The development team says that some newer Mac models like MacBook Air 2015 may have trouble recognizing the drive and a fix is underway. As always, you should try your luck.
Early Thoughts on PIXEL OS
I have been running PIXEL OS on my Mac using VirtualBox for a couple of days now. PIXEL OS comes pre-installed with a lot of utilities, but the feature list is pretty bare-bones. As of now, for the customization part, you can only choose among a set of 16 wallpapers. Libre Office Suite comes pre-installed too, so you can edit your presentation or work with data in tabular form. It also comes with a handful of games like Tetris and puzzles you can play, which are built using Python. From a programming perspective, you have IDE’s for Java and Python shell. This release of PIXEL comes with a Chromium browser for your web surfing needs.
The company promises that it is committed to making it the best desktop platform. Of course, they are miles away from establishing that, but they have taken a step in the right direction by making PIXEL OS available to macOS and Windows devices. I’ll be enthusiastically keeping a tab on future developments and try to cover it as much as possible over here at Beebom.
SEE ALSO: How to Set Up and Get Started with Raspberry Pi 3 (Starter Guide)
Have You Used PIXEL OS on Windows or Mac?
Raspberry Pi foundation says that if there’s enough interest over time, they’ll create an installable version. As of now, these are the only two ways through which you can easily try out the PIXEL OS on your Mac or Windows system. Of course, it’s not ready for primary use but nevertheless, the foundation is committed to making it one.
Let me know what do you think of PIXEL OS in the comments. If you get stuck somewhere in the process, feel free to shoot a comment and I’ll try my best to resolve it!


