
The BIOS, which stands for Basic Input/ Output System, is a basic layer of software that exists on the flash memory of your motherboard. It is used for accessing several options related to your motherboard’s settings, acting as a ‘bridge’ between your hardware components and the operating system. Learn more about BIOS and UEFI, and how they work, in our detailed explainer here. A BIOS update may sound risky to perform, especially with all the warnings. While this might feel like an intimidating process, don’t worry. We are here to guide you through the process to update the BIOS/UEFI in your PC.
Why Do You Need to Upgrade Your BIOS?
Manufacturers generally advise against updating your BIOS, and for good reason. If your system is running in a stable manner, we do not recommend updating your BIOS or UEFI firmware. However, there are several cases where it is suitable to have the latest BIOS installed on your system.
With the latest BIOS, motherboard chipset, and other hardware drivers (installed separately), you can ensure that your hardware can run in a stable manner. The latest firmware is important sometimes. BIOS updates include faster performance for certain cases, support for new generation of CPUs, better memory compatibility, bug fixes such as USB compatibility issues, and other things like fixing security vulnerabilities too. Sometimes the BIOS update may also fix a TPM issue that happens while installing Windows 11.

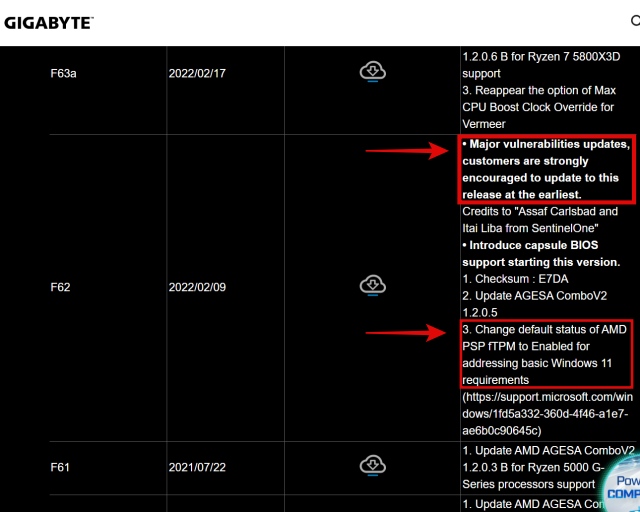
We recommend checking out the latest BIOS revisions for your motherboard on the manufacturer’s website. You will find out if there’s a major vulnerabilities update, and if so, install the latest BIOS. These important BIOS updates are also included by default on new stocks. Manufacturers advise installing these mandatory BIOS updates as soon as possible to ensure your system isn’t at risk.
Things to Remember Before Updating Your BIOS
1. Prepare a Storage Media to Use for BIOS Update
For updating the BIOS of your motherboard, you need to have a pen drive as a form of storage media. This is where we will store the BIOS update file. You will need to format this storage device into FAT32 format, and then copy the BIOS update file into it.
Also, it is preferable to use a USB 2.0 drive for updating your BIOS. If you cannot seem to perform a BIOS update with your existing pen drive, try a different one. But if that doesn’t work either, you might need to source an older pen drive or one with support for USB 2.0 only.
2. Ensure Your PC Has a Stable Power Source or Power Backup
Without stable power to your PC, the BIOS update can fail and brick your motherboard. If the BIOS update is underway and a power cut happens, the motherboard could brick. It will simply stop getting to the POST stage, which the system enters right before it starts loading the OS. Ensure that a stable power source is connected to your PC, preferably one with power backup.
3. Save Your Previous BIOS Configuration and Settings
The BIOS you are currently using might be configured with specific settings for your system. These include things like the XMP memory settings, processor power management profile, and fan profiles, among other things. So, remember to save these settings if the option is available for your motherboard.
How to Update BIOS/UEFI in PC or Laptop
Step 1: Download the Correct BIOS Update File
1. Start by opening Windows Search on your PC and typing System Information. Then, click on the search result that pops up.
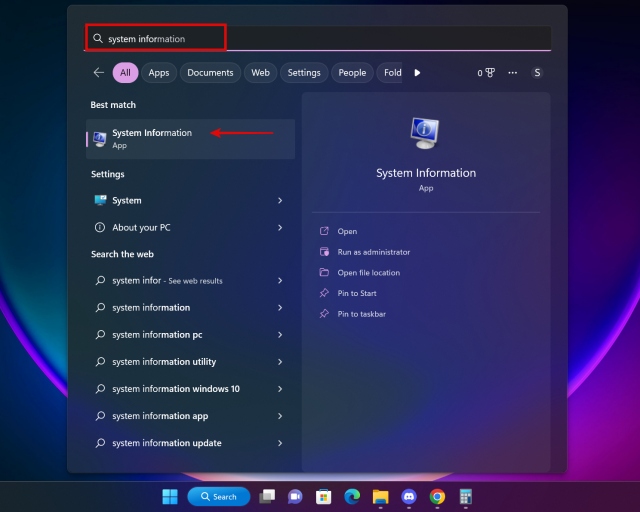
2. In System Information, note down the following things:
- BIOS Version/Date: The revision number of your BIOS, and the date of its release.
- System Model: Your PC’s system model. Useful for identifying laptops.
- BaseBoard Manufacturer: The manufacturer of your motherboard.
- BaseBoard Product: The model number of your motherboard.

3. For desktop PCs, remember that the “BaseBoard Manufacturer” represents the motherboard’s manufacturer, and the “BaseBoard Product” denotes the motherboard’s model number. For laptops, the “System Model” will allow you to narrow down the search process when visiting the manufacturer’s website in our next step.
4. Next, go to your motherboard manufacturer’s website. Open the motherboard overview page and navigate to the support page of your motherboard. Then, you need to move to the “Drivers & Downloads” tab.

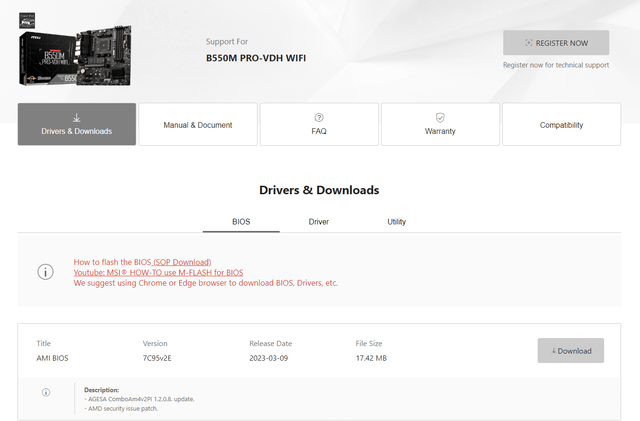
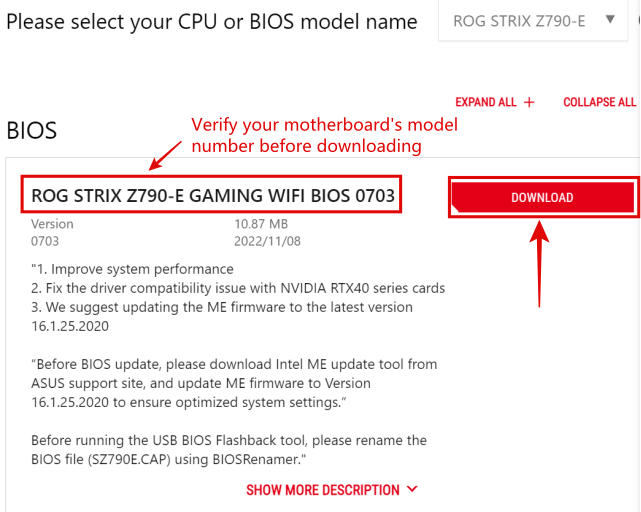
6. Here, you will be able to find the latest BIOS for your motherboard. Download the latest BIOS update for your motherboard.
Note: The terms might be under a different name, depending on your manufacturer. You will definitely still be able to find the latest BIOS file somewhere on the support page.

Step 2: Copy BIOS Update Files to Pendrive
1. After downloading the BIOS file, we recommend reading up on what your manufacturer recommends in relation to performing a BIOS update. The motherboard’s manual is your best friend when it comes to this procedure. This step is required because, at this point in the process, some steps might vary depending on your motherboard’s manufacturer. We have shown the BIOS update method for our ASUS ROG Z790-E Strix motherboard below.


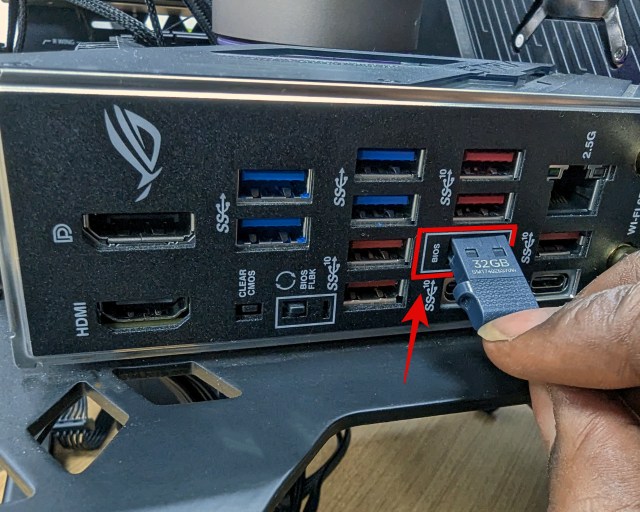
2. We will update our BIOS through the ASUS EZ Flash 3 feature. A similar method is used for several other motherboards as well. So, now that you have the BIOS file downloaded, grab a USB pen drive and plug it into your PC. You might have a dedicated port for installing BIOS update on the rear, as shown below.
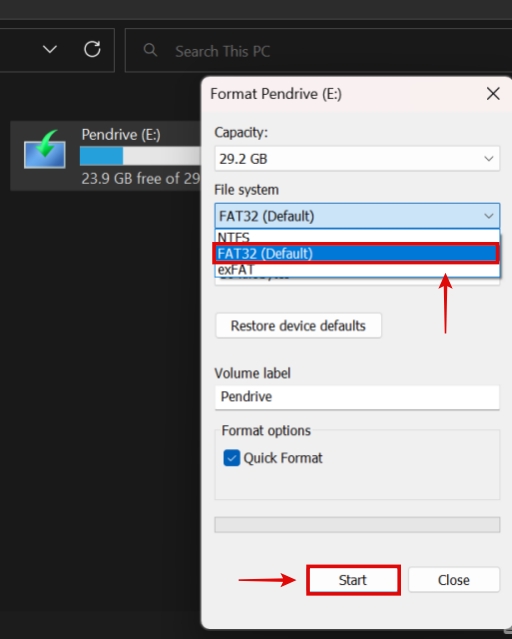
3. Now, open File Explorer and locate the USB drive you plugged in. Right-click on your pen drive, and select “Format” from the context menu. Next, check the “Quick Format” option and also select “FAT32” under File System. This is a widely supported file format that the motherboard’s BIOS can access.

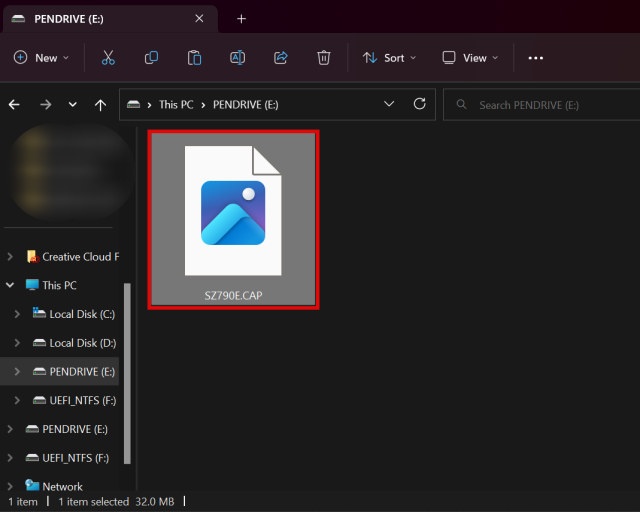
4. When you finish formatting, copy the BIOS file onto the pen drive. Ensure that you rename it if required. In our case, the BIOS file was automatically renamed after running the BIOSRenamer.exe app. This is how the end result looks when viewing the contents of the drive:
3. Enter the BIOS and Perform Update
1. Next, we need to enter the BIOS to perform the BIOS update. To do this, shut down your PC completely. Now, turn it on and spam the F2 or Delete key to access your BIOS. But, if that doesn’t work, restart the PC and keenly observe the POST screen (the first thing which appears when you boot your PC). Here, it will clearly say which key you need to press to access the BIOS. You can also refer to our guide on how to enter the BIOS.

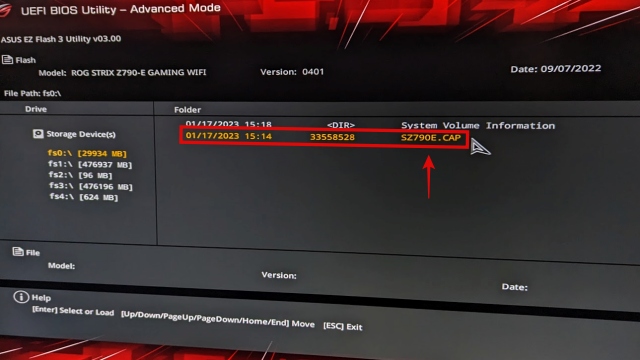
2. Navigate the setup utility and find the section for BIOS Update. You might have to refer to your motherboard manual if it’s not clear where the option is.
3. Now, when you are on the BIOS update screen, select your pen drive. Then, select your BIOS update file.

4. Next, click “Yes” on the pop-up prompt that shows up to start installing the BIOS update. The process will now begin, so sit back and relax.

Don’t worry if your PC restarts or goes blank randomly, as this behaviors is normal during BIOS updates. It might take around 5 minutes or slightly longer for the BIOS update to finish.
And that’s it; You have successfully updated the BIOS of your PC or laptop. However, there is something left for us to do. We need to verify if the BIOS update was completed successfully. Scroll down to learn how that works.
How to Install BIOS Update Without CPU
Is updating your BIOS without a CPU possible? Yes, it is. On several newer generation motherboards, manufacturers have implemented this amazing feature. Some users can’t even install newer-generation processors on their motherboard with a BIOS update, so this feature definitely solves this issue. Here’s how it works:
1. First, make sure to read the motherboard’s user manual regarding the process of how to update your BIOS without a CPU. Mostly, after plugging in the USB drive with a BIOS update file on it, a button can be pressed to initiate the BIOS update, without the CPU/ RAM/ GPU being present. Take your time in this step to understand the overall process before proceeding further.

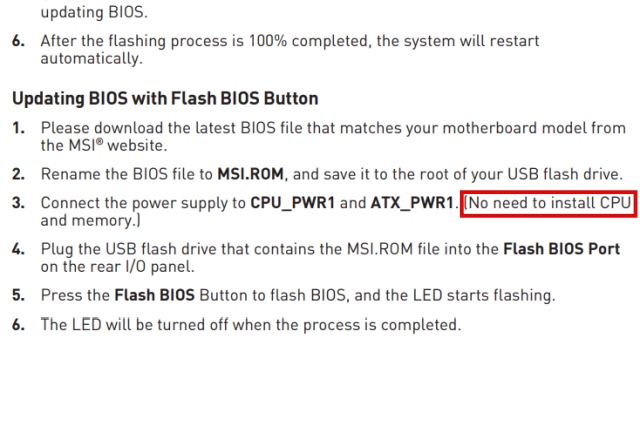
2. Next, plug in your pen drive into the BIOS USB slot. Ensure it is plugged into the specific port for BIOS, if valid for your scenario.
3. Then, navigate to the File Explorer and right-click on the pen drive. Select “Format” after which you have to select the file system as “FAT-32.” Now, check “Quick Format” and proceed to format the drive.
4. When done, open the pen drive and copy the final BIOS update file into it. Make sure to rename it if necessary, which you can confirm through the manual. This is how the drive’s contents look after doing all this.
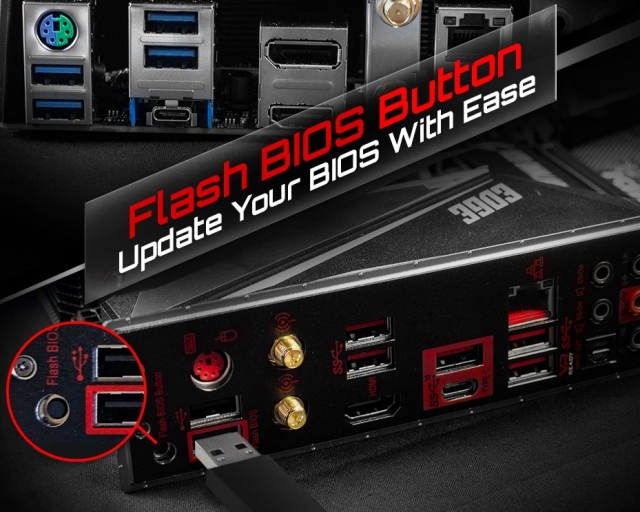
5. Now, shut off your PC completely and press the “BIOS Update/ BIOS Flashback button,” as demonstrated in your motherboard’s manual. This is usually found in the rear I/O section of your motherboard. The BIOS update should now begin, represented by a flashing light next to your USB port. The button looks like this on various MSI motherboards:
How to Verify If New BIOS Update Is Installed
To confirm if the new BIOS update is installed, go into “System Information” using Windows Search. You can verify what BIOS version is mentioned here. Then, compare this against the BIOS information we mentioned in the first few steps. The date in the “BIOS Version” section should be more recent, along with a version number that must be higher than you previously had.
No. Updating your BIOS is quite a simple process, but the risk of damaging your PC if the BIOS update fails is present. You must ensure a stable environment for your PC before performing a BIOS update so that it doesn’t shut off midway.
You can visit your motherboard manufacturer’s site and if there are any BIOS updates that fix critical security vulnerabilities, or offer improvements relevant to your hardware, or support a new CPU that you might want to install. If so, performing a BIOS update is a great idea for your PC.
If the BIOS update fails, then the motherboard could become bricked. Some motherboards have a BIOS flashback feature, which could help in a scenario like this. However, if yours doesn’t, you will have to send the motherboard to the RMA/Repair Centre of your manufacturer.
You can update your BIOS without a CPU present on certain modern motherboards. But, if you need your motherboard to support the latest processor but don’t have any existing one to perform a BIOS update with, you can ask the motherboard retailer to perform the BIOS update for you. The last alternative is to ask a friend with an older processor, or the manufacturer for help. AMD also offers short-term boot kits for B450/X470 users who require a BIOS update.


