- Apple Invites app for iPhone allows you to create beautiful invitations with personalized backgrounds and manage the guest list.
- You can even create shared albums and playlists for guests.
- You need an iCloud+ subscription to create an invite, but anyone can RSVP to them, even non-Apple users.
In case you haven’t heard, there’s a new app from Apple on the market. Invites is an Apple app for creating, sending, and managing beautiful invitations straight from your iPhone. Whether you’re hosting a birthday party or a casual get-together, the Invites app will make it extremely easy to invite people and manage RSVPs. That’s why the following guide will help you learn everything you need to know about using the Invites app from your iPhone.
What is the Apple Invites app?
Apple Invites app, as the name suggests, is for creating event invitations. Using the app, you can whip up beautiful invites with a custom background, track RSVPs, and even collaborate on shared albums and playlists in Apple Music with other attendees. Anyone, regardless of whether they’re an Apple user or not, can use the app since it’s also available as a web app.
There’s one caveat, though. Only iCloud+ subscribers can create invites. As an attendee, you can RSVP to an event, leave an event, or add items to a shared album or playlist if the host has created them. You can also change your RSVP or leave the event whenever you want.
How to Get Apple Invites app on iPhone
You can get the Apple Invites app by going to the App Store on your iPhone, tapping on the Search tab, searching for “invites” and tapping on the Get button on the Apple Invites landing page. You can get to this screen directly by clicking this App Store link. Alternatively, go to icloud.com/invites and sign in using your Apple Account. You can create one for free if you don’t have an Apple Account.
Before we get started, you must know that the Apple Invites app has some requirements that you need to fulfill in order to use it.
- You need iOS 18.0 or later to install the app on your iPhone.
- To create invites, you need an iCloud+ subscription. You don’t need a subscription to RSVP to events.
- To create shared playlists, you need an Apple Music subscription.
How to Create Event Invites on Apple Invites app
Once you’ve set up Apple Invites on your iPhone, you can start creating invites for upcoming events. Here’s how you can do it:
- Open the Apple Invites app on your iPhone.
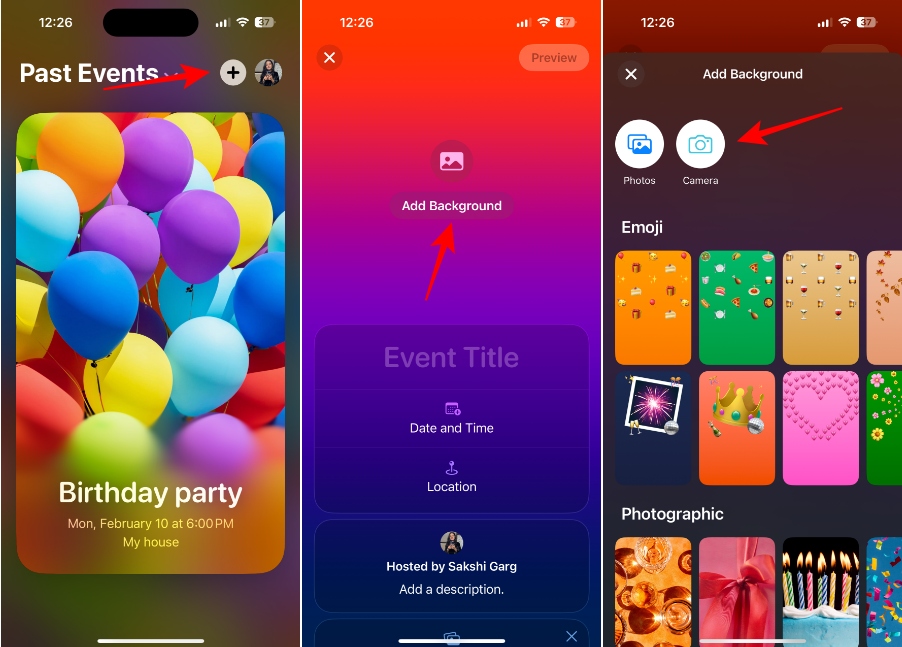
- Tap on the plus + icon toward the top right and add the details you want on the next screen.
- Now, tap on Add Background to add a background to the event invite.
- Then, tap on Photos to add a photo from your library or Camera to take a photo. You can also choose a photo from pre-made templates from Apple, which include the Emoji, Photographic, or Colors collection.
- If your phone supports Apple Intelligence and you have enabled it, you can also create a background using the Image Playground built-in experience in the Invites app.
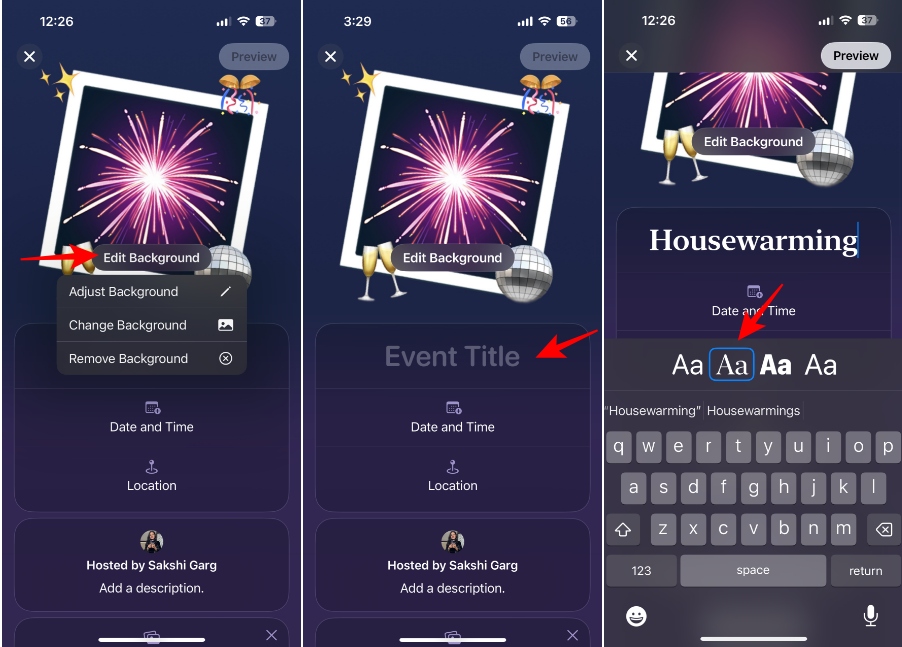
- After adding the background, you can crop, change, or remove it by tapping Edit Background.
- Tap on Event Title to enter a title for the event. You can also choose a font from the available options above the keyboard.
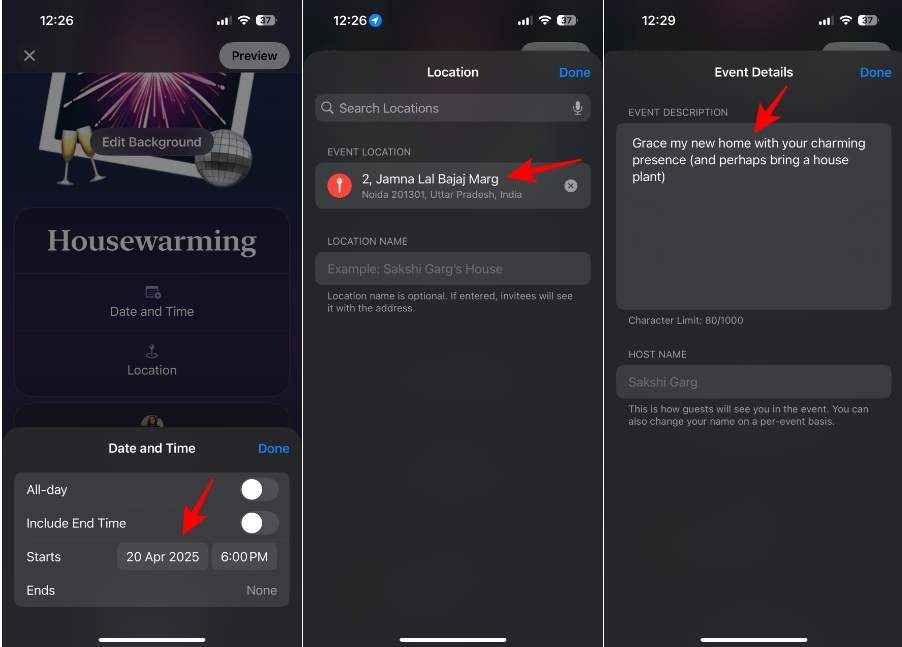
- Next, tap on Date and Time.
- Then, enter all the applicable details about the event, like the date and start time, from the pop-up menu. You can also choose whether it’s an all-day event or include an end time. Tap on Done.
- Next, select Location. Then, enter the address and a name for the location (optional).
- Here, tap on Hosted by to enter a description for the event and change the name of the host if you want. By default, the invite shows your name, but you can edit it on a per-event basis.
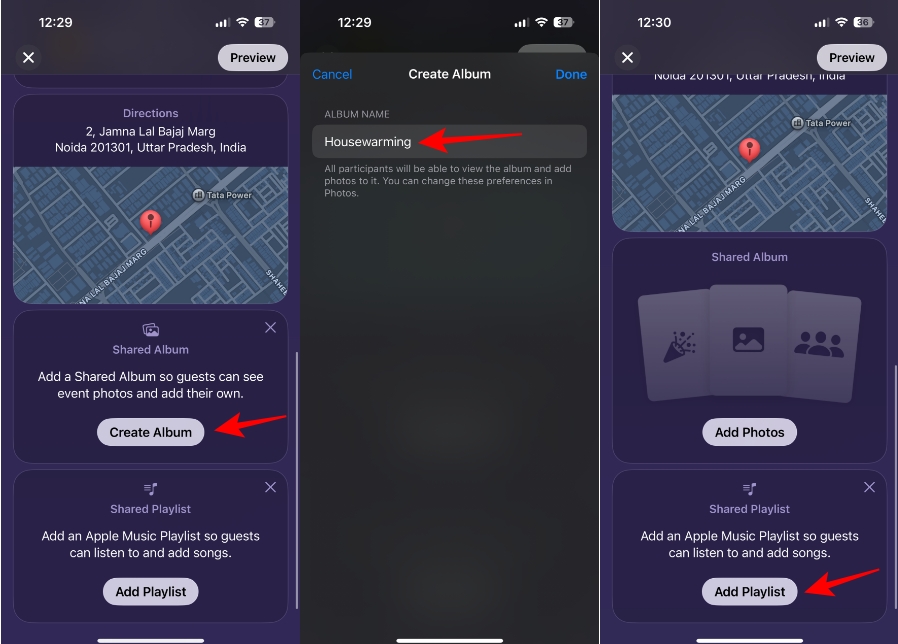
- Now, hit the Create Album button to set up a shared album for the event and enter a name for the album. All guests who RSVP to the event will be able to see and add photos in the shared album. You can change these preferences later from the Photos app.
- Next, tap on Add Playlist to set up a playlist for the event that your guests can listen to and add songs to.
Note
To set up a playlist in the Invites app, you need an Apple Music subscription. Any guest who wants to listen or add to the playlist will also need to have a subscription to the service.
- Tap on Preview after adding all the details to see what your invite will look like to your guests.
- To make any changes, you can go back to the previous screen. Otherwise, tap on Next to publish the invite.

How to Invite Guests to an Event on Apple Invites App
After you publish an event, you can invite guests to it. The invite screens open automatically after you publish an event. However, you can also access it later.
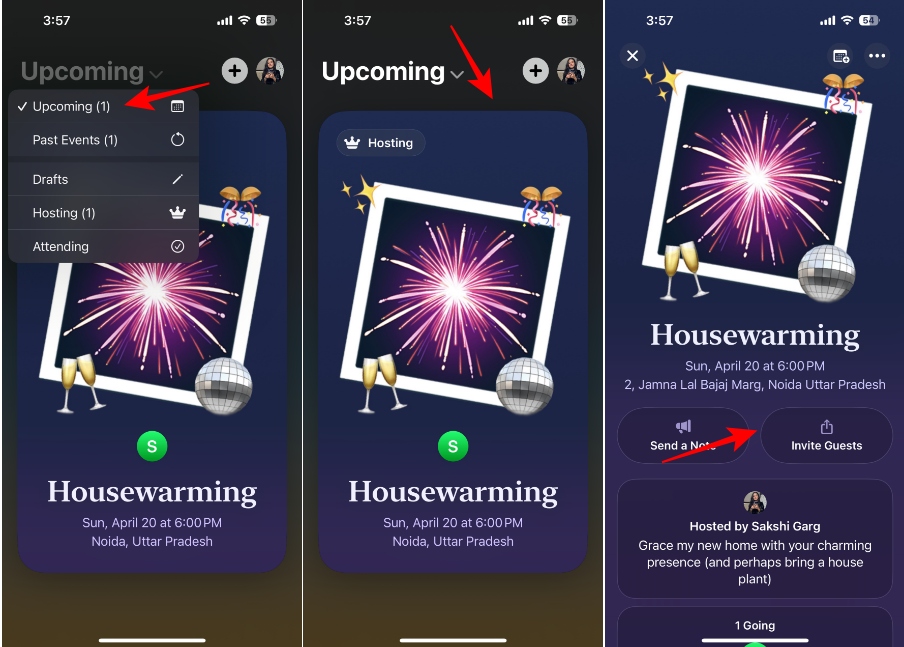
- Make sure you’re in the Upcoming or Hosting tab from the dropdown at the top.
- Then, select the event to which you want to invite guests.
- Next, tap on Invite Guests from the event page.
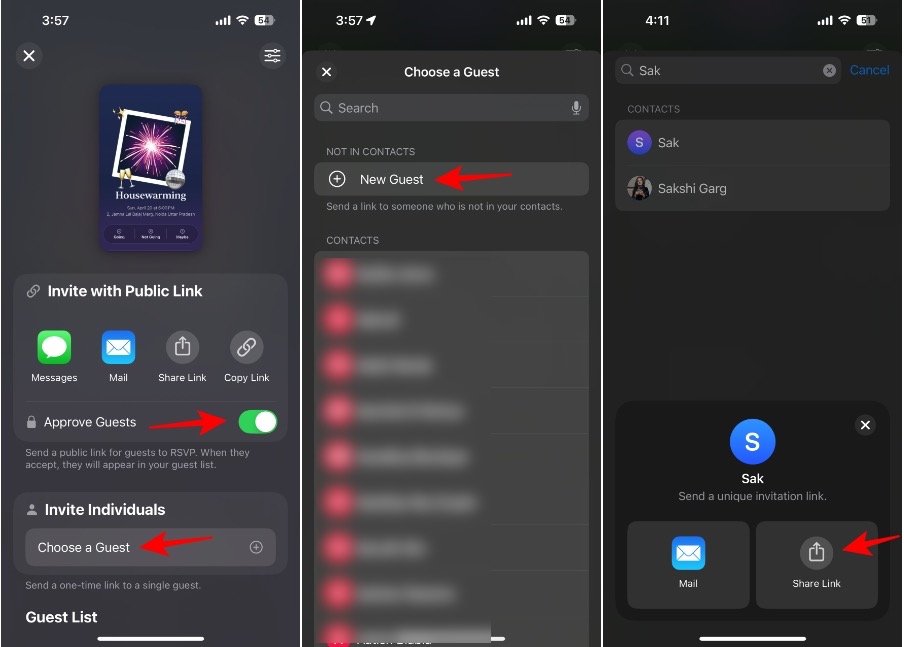
- You can invite guests using two methods:
Public Link: Create a public link that anyone can use to RSVP to the event. If you want to manage the guests manually, turn on the toggle for Approve Guests before sharing the link using any of the methods – Messages, Mail, Share Link, or Copy Link.
Invite Individuals: Use this method to send a uniquely generated link that can only be used once to RSVP to the event. Tap on Invite Individuals and invite people from your contacts, or send an invitation to someone not in your contacts.
Note
When using the Invite Individuals method, you have to share links with guests one at a time.
How to Manage Guests and RSVPs on Apple Invites App
Once you invite guests, you can manage your RSVP requests (in case of manual approval) and manage and remove any guests.
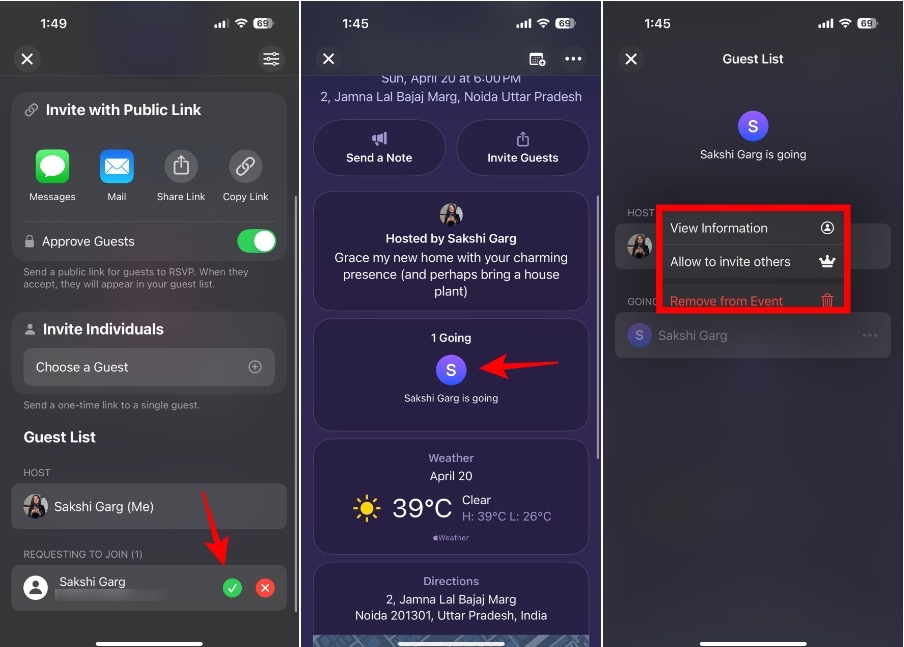
- Open the event and tap on Invite Guests.
- Scroll down, and if you’ve enabled manual approval, you’ll see any requests down there. Tap the check to approve the request and cross to deny it.
- You can see the list of guests and their status under the guest list. Tap on a guest’s name to view more information about them, change their access level (whether they can invite others), or remove them from the event.
How to RSVP to an Event on Apple Invites App
If you’ve received an invitation to the event or a public link, here’s how you can RSVP to the event. RSVPing to events with public links requires one extra step.
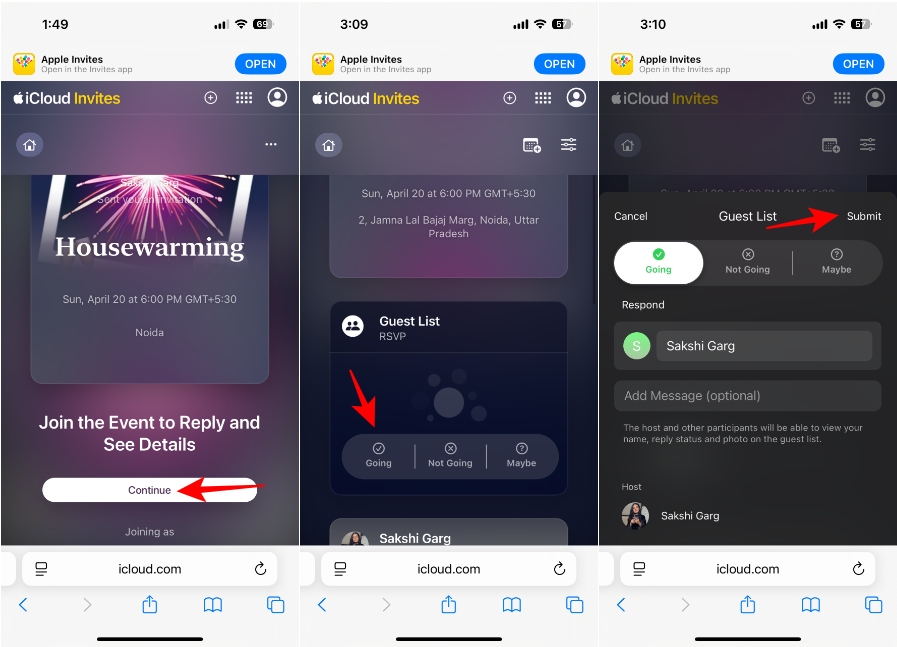
- Open the event invite in the Invites app or on iCloud.com.
- Sign in with an Apple account if you have to.
- Tap on Continue to join an event with a public link.
- If joining an event requires approval, you’ll have to wait until the host approves your request. For automatic approval, you’ll be able to RSVP directly.
- The next steps will be the same whether you received a direct invitation or the link to join.
- Open the event from the app.
- Tap on your response from the RSVP card from the available options – Going, Not Going, and Maybe.
- Add a message (optional) in the pop-up menu and tap on Submit. You can change your response later and resubmit if you want.
The Apple Invites app for iPhone is a simple app that takes the hassle out of inviting people to a party and makes it easy to manage it all from your iPhone. While it’s undoubtedly more convenient for people already in the Apple ecosystem, it’s great that non-Apple users aren’t left out completely.


