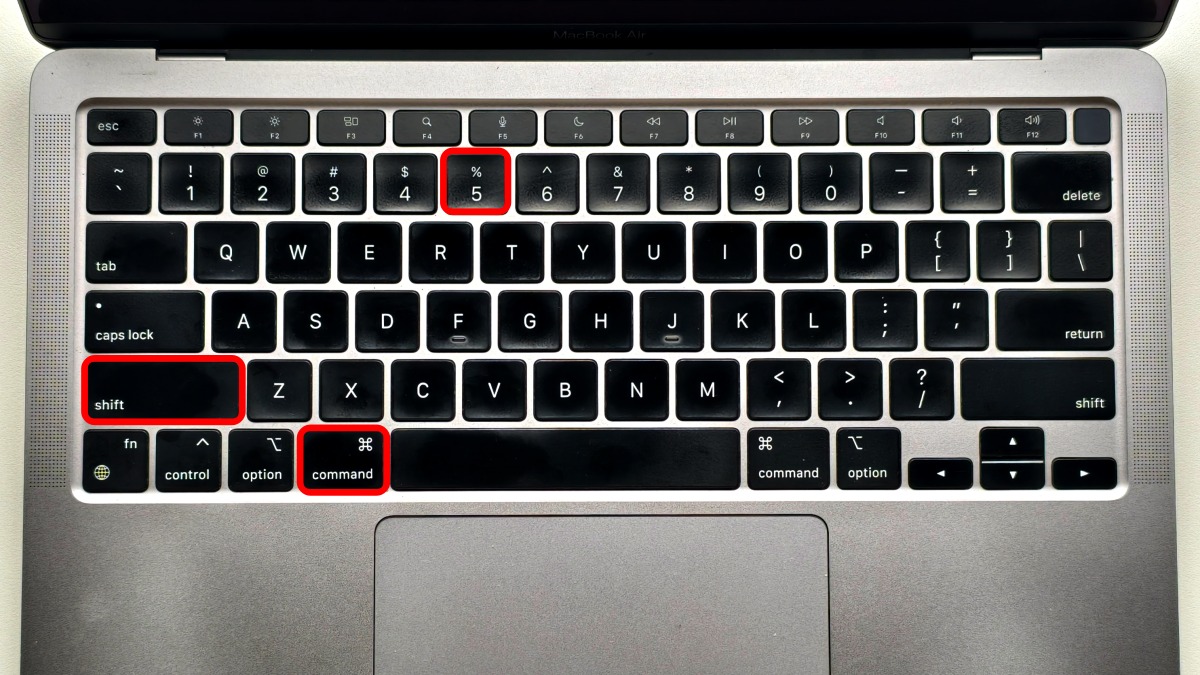
- To screen record on Mac, press "Shift + Cmd + 5" and click on Record Entire Screen.
- If you want to record a specific window, press the same keyboard shortcut and choose Record Selected Window.
- The screen recording on macOS is generally saved on the Desktop.
Whether you’re explaining something or simply sharing a funny or a cool clip with friends, screen recording is one of the easiest ways you can go about it. The great thing about macOS is that it has had screen recording on Macs for years now. However, newcommers coing from Windows may find it hard to find the option. Let me show you how to screen record on Mac and different ways to do it.
How To Use Native Screen Recording on Mac
Note:
The following methods for screen recording on Mac work with all macOS versions including macOS Big Sur, macOS Monterey, and macOS Ventura.
To keep things simple, I will start off by discussing the native screen recording methods, that are already available on your MacBook or Mac desktop. There are 2 ways to record screen on your Mac without any third party software, and I will take you through both the methods. However, if you need an easy quick lesson on screen recording on the system then you can checkout this table:
| Method | Screen Recording Type | Description |
|---|---|---|
| Shift + Cmd + 5 > click on Record Entire Screen | Record Entire Screen | Capture everything displayed on your Mac display, including currently open windows, the dock and other items. |
| Shift + Cmd + 5 > Click on Record Selected Window | Record Selected Window | Only record a specific window or a currently open app. |
| Shift + Cmd + 5 > Click on Record Selected Portion | Record Selected Portion | Lets you screen record a portion of your Mac screen that you can specify |
| Open QuickTime Player > File > New Screen Recording | Record using QuickTime Player | Capture your Mac screen using QuickTime Player which offers more options compared to regular screen capture tool. |
Method 1: Record Screen with Screenshot Toolbar
By far the easiest method to record your screen on macOS is using its build in screenshot toolbar. It gives you plenty of option to take a screenshot on Mac as well as record the screen. Like whether you want to record the entire screen or portion of it, as well as choose input sources so you can screen record with audio on your Mac. Here’s how to use it.
- Press shift + command + 5 to bring up the screenshot toolbar.
- Here, pick your preferred screen recording option. You can choose between record the entire screen, selected window or a selected portion of the display.
- Select the option that you want to use.

Note:
Do note that everything on your screen will be recorded while screen recording is running, including any notifications that come in. We would recommend that you enable a Focus mode to block incoming notifications from showing up on your screen.
- You can also click on Options if you want to change microphone input or set a timer before recording.
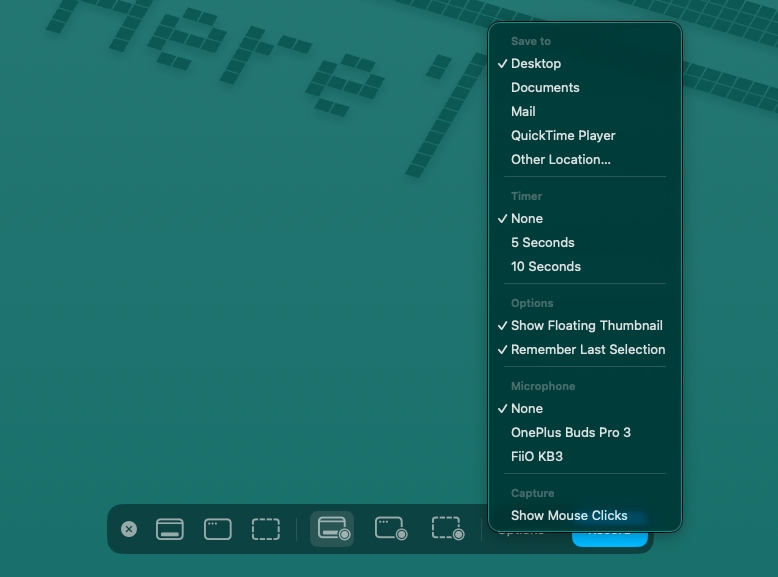
- Once you’ve made your selection, simply click on the Record button to start recording.

All your screen captures will appear in the Desktop folder by default which you can access using Finder and it will be stored in the .mov format.
Method 2: Capture Mac Display with QuickTime Player
For those of you who want screen recordings with basic editing options then you can use macOS QuickTime Player. It has a simple interface and can also come in handy to record screen on Mac with audio included. And here’s how you can use it for youself.
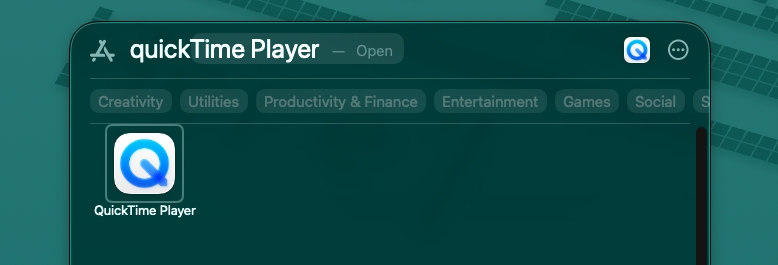
- Open the QuickTime Player app from App’s menu or Spotlight Search.
- Then, click on the File option in the menu bar at the top left side.
- Here, click on New Screen Recording.
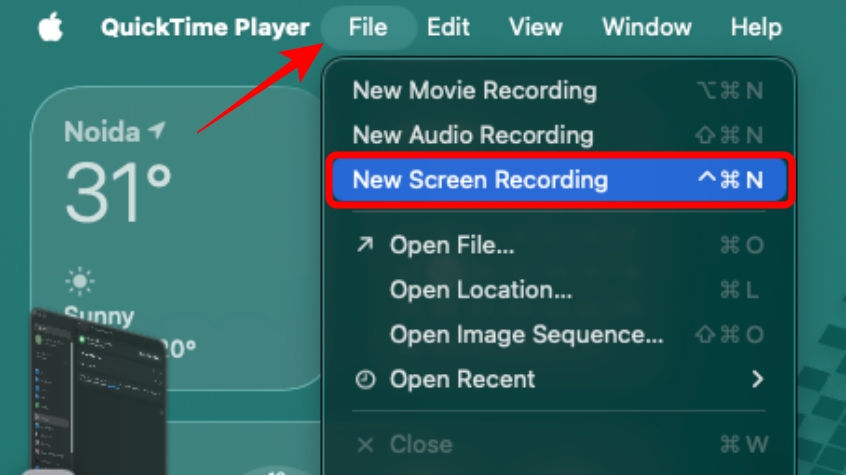
- This will again bring up the screenshot toolbar.
- Here, pick the preferred options and click on the Record button.
How to Stop Screen Recording on Mac
Now that you have captured everything necessary that you wanted to show, and want to stop screen recording on Mac after you’re done, then here’s how you can do that.
- When your screen is being recorded, you will see an icon on your Mac menu bar on the top right side.
- Click on this record icon to stop the screen recording.
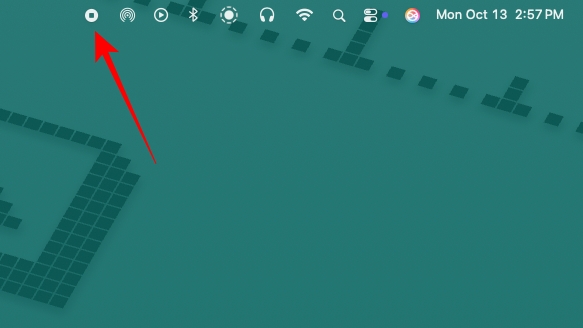
- Alternatively, you can press Command + Control + Esc or Shift + Command + 5 and choose Stop Recording.
Use Third Party Tools to Screen Record on Mac
One of the few limitations of Mac’s screen recorder is that it just can’t record system audio. Even on the latest macOS 26 Tahoe, this doesn’t work for some odd reason. So if you need to have audio in your screen recording, then you can try out some third party options like OBS which is a very popular tool among professionals. Here’s how to use OBS to screen record on Mac.
- Download the OBS tool from its official website.
- Once installed, allow all necessary permission to OBS so it can record your Mac’s screen.
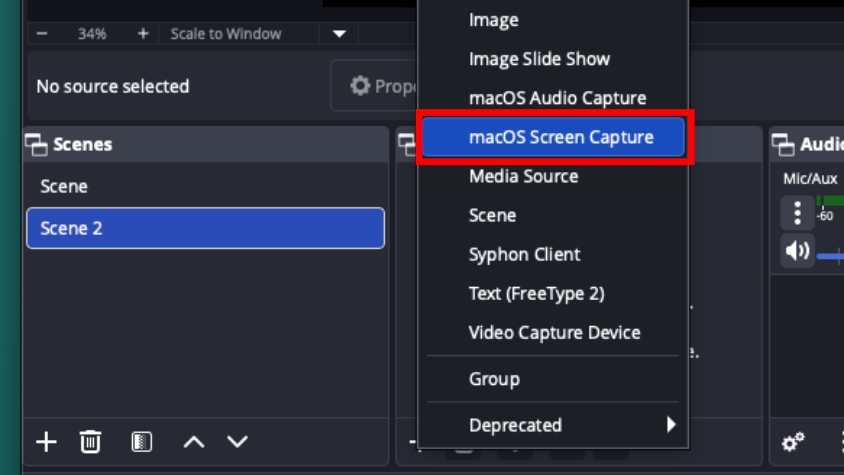
- After that, open the app and select the Scene panel.
- Here click on the + button and name your scene.
- Next, go to the Sources panel and click the + button again.
- Here, choose macOS Screen Capture and click on OK. If you want to record audio as well, then select macOS Audio Capture as well.
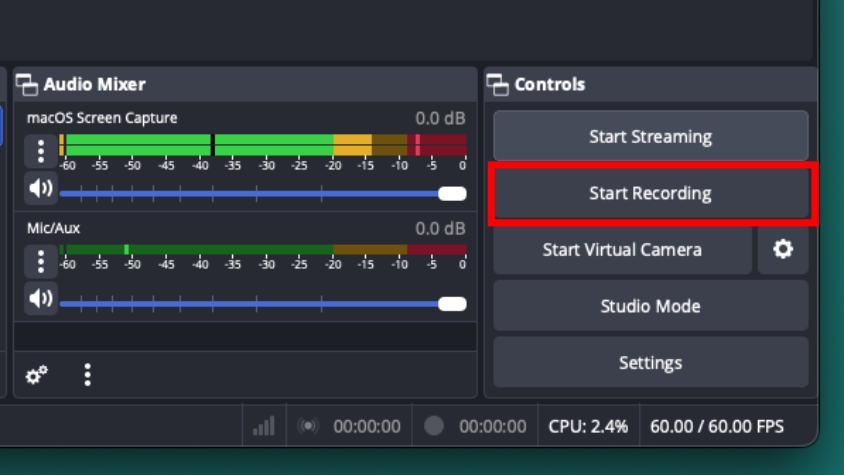
- Now, simply click on Start Recording to capture a video of your Mac’s screen.
- To stop, go to OBS panel and click on Stop Recording.
Every video you record is automatically saved to the Movies folder in macOS. This is just one of many Mac screen recording apps that you can try out.
How to Use iPhone as a Mic for Screen Recording on Mac
The Apple ecosystem allows you to control your iPhone with your Mac which allows you to do a lot of things, like using your iPhone as an external mic for your Mac, offering better quality audio for your screen recording. Here’s an easy process to change mic input to your iPhone in Mac.
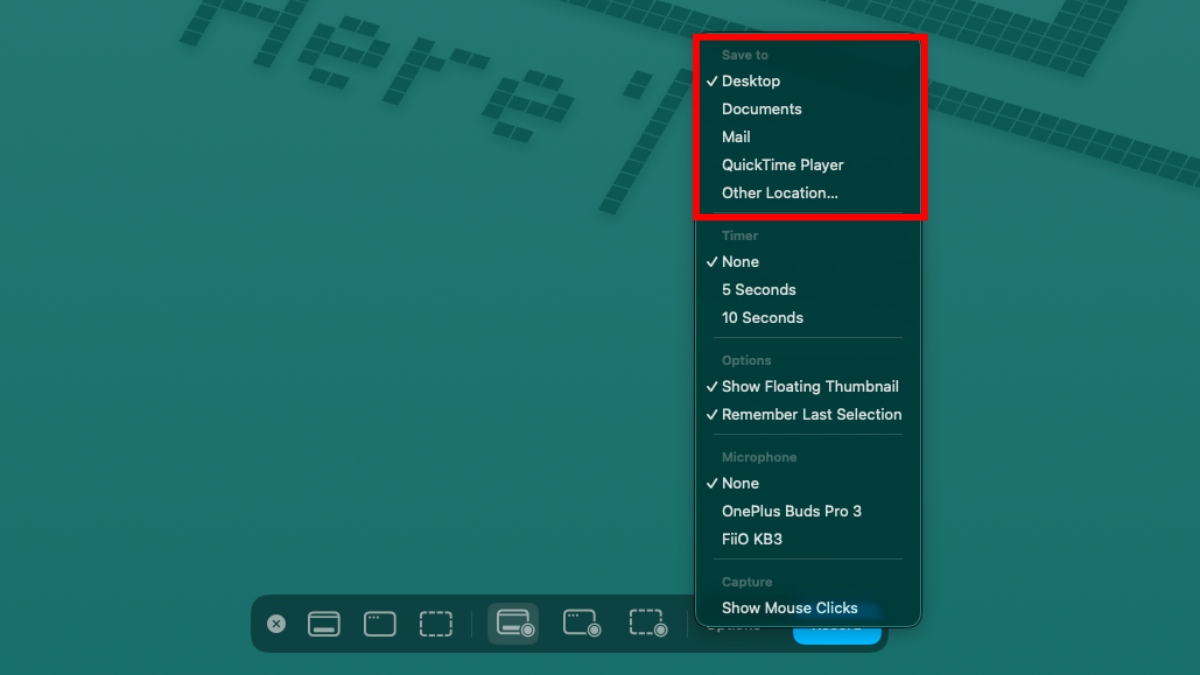
- Open the screenshot toolbar by pressing shift + command + 5 and click on Options.
- Now, select your iPhone’s mic as the audio source.
How to Change the Destination Folder for Saving Screen Recordings
By default, the screen recordings are saved on the Desktop folder. However, if you want to organise your clips better, you can change the destination folder for screen recordings.
- Open the screenshot toolbar by pressing Shift + Command + 5 and click on Options.
- From here, you can choose the folder where you want to save the screen recording.
How to Remove Audio from Screen Recording
If you have recorded your Mac’s screen with audio from your mic or system audio, and you later decide that you would rather have the video play without any sound, you can do so easily. Just follow the steps mentioned below.
- Open the recorded video in QuickTime player, and click on Edit in the menu bar.
- Click on Remove Audio to remove the audio from the recorded file and save it.
Unable to Screen Record on Your Mac? Try These Fixes
It is not uncommon for folks to run into issues when trying to record screen videos on their MacBooks and Mac computers. There can be various reasons as to why you are having problems recording you screen, that is why I have mentioned some common troubleshooting fixes here.
- Check if you are using the correct keyboard shortcuts to open the screenshot toolbar.
- Make sure you have plenty of storage as screen recordings can take up a lot of space.
- Try changing file destination from the default Desktop folder to any other one.
- Restart your Mac machine as there can be some bugs preventing you to capture screen recordings.
- If that doesn’t help, you might as well try to clear cache of your Mac.
- Make sure you update your Mac to the latest software version by going to Apple logo > System Settings > General > Software Updates.
- Relaunch Finder by clicking on the Apple icon > Force Quit > select Finder > Relaunch.
Well, those are all the ways you can record the screen on your Mac. As you can see, the built-in recording tool in macOS is quite feature-packed and can easily meet the needs of most people. But if you need something more then there are a ton of third party apps to check out for power users.