
- You can bulk delete emails on Gmail using the web, as the mobile app does not work well for this purpose.
- To mass delete emails, go to Gmail > More menu > All Mail > tick checkbox > Select all conversations in All Mail > Trash icon > OK.
- Emails you delete are moved to trash and are automatically deleted after 30 days, but you can manually delete them as well.
With Google offering only 15GB of drive storage, you can’t exactly afford to let any kind of junk pile up across Google services. While it’s easy to get rid of unwanted data from Google Drive, it’s not as hard as filtering and deleting email in Gmail. Emails may look small but accumulate over time and since they contain assets like images and attachments, they consume lots of space. Therefore, here’s how to efficiently bulk delete all emails in Gmail.
How to Delete All Emails on Gmail
Depending on the device you’re using or which messages you want to delete in bulk, there are multiple ways to delete all emails on Gmail. Here’s all of them:
Method 1: Delete All Gmail Messages from a Specific Category
If you are super frustrated with mostly junk emails taking up your precious Google account space, deleting them is a good starting point. Most junk emails tend to accumulate in the Promotions, Updates, Social, and Spam tabs. The Promotions tab contains all promotional emails, Social contains updates from people on social media, it’s usually the same as the Updates tab. Here’s how you can bulk delete them in Gmail.
- Head over to Gmail. Once signed in, you should see multiple tabs beside Primary.
- Go to each tab and check the emails. In most circumstances, these emails are of little worth and can be deleted.

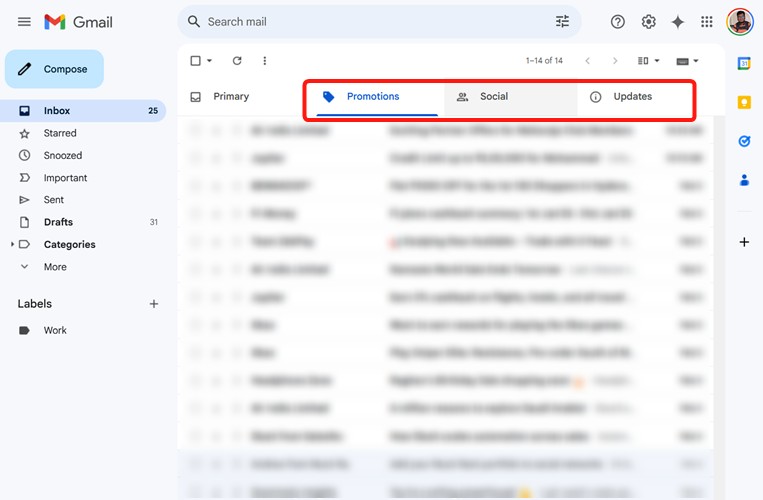
- When in a tab, click on the checkbox to select all emails. Then click on the Bin icon to bulk delete emails in Gmail.


- If you want to delete just read or unread, starred, or unstarred emails, click the arrow and select the desired option.
- Next, click on the delete icon at the top symbolized by a recycle bin icon. Then, hit OK on the confirmation popup window.


Method 2: Bulk Delete Emails Using Gmail Advanced Search
Let’s say that you don’t want to delete all your emails at one go and rather, your read, unread, starred, inbox, or other emails within a specific timeframe. In that case, you can use the Advanced Search functionality on Gmail to filter and sort out such emails. Let me show you how:
- On the Gmail website, tap on the Advanced Search icon right beside the Gmail search bar at the top.

- A big window with several tweakable settings will pop up.


- You can define each field to narrow down and select the emails you’re looking for. Once done, use the checkbox to delete all emails.
To make it easier to understand, we have further divided this panel into different sections. Here’s how you need to specify these settings:
Delete Emails based on Size
The easiest way to free up space is by deleting what’s taking too much space on your account. Admit it, we’ve all used Gmail as Google Drive for storing important documents, which could take a toll on the storage. You can specify the size of these files like this:


The drop-down menu lets you select a combination of greater than/less than and MB/KB/Bytes. Select accordingly.
Delete Emails From Particular Sender and Receiver
First, we have the From and To sections in the Advanced Search panel. So, let’s say that your bank has been troubling you with a lot of promotional emails. Specify the email IDs of such senders in the From box and in the To box, of course, your Gmail address will come in. The receiver address comes in handy when you are trying to delete those files you have sent yourself for safekeeping purposes.


Delete Emails Containing Specific Words
After you enter the sender’s address, you will see the option to specify the subject of the emails you are trying to delete. I have found this option to be a bit of a hassle as you won’t know the subject of most junk emails.


For an effective search, use words like “discounts” and “offers” that these promotional emails usually contain. Enter these words in the ‘Has the words‘ box. If you can specify the words that these emails will not have, you can go ahead and do that in the Doesn’t have panel. That will further narrow down your search.
Delete Emails By Date Range
Now, it’s time to specify the date range of these emails you want to delete. This is important, as it allows you to really narrow down the search and prevent the deletion of recent emails that may be important. So, let’s say all 2025 emails are important to you, and if you want to delete much older emails spanning from 2021-2023, you can do that here.


In the Date within the drop-down menu, you can select up to 1 year of emails. Then, in the calendar box beside it, if you select let’s say January 2021, that will target emails from January 2020 to January 2021.
Delete Emails Category-Wise
Finally, we have arrived at selecting the category of emails you want to delete. Do so by clicking on the drop-down menu adjacent to the Search option. This particular drop-down menu lists all the categories, including custom labels you have created. Simply click on the desired category of emails to further narrow down the search.


Once you are done specifying all these categories, simply hit the Search button.


That will reveal all the emails that match your search. Then, as you did with deleting all emails on Gmail, click the central checkbox at the top to select all emails > Select all conversations that match this search > Date > OK.
Method 3: Delete All Emails on Gmail App (Android and iPhone)
To mass delete emails using the Gmail app on Android or iOS, you can long-tap an email> Select All box > Bin icon at the top.
However, doing this will delete emails in batches of 50. As you scroll down, you can keep selecting your emails in batches of 50 and hit the delete icon to delete them. Like this:


Or, you can choose to customize the right-swipe action and change it to delete emails. The default right swipe action is set to “Archive” but you can change that on both Android and iPhone apps. Here’s how:
- In the Gmail mobile app, tap on the hamburger icon and go to Settings.
- Then select General settings and tap on Swipe actions.

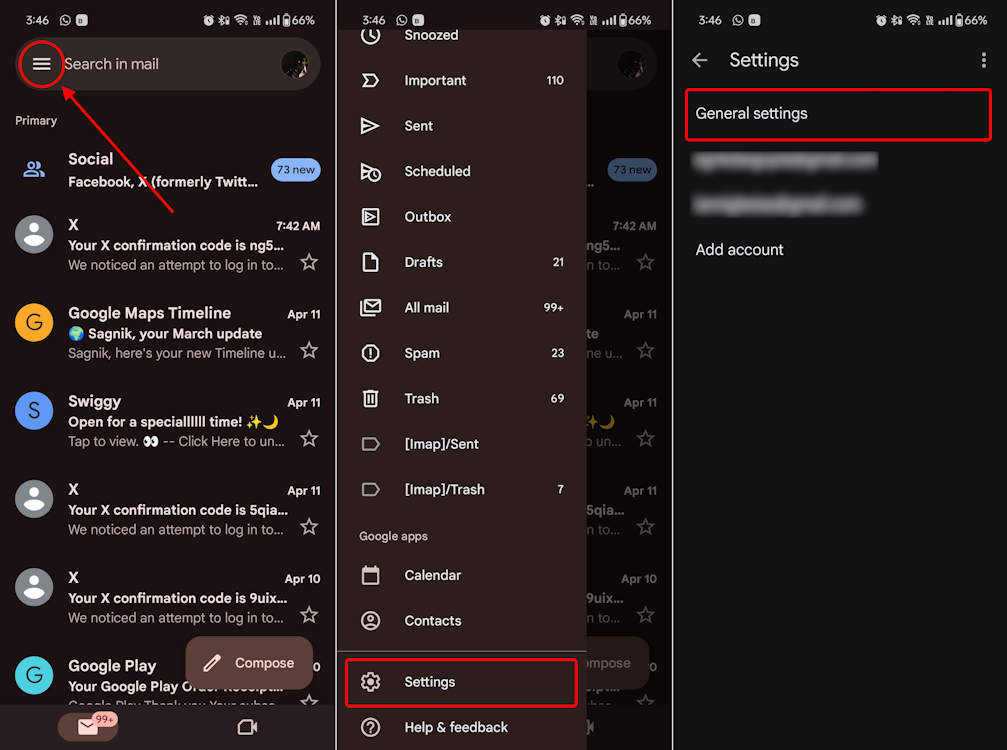
- Tap on CHANGE inside the “Right swipe” or “Left swipe” section, and select Delete to change the action.

However, there’s no advanced search in the Gmail app, these methods, which are rather time-consuming, are your only options. Therefore, if you have a PC or Chromebook lying around, it’s much easier to launch Gmail Web to clear your emails effortlessly.
How to Permanently Delete Your Emails on Gmail
Do note that simply deleting your emails, whether on the web version or mobile, does not delete them permanently and won’t free up storage. Deleted emails are moved to Gmail’s trash/bin folder, where they take 30 more days to be permanently discarded. You can clean up the trash folder manually for instant space savings.
- Navigate to the Trash/Bin folder from the left panel.


- Now, hit the Empty Trash/Bin now button at the top and hit OK in the confirmation window.


With that, you will be deleting your unwanted emails on Gmail permanently. If you end up accidentally deleting an important email, you can still restore deleted mail using the Gmail recovery tool.
If you have an inactive Gmail account, deleting the account altogether might be a better idea. However, unlike your YouTube channel, deleting a Gmail account also means deleting your Google account. Therefore, unless you’ve downloaded and backed up all your Google data from Google Takeout.
Were you successful in cleaning your Gmail inbox using the above methods? Let us know the amount of space you saved by doing so in the comments below.


