
With watchOS 9, Apple has added a lot of new stuff to the Apple Watch. There’s a new Low Power Mode to extend battery life, an improved sleep tracking feature in watchOS, and a powerful new compass app. So, if you’re going on a hike or exploring the road less travelled, you should know that the new compass app can do a lot to help you find your way and even re-trace your steps. If that sounds interesting to you, read on as we take a look at how to use the new compass app on Apple Watch.
Learn to Use the watchOS 9 Compass App
The new compass app in watchOS 9 enables a lot of useful features. You can obviously do the basics like finding your bearing, elevation, and co-ordinates; however, you can also do more, by adding waypoints, or recording your steps to retrace them later. We’ll be taking a look at all of these things in this article. As always, you can use the table of contents to navigate to any section that you want to learn more about.
Check Bearings, Elevation, Incline, and Co-ordinates
The new compass app shows a lot more information, including things like your bearing (which was also available in the old app), elevation, incline, and even your current co-ordinates. Checking all this information is pretty easy as well.
Simply open the Compass app on your Apple Watch and you will be able to see information such as the heading that you’re facing. If you rotate the Digital Crown, you will be able to see additional information such as the elevation, incline, and even the co-ordinates (latitude and longitude) of your location.

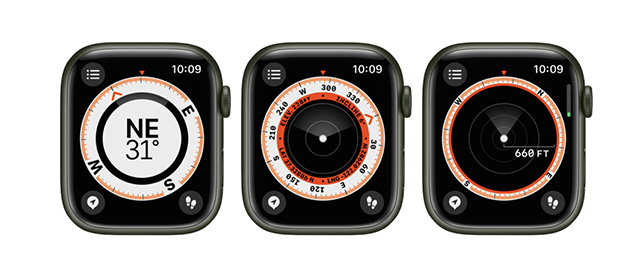
Alternatively, you can tap on the menu icon on the top-left. Here you will be able to see the elevation, incline, and other information.


Add New Bearing
Here’s what you need to do in order to add a new bearing in the compass app.
- Tap on the menu icon in the top-left.
- Scroll down and tap on ‘Bearing’.

- Rotate the Digital Crown to set the bearing and tap on ‘Done’.

Clear Bearing
- Tap on the menu icon in the top-left.
- Scroll down and tap on ‘Clear Bearing’.

Add Elevation Info to Watch Face
The compass app in watchOS 9 supports some really cool complications for your favourite Apple Watch faces as well. So if you want to, you can easily add the elevation information right on your watch screen. Here’s how:
- Long press on the watch face and then tap on ‘Edit’.

- Here, swipe to the ‘Complications’ screen and then tap on a complication where you want to add the elevation information.

- Head over to the ‘Compass’ category and choose ‘Elevation’ as the complication for your watch face.

Note: You can also choose complications for incline, among other compass complications.
Waypoints in watchOS 9
One of the coolest new features in the compass app is the ability to create waypoints. Waypoints are a great way to navigate outdoors, if you’re hiking, or exploring off the beaten path. With waypoints, your Apple Watch will remember the co-ordinates to a location, and you can navigate back to it using the compass app. Here’s how you can create waypoints in the Compass app on watchOS 9.
Create Waypoints in the Compass App
- In the Compass app, tap on the ‘location arrow’ icon.

- Enter a label for the waypoint.

- You can even choose a color as well as a symbol for the waypoint if you want to.

- Once done, just tap on ‘Done’, and that’s it. The waypoint will now show up in the compass app.

View/Navigate to Waypoints
- Tap on any waypoint in the compass app to access a list of all your waypoints.

- Choose the one you want, and tap on ‘Select’.

- The compass app will now show you the direction you need to move in, along with the distance, in order to reach the waypoint.

Delete Waypoints
- Tap on any waypoint in the compass app to access a list of all your waypoints.
- Choose the one you want, and tap on ‘Select’.
- Tap on the ‘pencil’ icon to edit the waypoint.

- Scroll down and tap on ‘Delete Waypoint’.

Add Waypoints to Watch Face (Apple Watch SE, Series 6 and Later)
The cool thing about waypoints is that you can even add them to your Apple Watch’s face as a complication to have easy access to them whenever you might need them. Here’s how to do that.
- Long press on the watch face and then tap on ‘Edit’.
- Here, swipe to the ‘Complications’ screen and then tap on a complication where you want to add the elevation information.
- Head over to the ‘Compass’ category and choose any complication from ‘Compass Waypoints’ for your watch face.

Record and Retrace Steps
If you’re hiking, or in a place where you want to ensure you can retrace your steps back to your starting point, the new Record and Retrace Steps feature in watchOS 9 is going to be a godsent for you. Here’s how to record and retrace steps with Apple Watch.
- In the Compass app, tap on the ‘foot’ icon in the bottom right corner of the app’s screen.

- The app will start recording your steps. You will see a pause icon instead of the steps icon on the bottom right. If you want to retrace your steps, just tap on the pause icon.

- You can now tap on ‘Retrace Steps’ to retrace your path, or ‘Delete Steps’ to delete the recorded path.

Check out the New and Improved Apple Watch Compass
Well that’s pretty much everything you can do with the new Compass app in watchOS 9. As you can see, there’s a lot that the app can do now. It can retrace your steps, record waypoints for easier explorations in the unknown, and of course, it can show you your elevation, bearing, incline, and more information. Plus, you can now add Compass complications to get important information at a glance. So, what do you think of the new compass app in watchOS 9? Let us know in the comments.


