With the release of the Windows 10 May 2020 update, Microsoft made a lot of new changes that didn’t go down well with many users. The company changed how the Alt+Tab app switcher worked and changed the appearance and size of tasks in the overview menu. So we wrote a detailed guide on how to restore the old Alt+Tab switcher in Windows 10. And now, Microsoft has presented us with another problem, i.e. Meet Now has been permanently added to the Windows 10 Taskbar — something that people didn’t even ask for. So if you wish to uninstall Meet Now from Windows 10, follow our guide below.
Permanently Uninstall Meet Now From Windows 10 (2022)
In this tutorial, we have mentioned four ways to uninstall Meet Now from Windows 10. You can hide, disable, or uninstall Meet Now from Windows 10’s Taskbar. Expand the table below and move to any section you want.
What is the Meet Now Icon in Windows 10’s Taskbar?
Since the COVID-19 pandemic, Microsoft has been putting in efforts to make people use its own video calling solution instead of Zoom or Google Meet. Meet Now is an instant video conferencing solution, which is powered by Skype, and is integrated within Windows 10. Right from the Taskbar, you can now start a meeting and share the link with your family members, friends, or colleagues. It’s entirely free and supports up to 100 participants in a single Meet Now link.
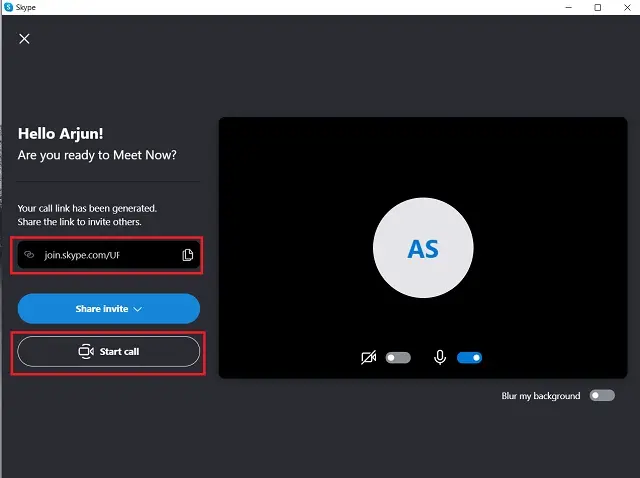
It supports all standard video conferencing features like custom backgrounds, Grid view, etc. Not to mention, participants can directly join the call without requiring a Microsoft account. Having said that, many users don’t prefer Microsoft’s video conferencing platform and want to get rid of the Meet Now icon in the Taskbar. Also, it constantly runs in the background and eats up major system resources. So if you want to uninstall Meet Now from Windows 10, follow our tutorial below.
Hide Meet Now From Windows 10 Using Settings
The easiest way to hide Meet Now from Windows 10’s Taskbar is through the Settings page. It does not uninstall the app, but permanently hides the Meet Now icon from the Taskbar. Here is how you can do that:
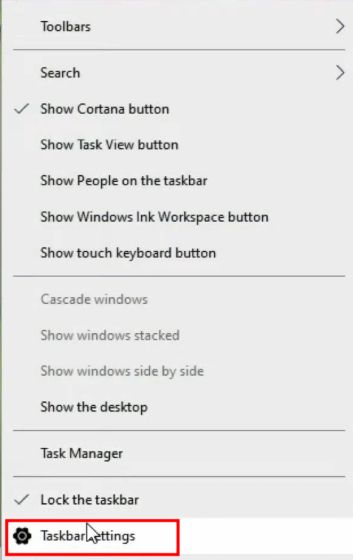
1. First, right-click on the Taskbar and open “Taskbar Settings“.
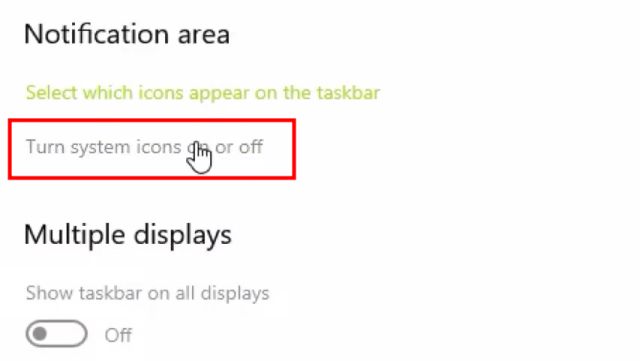
2. Next, scroll down and look for “Turn system icons on or off“. Click on it.
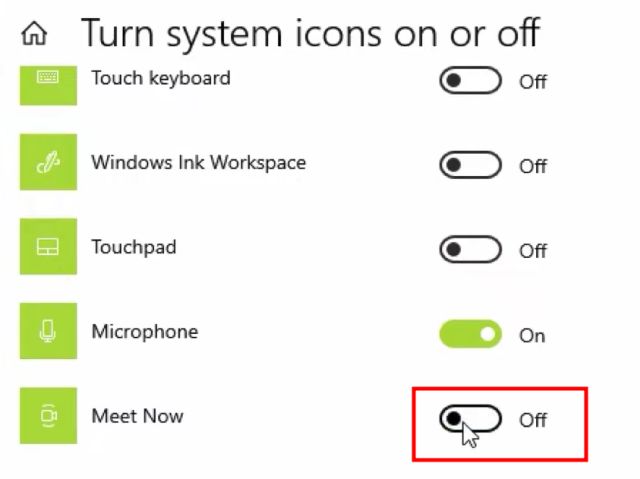
3. Now, scroll to the bottom and disable the “Meet Now” toggle. This will remove Meet Now from Windows 10’s Taskbar.
Uninstall Meet Now From Windows 10 Using PowerShell
If you want to completely uninstall Meet Now from Windows 10, you will need to use a simple command in PowerShell. It will remove the APPX package for this app from your PC right away. Here are the steps to follow.
1. Right-click on the Windows Start Menu and open “Windows PowerShell (Admin)”.
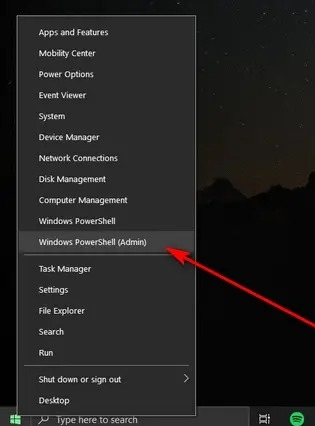
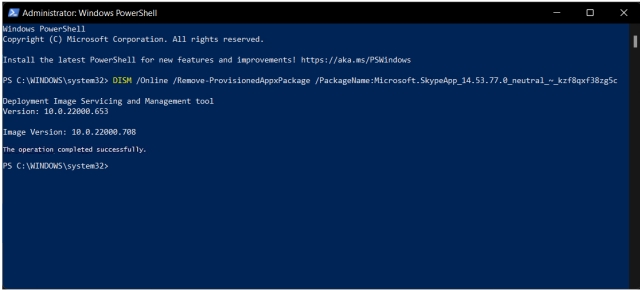
2. In the PowerShell window, run the below command and hit Enter. This will uninstall Meet Now from your Windows 10 PC right away. You are done.
DISM /Online /Remove-ProvisionedAppxPackage /PackageName:Microsoft.SkypeApp_14.53.77.0_neutral_~_kzf8qxf38zg5c
Remove Meet Now From Windows 10 Using Group Policy
To permanently uninstall Meet now from Windows 10, we will use Group Policy Editor. Unfortunately, Group Policy Editor is not available on Windows 10 Home, but there is a workaround to enable it. So go ahead and enable Group Policy Editor on Windows 10 Home to use this method. If you are on Windows 10 Pro, Enterprise, or any other edition, simply go through the steps below:
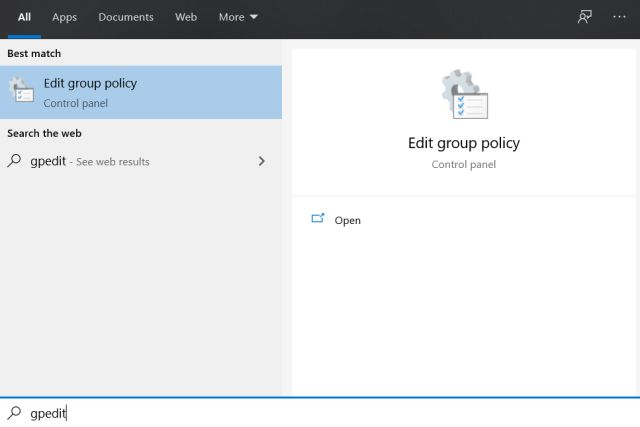
1. With Group Policy enabled, you need to press the Windows key and search for “gpedit“. Now, click on “Edit group policy”.
3. Here, under the User Configuration section, navigate to Administrative Templates -> Start Menu and Taskbar in the left sidebar.

4. Now, scroll down and look for “Remove the Meet Now icon” in the right pane.

5. Finally, double-click on it and select “Enabled“ in the pop-up window. After that, click on the “OK” button.

6. Now, restart your computer, and Meet Now will be gone from Windows 10 for good. That’s it.

7. In case you want to enable it once again, follow the steps above and choose “Not Configured” in step #5.

Disable Meet Now From Windows 10 Using Registry Editor
1. In case you want to permanently disable Meet Now from Windows 10 Taskbar, you can do so with Registry Editor. Press the Windows 10 keyboard shortcut “Windows + R” to open the Run prompt. Here, type regedit and hit Enter.

2. Next, paste the below path into Registry Editor’s address bar and hit Enter. This will directly take you to the Explorer folder.
Computer\HKEY_CURRENT_USER\Software\Microsoft\Windows\CurrentVersion\Policies\Explorer

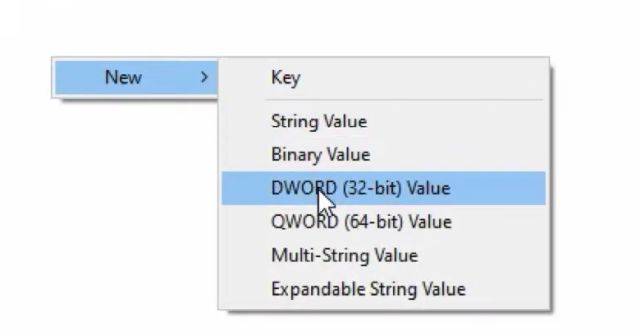
3. After that, right-click in the right pane under “Explorer” and choose New -> DWORD (32-bit) Value.
4. Rename the new key to HideSCAMeetNow.
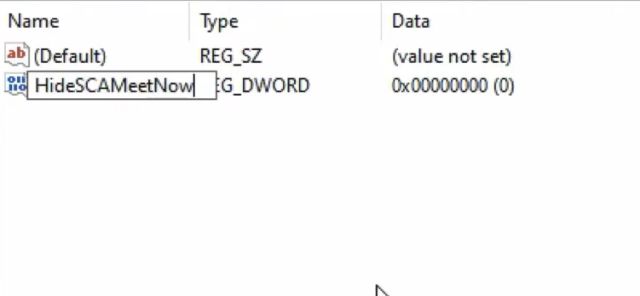
5. Now, double-click on “HideSCAMeetNow” and open it. Here, change the “Value data” to 1 and click on “OK”.
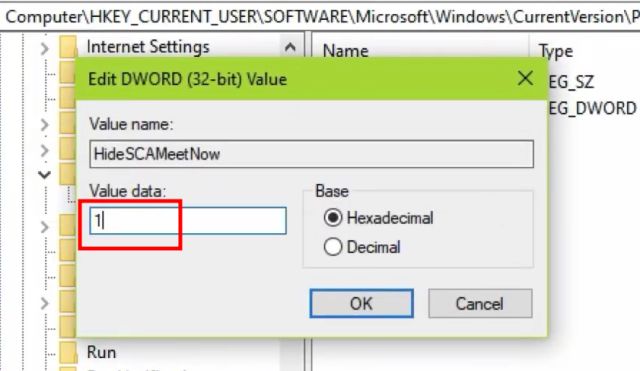
6. Now, close the Registry Editor and restart your Windows 10 PC. You will find that Meet Now is nowhere to be found on your PC.
Disable Meet Now on Windows 10 With Ease
So that was our guide on how to disable Meet Now from the Taskbar on Windows 10. Now, you won’t be bothered by Meet Now on any of the accounts on the PC. This also means that your computer will be responsive after every reboot, reducing the startup process lag. You can go through our guide on how to speed up Windows 10 to find more such ways to improve performance on your PC. Anyway, that is all from us. If you are face any issues in this guide, do let us know in the comment section below.


