
Windows 10 has often been blamed for consuming more power than its predecessors, including Windows 7 and Windows 8/8.1. Microsoft, however, has rolled out a number of updates over the years to mitigate some of the power-drainage issues in Windows 10. That said, a lot more still needs to be done. So today, we’re bringing a detailed guide on how to improve battery life of your Windows 10 laptops, two-in-ones and ultra-books.
Note: If you also use a MacBook, check out how you can improve battery life in macOS Big Sur.
Improve Battery Life in Your Windows 10 Laptop
This article will show you how to check for applications that are drawing the most amount of power on your Windows 10 laptop. It will also take you through the process of disabling them to enhance the power efficiency of your computer, thereby improving battery life. We will also discuss a number of other ways you can improve battery life on your Windows 10 computer. So without any further delay, here are the top tips to improve battery life in your Windows 10 computer:
Note: Make sure your laptop is unplugged and running on battery. If it’s plugged into a power source, you won’t be able to access some of the battery settings described below.
1 . Change the Power Mode
First off, change the Power Mode in your computer. It is one of the easiest ways to improve power efficiency of your laptop.
- Click on the battery icon in the notification area of your Windows 10 taskbar. Then drag the slider to select the power mode you want. You’ll get four options when running on battery and three when plugged-in. Mine is tuned for ‘better performance’, but you can opt for ‘Better battery life’ or Best battery life’.


Note: This setting isn’t available on all Windows 10 PCs. It depends on the hardware and the PC manufacturer. Your computer must be running Windows 10, version 1703 or later.
2. Reduce Screen Brightness
Another easy way of improving battery efficiency is reducing the screen brightness. Windows 10 offers an easy way to do that.
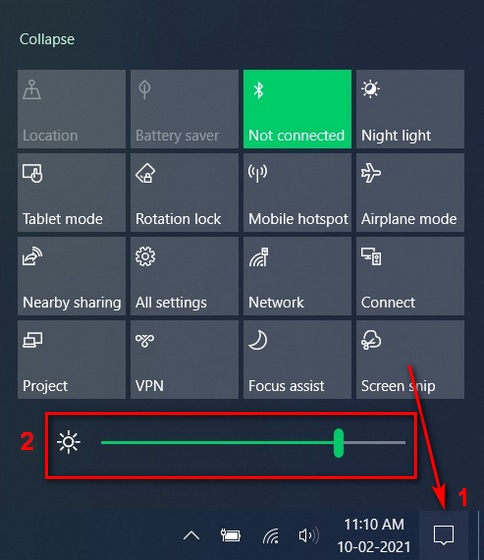
- Click on the notification icon [1] on the far-right of the Windows Task Bar. Then use the brightness slider [2] to reduce screen brightness.

3. Turn on ‘Battery Saver’
Another step you can take to improve the battery life of your laptop is to enable the Battery Saver mode, which will limit notifications and background activity when battery is running low.
- Make sure your PC is running on battery power, and then go over to Settings (Windows key +I) > System.


- Click on ‘Battery’ on the left pane to get to the power-saving options. Here, you can turn on the ‘Battery Saver’ mode.

4. Detect and Disable Battery-draining Apps
On the same page as above, you can check for battery-draining apps on your laptop. You can disable them from running in the background if they’re consuming too much power. Follow the method described below to do that:
- Scroll down to check the apps that are consuming the maximum power on your device. Using the drop-down menu, you can check the power consumption history for the past 24 hours or the past week.

- Now click on one of the offending apps to see how much power it is consuming in the background.

- Finally, use the drop-down menu to disable the app from running in the background. The default option is ‘Let Windows decide’. Select ‘Never’ if you don’t the app to ever run in the background.

Note: This setting is available only for Microsoft Store apps and not regular desktop apps.
5. Disable Background Apps to Improve Battery Life
Alongside the apps listed under Battery Settings above, you can also turn off dozens of other apps from running in the background. However, you’ll have to do that from the ‘privacy’ settings. Here’s how you do it:
- Go over to Settings > Privacy.

- Now scroll down on the left pane and click on ‘Background Apps’ [1] under the ‘App Permissions’ section. On the right pane, toggle off the option to ‘Let apps run in the background’ [2].
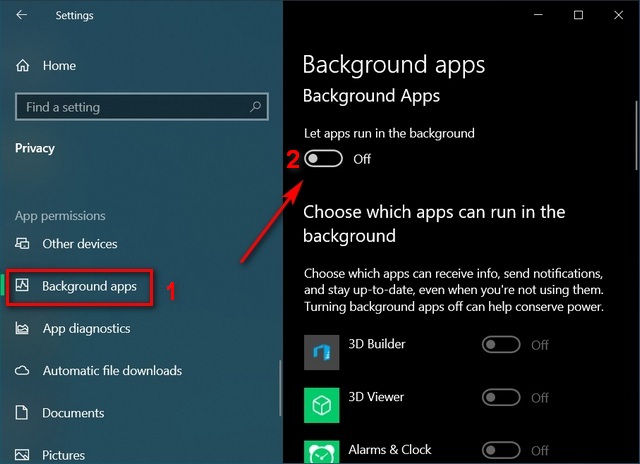
Do note that some apps need to run in the background for notifications, alarms, etc. If that’s important to you, keep the main toggle ‘On’ and turn off background access for select apps by using the toggles next to each app. If, however, you don’t want to deal with random notification popups at all, check out our detailed guide on how to disable notifications on Windows 10.
6. Change Power and Sleep Settings to Improve Battery Life
One of the easiest ways to get a little bit more out of your laptop battery is to optimize its ‘Power and Sleep’ settings to reduce the display and sleep timeout. Here’s how you do that:
- Go over to Settings > System as mentioned in Step 2. Now click on ‘Power and Sleep’ on the left pane. On the right pane, you can now use the drop-down menus to specify the Display Timeout and Sleep Timeout to improve battery life.

Note: Choosing a very low value (like 1 or 2 minutes) might affect workflow, so choose something like 5-10 minutes, which will likely offer the best balance between power saving and productivity.
- Advanced users can scroll down further on the same page and click on ‘Additional power settings’. This will let you configure even more options, including, creating your own power plan. Just make sure you know what you’re doing if you don’t want your changes to wreak havoc.

7. Disable UI Animations and Shadows
Another way to improve battery life in your windows PC is by disabling all UI animations and shadows. Here’s how it’s done:
- Open the ‘Run’ dialog box (Windows key + R). Type in ‘sysdm.cpl’ (without quotes) and hit Enter to open System Properties.


- Select the ‘Advanced’ tab [1] and then click on the ‘Settings’ button [2] under the ‘Performance’ section.


- Now, under the ‘Visual Effects’ tab, select the option that says ‘Adjust for best performance’. Finally, hit ‘Apply’ or ‘OK’.


Note: This setting will reduce the aesthetic appeal by disabling all animations, shadows and cool transitions. If you want to retain all that, keep this setting on the default ‘Let Windows choose what’s best …’.
8. Turn off Bluetooth and Wi-Fi to Improve Battery Life
Wireless signals such as WiFi or Bluetooth eat a lot of battery power as they require dedicated hardware components to run continuously. Make sure to switch off Bluetooth every time you take off your headset. You can also switch to wired Ethernet whenever possible, as well as used wired input devices, like USB keyboard and mouse. This will help conserve power and improve battery life.
9. Disable Startup Apps
You should also disable startup apps to improve battery life in your Windows 10 computer. To do that, follow the process described below:
- Open the Windows Task Manager (press Ctrl + Shift + Esc simultaneously) and click on the ‘Startup’ tab. Now disable every app or service that you don’t think needs to run at startup. To do that, click on a listed app and hit the ‘Disable’ button on the bottom-right corner.


Note: Make sure you know what you’re doing, because disabling some apps or services might break important features, like audio, wireless connectivity, etc.
10. Disable CPU Cores
Just about all laptops ship with multi-core processors these days. However, you can disable some of the CPU cores to save power and improve battery life. Here’s how to do it:
- Open the ‘Run’ dialog box (Windows key + R) as described in Step 5. Type in “msconfig” (without quotes) and hit Enter. This will open the System Configuration settings.

- In the System Configuration window, move to the ‘Boot’ tab [1] and click on ‘Advanced Options’ [2].
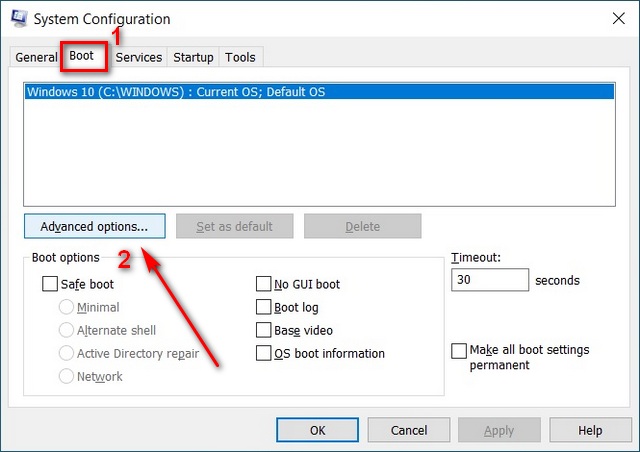

Note: Make sure to select the correct OS manually if you’re using a multi-OS computer.
- In the Advanced Boot Options window, check the box next to ‘Number of processors’ [1]. Next, use the drop-down menu [2] to select the number of processor cores you want active. Hit ‘OK’ [3] and restart your PC for the changes to take effect.


Note: This will only disable processor cores when your PC is idling. It will still use all processing power necessary when under stress.
11. Check Power Configuration
You can use the Windows Command Prompt to see information about apps and processes that are using too much power on your computer. Here’s how you do it:
- Open Windows Command Prompt in Admin mode. To do that, first search ‘cmd’ in the Windows Search Bar and then select ‘Run as administrator’.


- In the Command Prompt window, type in “powercfg /energy” (without quotes) [1] and press Enter. The PC will now will monitor your usage for 60 seconds to generate a list of errors, warnings and other information. The report will be stored in HTML format and the location will be clearly mentioned at the end [2].


- Open the file in your default web browser, and you will see a whole host of technical data and power usage details. Much of it is meant for advanced users, but you can still lookup some of those on the internet to get a better idea about what’s eating up your laptop’s battery.


12. Sync Data Less Often to Improve Battery Life
You can sync email, calendars and contacts less often to improve battery life on your Windows 10 laptop. The process to change the settings will differ from one email client to another, but on the default app, you can go to ‘Settings > Accounts > Email & app accounts’ to get started. Thereafter, select the account that you want to change the settings for, and select ‘Manage > Change mailbox sync settings’. Finally, choose a longer syncing interval for ‘Download new email’.
- You can even turn off auto-sync entirely for most Microsoft apps and services. For that, go to Settings > Accounts.


- Now click on ‘Sync your settings’ on the left pane and turn off the first toggle on the right pane to ensure that none of the apps or services will sync automatically. You can, of course, manually sync all data whenever you want.

13. Prevent Overheating
Heat is one of the biggest enemies of any computation device, including desktops, laptops and smartphones. It induces thermal throttling, which slows down your PC to reduce operating temperatures. If left unchecked, overheating can even reduce the lifespan of your computer. It is also one of the leading causes for faster battery drain and progressive degradation in battery life. Keeping temperatures under check is one of the best ways to improve battery life in your Windows 10 machine. For more details, check out our detailed guide on how to prevent your PC from overheating.
14. Disable Keyboard Back-Lights
Some laptops also come with keyboard back-lighting, which also drains the battery. In that case, the device likely has a ‘Function’ key that lets you toggle the keyboard back-lighting on and off. You will likely also find a control for it in the Windows Mobility Center. Some manufacturers also offer custom software to tune RGB lighting on their peripherals. You can use that to tone down or turn off the lighting on gaming mice in some cases.
15. Replace Your Battery
Finally, here’s the nuclear option if all else fails. If you’re using a relatively old laptop, the problem with low battery-life may have more to do with the age of the battery than the power settings. The older the battery, the less charge it will be able to hold. Once your laptop battery starts discharging quicker, it would be for the best that you replace it with a new one to improve the battery life of your computer. For best results, make sure that you buy the new battery either from the laptop manufacturer or one that’s recommended by the OEM.
Optimize Battery Life on Your Windows 10 Laptop
A power-hungry laptop can be a major headache, but there are ways to mitigate at least some of the problems. Using the methods described above, you can improve the battery life of your Windows 10 computer. While it will ensure that you can extend the screen-on time of your laptop just that bit longer, there are limits to how far that can work.
Eventually, you will have to invest in either a new battery or a whole new laptop to make sure that you can work on your PC long enough without having to rush to a power outlet every few minutes. If you enjoyed this article, also check out our article on how to speed up Windows 10 where we have shared tips that will breathe a new life into your aging laptop.

