It’s always a nice idea to keep your AirPods updated to the latest firmware version to enjoy the exceptional sound quality and all the newest features these premium true wireless earbuds from Apple has to offer. The latest firmware update rolled out by Apple can also fix any issues you might be having with your AirPods. Keep reading to learn how to update your AirPods, AirPods Pro, or AirPods Max. Also, learn how to check if the latest update is installed on your AirPods or not.
How to Update AirPods, AirPods Pro, and AirPods Max on iPhone
While Apple automatically updates your AirPods to the latest firmware, sometimes your earbuds can skip an update if not connected to an iPhone or iPad for a long time. In that case, here’s how you can connect the AirPods to your iPhone and manually update them:
1. Make sure that your iPhone or iPad is running the latest iOS or iPadOS version.
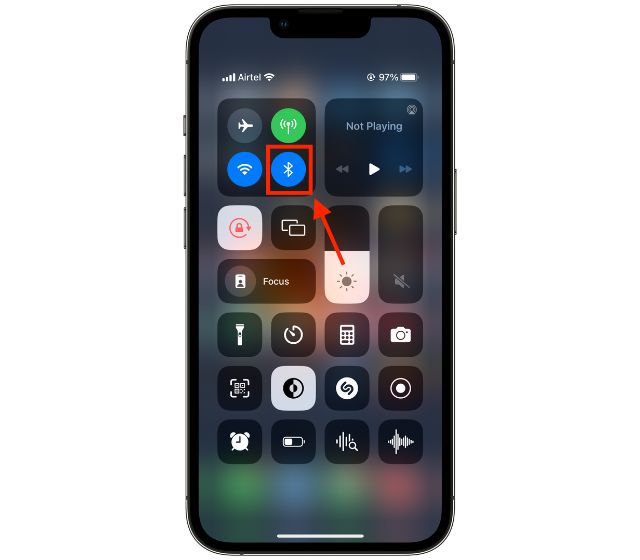
2. Turn on Bluetooth on your iPhone.

3. Open the lid of the AirPods charging case without taking out the AirPods and place it close to the iPhone.
4. Now, a setup animation will show up on the iPhone. Tap Connect.
5. Connect the charging case to a power source while keeping the AirPods in it.
6. Place the AirPods case in close proximity to your iPhone to update AirPods.
This way, your AirPods will automatically update to the latest firmware version.
How to Update AirPods, AirPods Pro, and AirPods Max on Mac
1. Turn on Bluetooth on your Mac device by accessing it from the Control Center.
2. Open the lid of the AirPods charging case without taking out the AirPods and place it close to the Mac.
3. A pop-up will show up on your Mac; click the Connect button.
4. Connect the charging case to a power source while keeping the AirPods in it.
5. Place the AirPods case in close proximity to your Mac to update the AirPods.
How to Check AirPods Firmware Version on iPhone
Determining whether the latest update is installed on your AirPods takes time and effort. One way to ensure that your AirPods are running the latest firmware is to cross-check with Apple’s official AirPods firmware support page to see the latest firmware version that is available for different AirPods models.
Once you have noted the latest AirPods firmware version available, here’s how you can check the AirPods firmware version on your iPhone. Then, you can decide to update your AirPods manually if required.
1. Connect your AirPods to your iPhone or iPad.
2. Open the Bluetooth settings on your iPhone or iPad by visiting the Settings app.
3. Tap the “i” button in front of your AirPods name. If you are confused about your AirPods name, check out our guide on how to change the AirPods name.
4. Now, scroll down to the “About” section to find the current firmware version of your AirPods in the “Version” tab.
How to Check AirPods Firmware Version on Mac
You can also use your Mac to check the firmware version of your AirPods if you don’t have an iPhone. Here’s how you can –
1. Connect the AirPods to your Mac.
2. Now, click the AirPods icon in the menu bar at the top. Next, select the “AirPods Settings” option.
3. Here, you can check the current “Firmware Version” of your AirPods.
If your AirPods do not have the latest update installed, you can use the method stated above to update AirPods manually.
Unfortunately, unlike other Apple Devices, Apple offers no button or setting to force update your AirPods.
You cannot update your AirPods using an Android phone as there is no setting or app for it.
There is no fixed time that is taken by AirPods to update to the latest firmware, as AirPods automatically update when placed close to a connected Apple device.