Doesn’t matter if you are a casual Instagrammer or a content creator, at some point, you have surely fantasized about having that blue tick right beside your name. Making this fantasy come true was pretty difficult even a couple of months ago. However, now you can actually just straight-up get this blue tick as part of the Meta Verified subscription. Pretty crazy to think about, but it is what it is, and getting a verification badge on your Instagram account is easy in 2024. Of course, you can also just simply “apply” for verification the old-school way if you have amassed enough followers and reach. So, without any further ado, let’s take a look at how you can get verified on Instagram using all these methods.
How to Get Verified on Instagram Using Meta Verified
For you to get the Meta verification subscription on Instagram, you can’t just simply make the payment and be done with it. There are a couple of other things that you need to do prior to that as well as after, like setting up two-factor authentication on Instagram, uploading government-issued photo IDs, and more. Also, you need to have a good idea about what Meta Verified is and how it actually works before you begin the process to get verified on Instagram. So, here’s a quick rundown of it all.
What is Meta Verified on Instagram?
Before getting into the process of getting Meta-verified on Instagram, let’s first understand what it actually is.
Back in March, Meta Verified was rolled out as an open-to-all premium subscription service. Meta verification brings quite a few features to the table, including the blue tick right beside your name. Once you subscribe to Meta Verified, it offers these benefits to your Instagram or Facebook account:
- A verified badge, aka the blue tick
- Advanced identity monitoring to prevent impersonation, thereby acting as an added security measure
- Get instant support
- Get access to unique Meta-verified stickers
With Meta verification, everyone out there can get that blue tick on Instagram. This helps budding content creators in establishing a presence on social media. Previously, the Meta-verification subscription also boosted reach on Instagram. However, that perk was removed soon after. Another thing to note is that unlike the Instagram threads badge, which is temporary, the blue tick is permanent and can be removed only if you unsubscribe to Meta verified.
Eligibility for Meta Verified on Instagram
In order to be eligible for the Meta Verified subscription on Instagram, you will need to meet the following criteria:
- Must be at least 18 years of age.
- Have a public or private profile with your full name associated with it; should also align with Instagram’s naming standards.
- A profile picture that shows your face properly.
- Two-factor authentication enabled on Instagram account
- A decent prior posting/activity history (being active on the platform, in other words)
- Government-issued ID to back up your profile picture and name on Instagram
- Meet Instagram’s Terms of Use and Community Guidelines
How to Get Meta Verified on Instagram (Paid)
Now that you know a tad bit about what is the criteria for Meta verification for Instagram, let’s take a look at how you can avail of this premium service. In just a couple of easy steps, you will be able to get verified on Instagram using a Meta-verified subscription. Here’s a quick rundown:
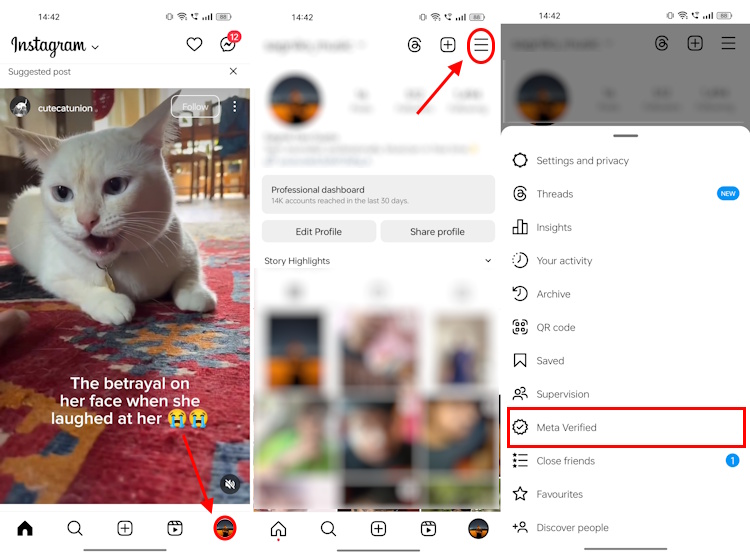
1. Open the Instagram app on your Android or iOS device.
2. Move to your Profile and tap on the hamburger menu at the top right corner.
3. Here, you will find the Meta Verified panel and tap on it.
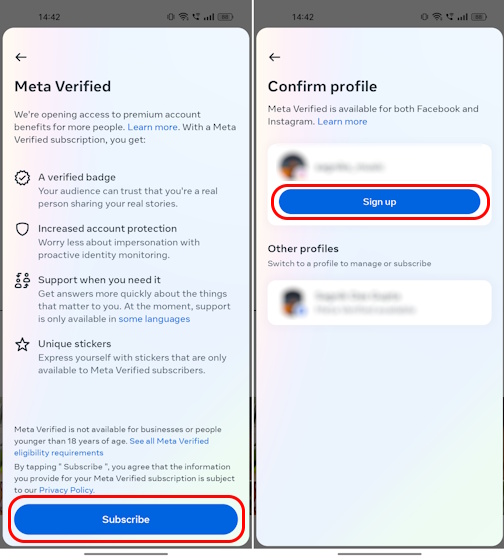
4. Tap on the Subscribe button and on the next page, tap on the Sign up button.
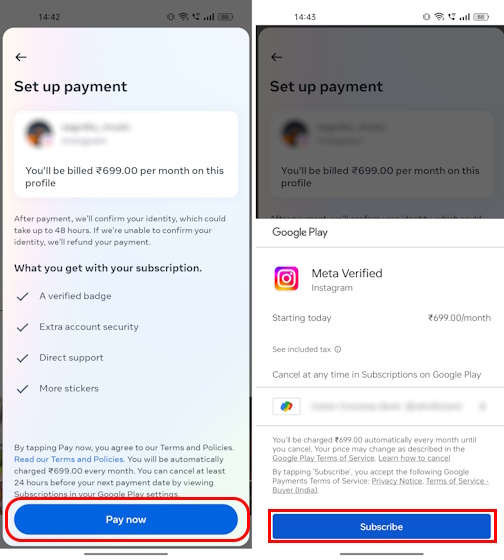
5. This should take you to the final payment window. Here, tap on Pay now and choose your payment method. Next, hit Subscribe and make the payment.
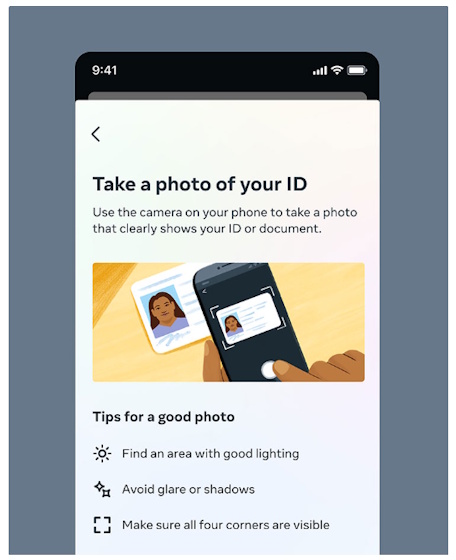
6. Lastly, you just need to send a photo of your government-issued photo ID alongside a selfie video to be eligible for Meta verification on Instagram.
Things to Note When Applying for Meta Verified on Instagram
- After applying for Meta verification, you will get a response within 48 hours which will let you know whether or not your request has been accepted.
- If you have paid the Meta Verified subscription fee and your account does not get verified after two tries, the fee is automatically refunded within 60 days.
- In case your account is suspended for you having violated Meta Verified eligibility criteria, and Instagram’s Terms of Use or Community Guidelines, your Meta Verified subscription will be automatically canceled and you won’t be receiving a refund for it.
How Much Does Instagram Verification Cost?
The price for Instagram verified account under the Meta Verified program in the U.S. has been set at $11.99 per month for the web version. Meanwhile, the Meta Verified pricing changes to $14.99 per month for the Android and iOS versions. This is similar to how Twitter Blue is priced at the moment, differential pricing for the web and mobile versions.
How to Get Verified on Instagram Completely for Free
Meta-verified is the easiest way to get your hands on that prestigious blue tick on Instagram. However, you can also go all organic and simply drop a verification request on Instagram if you think you have met the criteria for it. Now, if you are unaware of the verification criteria on Instagram, in case you don’t want to go for the Meta Verified subscription, we have summed it up for you down below:
Eligibility for Verification on Instagram
The path to getting an organic Instagram verification is not an easy one. With that being said, it is not impossible either and a whole lot of content creators and businesses get verified on Instagram on a daily basis. Without any further ado, here’s what you need to get that verification badge on Instagram:
- The profile you are trying to get verified needs to be authentic (genuine and belong to a real person/business) and not trying to imitate another profile.
- The account to be unique and, as Instagram states, “Only one account per person or business may be verified, with exceptions for language-specific accounts. We don’t verify general interest accounts (example: @puppymemes)”.
- Unlike Meta verified which can be imposed on both private and public profiles, organic verification can be requested only for a public account.
- Your account needs to have a bio.
- The profile you are trying to get the verification badge needs to have a profile picture as well.
- When applying for Instagram verification, make sure that the profile is active.
- The account must have a notable presence, like a “well-known, highly searched for person, brand or entity”.
How to Request Verification on Instagram for Free
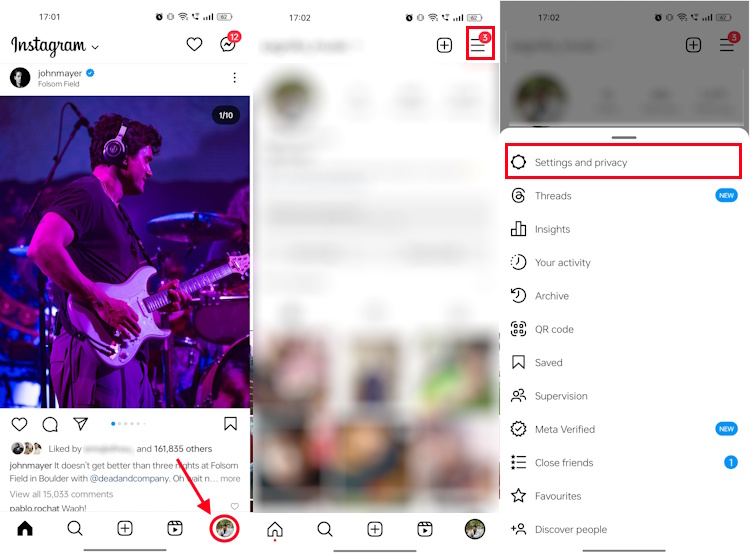
1. On the Instagram app, head over to your Profile section and tap on the hamburger menu at the top right.
2. Here, you will find the Settings and privacy panel. Tap on it.
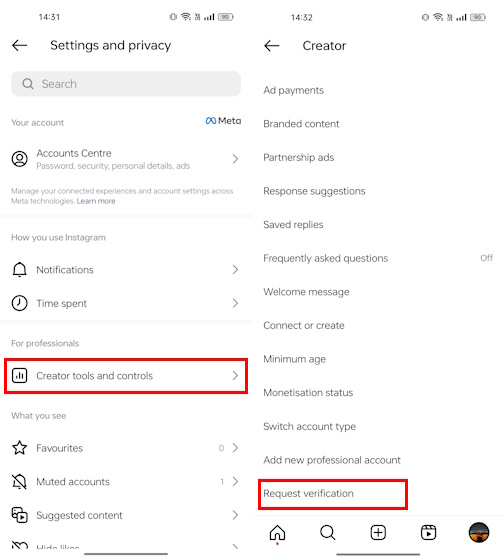
3. In the next window, tap on Creator tools and controls and then, tap on the Request verification option.
4. Now, all you have to do is fill out the form and upload the necessary documents.
5. Once done, tap on the Submit button. After submitting, you will see a message that lets you know that your verification form is under review now. Tap on Done.
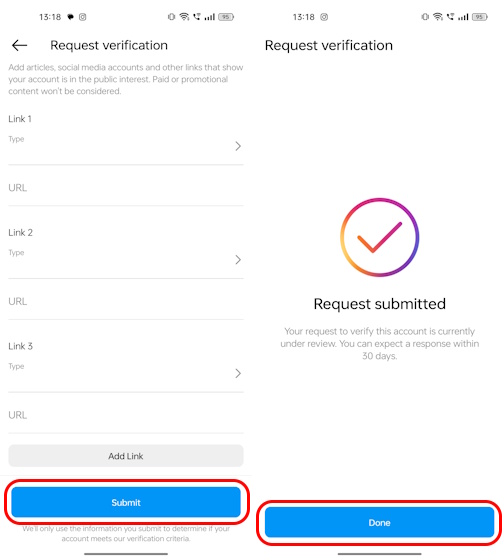
With this, your Instagram verification request shall be successfully submitted. As Instagram states, it will take some time to get the status of your verification request. To be specific, you can expect a response within 30 days.
Things to Note When You Request Verification on Instagram
- Decide upon a username before applying for the verification badge because you won’t be able to change it afterward.
- Make sure to not use fake information to get an Instagram verification badge during the process as it may cause Instagram to not deny the badge but also take additional actions and disable your account completely.
To get verified on Instagram, you can either subscribe to the Meta Verified subscription or drop a verification request if you have a notable social media presence.
No, Instagram does not verify you automatically and requires you to manually submit a verification request or subscribe to Meta Verified instead.
Yes, you can buy the Instagram blue tick by simply subscribing to Meta Verified. You also get a bunch of bonus features like enhanced account security, active account-related support, etc.
If you are applying for verification the conventional way, chances are your verification request may be denied. However, if you have already established quite a presence on social media and fulfill other Instagram verification criteria, your verification request will be accepted easily.
Meta verified on Instagram starts at $11.99 per month for the web version and goes up to $14.99 for the mobile version.
Meta says that it takes the time of 48 hours to process verification requests on Instagram. However, it might take more time in some exceptional cases to verify your Instagram account.


Great blog post! The content is informative and well-structured. I particularly enjoyed the practical tips provided. Keep up the excellent work!
What is the point in making it available for all to apply and then disapprove the request. Just a trick to curb the malpractice of getting an account verified.
what about a account having less than 1k followers!
Even I didn’t get an option like that in my Instagram
But i have not get the option in my Instagram app
Hey Kalanithi, are you using the Instagram app on Android? If so, the feature has only appeared on iOS device right now.
I am sorry but even after updating the app am not able to get this option. Please help me
Hi Hasnain, are you using an Android phone? If so, the feature hasn’t yet shown up on Android devices
Oh My God!!! Finally !