- Epic Games recently mandated Secure Boot and TPM 2.0 to play competitive Fortnite on PC.
- You can enable Secure Boot and TPM 2.0 through your BIOS settings.
- It is advised that you check your motherboard manufacturer's instructions when trying to turn on TPM through your BIOS settings.
Fortnite, much like any online game, is not immune to cheaters and hackers ruining matches for other players. While the game uses the Easy Anti-Cheat to reliably monitor players’ behaviours, some hackers continue to find ways to mess with the game’s code and give themselves unfair advantages.
To battle this issue, Epic has issued new security measures for Fortnite PC players, which include enabling Secure Boot and TPM 2.0 in Fortnite. These steps essentially check your system for any programs that grant you competitive advantages. Here’s everything you need to do to meet Epic’s PC requirements and enable Secure Boot and TPM 2.0 in Fortnite.
How to Enable Secure Boot in Fortnite
You can turn on Secure Boot through your System BIOS settings. However, the setting can be quite hard to find, and before even heading to enable Secure Boot, you should first check if you already have Secure Boot enabled in Fortnite.

You can follow these steps to check the status of Secure Boot on your PC:
- Press the Windows Button + R Key to open the Run command.
- In the Run search bar, type ‘msinfo32‘ and hit Enter.
- In the menu that opens up, search for the ‘Secure Boot State‘ item under the ‘System Summary’ section.
- If it states ‘On,’ you’re good to go.
If your Secure Boot State is set to ‘Off,’ you will not be able to play competitive Fortnite. To change your Secure Boot State, you will have to head to your system’s BIOS settings. Remember, however, that this can be quite a tricky process and can even include changing the BIOS Mode on your system. Thankfully, we have you covered with a dedicated guide on how to enable Secure Boot, which will help you fix this issue.
How to Enable TPM 2.0 in Fortnite
Enabling TPM 2.0 involves similar steps to enabling Secure Boot. Since TPM 2.0 is a mandatory component for Windows 11, you are likely to have the feature enabled. However, you might run into problems if you are playing Fortnite on a Windows 10 system.
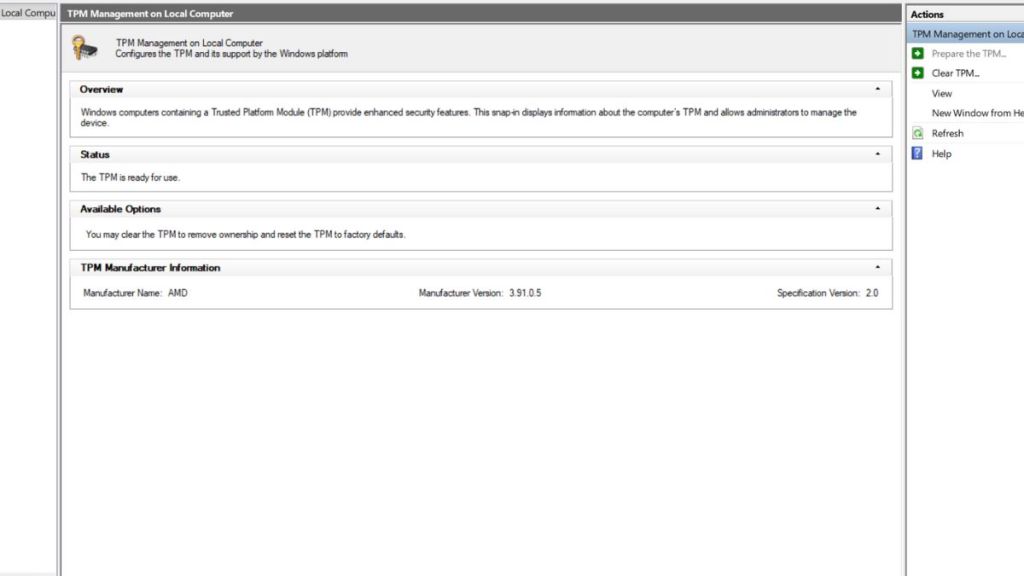
You can follow these steps to see if TPM 2.0 is enabled or not:
- Press the Windows Button + R Key to open the Run command.
- In the Run search bar, type ‘tpm.msc‘ and hit enter.
- In the TPM Management menu, check under the Status section.
- If it says, ‘The TPM is ready to use,’ you’re good to go.
However, if your screen says ‘not ready for use,’ you are going to have to manually enable TPM, which can be quite a hassle. You can follow these steps to have your TPM ready for Fortnite tournaments:
- Right-click the Start button and click Disk Management.
- Right-click the (C:) Drive partition and select Properties.
- In the following menu, navigate to the ‘Hardware‘ tab and click on Properties once again.
- Select the Volumes tab.
- Check if the Partition Style is MBR or GPT.
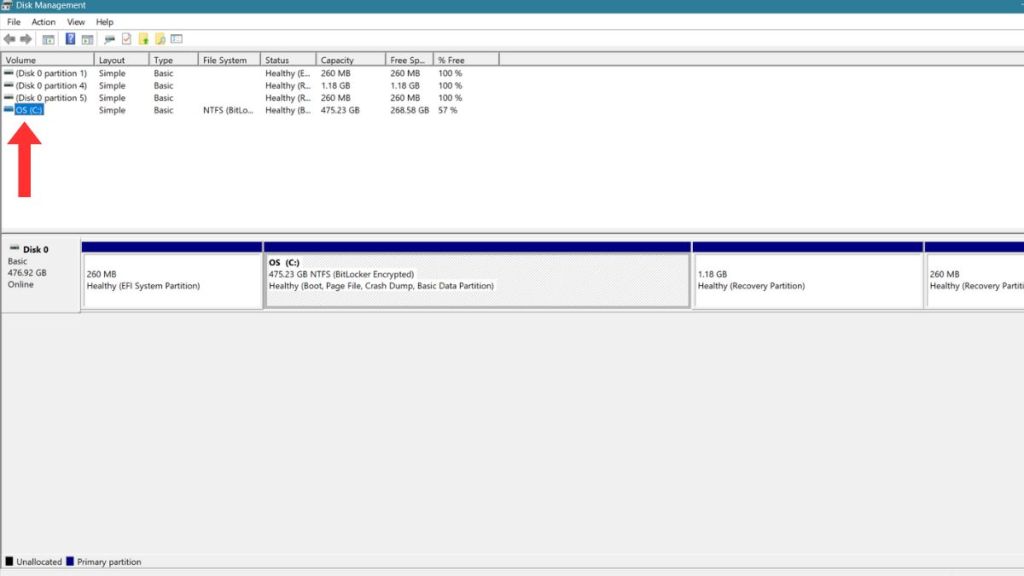
Your Partition Style needs to be set to GPT for TPM to work. You can then activate Secure Boot by following the steps mentioned in our guide. If your Partition Style is set to MBR, you need to manually convert your Partition Style. This, just like the Secure Boot process, can be quite tricky to tackle, and we advise you to back up any data you have before you start the process of converting your Partition Style.
Enabling TPM 2.0 is a process that differs depending on the manufacturer of your motherboard. To go through with the changes, you need to check your motherboard manufacturer’s website for instructions.
Will you enable Secure Boot and TPM 2.0 to play Fortnite tournaments? Tell us in the comments below!
Yes, you need to enable Secure Boot and TPM 2.0 to take part in Fortnite tournaments, as Epic Games has mandated these steps.
No, both Secure Boot and TPM 2.0 are merely security checks in Fortnite and do not consume CPU or GPU resources.
No, most Windows 11 PCs built in the last 6-7 years already have these features, and you just need to turn them on through your BIOS settings.


 Pranav Maytray