Since the dawn of smartphones, video capturing and sharing has become a common phenomenon, and why shouldn’t it. Smartphone cameras are improving with each generation with the best of them even allowing you to record videos in 4K resolution. However, there’s one tiny disadvantage of recording videos, and that is the audio that comes attached with it. The audio captured with your smartphone is just bad, there is no two ways about it. Add that to the fact that sometimes you might capture a piece of audio that you didn’t intend to, and that, can be really embarrassing. As a rule of thumb, it is best to remove the original audio unless it is really needed. So, if your audio is stopping you from showcasing your videos to the world, here is how to remove audio from video on any device.
Remove Audio From Video File
The process of removing the audio from any video file will depend on the device or rather the operating system you are using. Also, you can use multiple methods on the same operating system. For this article, we are going to cover one method each for macOS, iOS, Android, and Windows operating systems. I have selected the methods based on their simplicity and the kind of the software required. So, let us get started, shall we?
-
Remove Audio From Video File On macOS
One thing that I really like about Apple’s operating system is that it already comes with really great first-party software that allows you to get things done as soon as you unbox your Mac. The most popular and most used ones are the native Mail app, the Notes App, the whole iWork Suite, and so on. Similarly, Apple also includes a basic video editing software which comes pre-installed with your Mac called the iMovie. Although iMovie cannot compete with feature packed video editors out there, it is enough to do some basic editing like removing audio from video. So, let us see how we can do that.
1. Launch iMovie and import your video by clicking on the import button and then selecting your video.

2. Right click (control+click), on the imported video and select the entire clip.

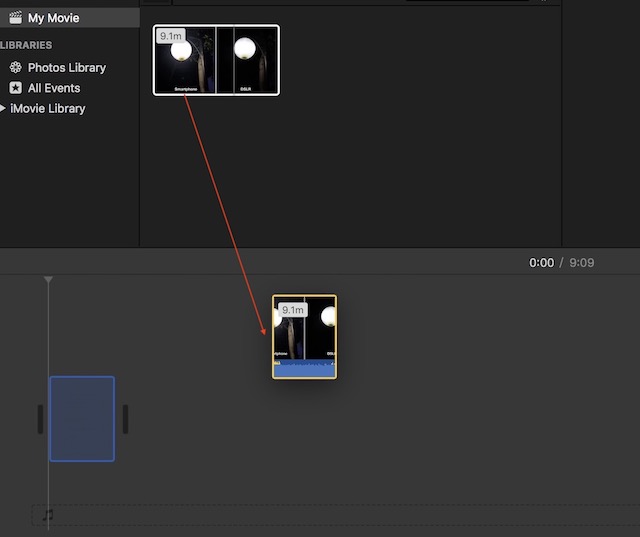
3. Now, drag and drop the video to the editing timeline (look at the picture).
4. Right click on the timeline video and select “Detach Audio”.

5. Now you will be able to see that the audio section is separated from the video. Just click on the audio file to select it and then hit the delete key on your keyboard to delete the audio.

6. After deleting the audio hit the Command+E combo to export your video. Depending on the size of your video it might take some time to export it.

7. You still need to save this video, to do that, click on the share button present at the top right corner of the app. Here, click on file and then go through the steps to save your video.

-
Remove Audio From Video File On Windows
Like iMovie on macOS, you can use any free video editing software to get your job done. However, for today’s tutorial we are going to use a software which is not only free but chances are that most of you will already have it. The name of the software is VLC Media Player. If somehow you don’t already have it, click on the link to download it.
1. Launch the VLC app and click on the “Media” option at the top left corner. On the resulting drop down menu click on “Convert/Save”.

2. Now, add the video which you want to remove the audio from by clicking on the “Add…” button and then click on the Convert/Save button.

3. Here, click on the button which is marked in the picture.

4. Now, select the “Audio codec” option and remove the checkmark next to the “Audio” subheading. This will remove the audio from the video. Now, click on save.

5. On this page, just select the file destination and click on the “Start” button. The video will be converted and saved to your specified location.

-
Remove Audio From Video File On Android
Android makes it really easy for you to remove audio from videos. It will just take you a couple of steps to do that, so let’s do it.
1. Install the Timbre App from the Play Store. Launch the App and then scroll down to the video section and tap on the “Mute” button. This will automatically take you to your Gallery app. Here tap on the video to select it.

2. As soon as you tap on the video, the app will import it into the app. Now, to mute the video, tap on the mute button marked in the picture. You will see a pop-up card telling you that the audio will be removed. Since, that’s what we want to do, hit save.

3. Once you hit save, the app will give you the option to open the file, tap on Yes to do that. If you don’t want to do that now, just tap on No. You can find the saved video in your main gallery app.

-
Remove Audio From Video File On iOS
Removing audio from video on iOS is as simple as it is on Android. Sadly, Timbre is not available for iPhone hence we will have to use a different app to achieve our desired result.
1. Install Video Mute from the App Store and launch the app. You will see that the app already pre-loads all your content present on the phone.

2. Select the video that you want to mute by tapping on it. The app will show you a small preview of the video. To start editing, hit the “Select” button present at the top right corner.

3. In the editing window, look at the volume slider present at the bottom of the screen. To remove the audio slide it to the extreme left and then hit the Export button at the top right corner.

4. The video will be processed and then you will get the option to save the video. Click on the “Save Video” button to save the video to your iPhone’s storage.

-
Remove Audio From Video File Online
If you don’t want to install apps and go through so many steps just to remove audio from your videos, there is a simple way to do it. However, in this process you are limited to a file size of 500 MB and you will need an internet connection. The steps are pretty simple, so let’s just go through them quickly.
- Visit the AudioRemover website by clicking on this link. Here, click on the browse button and select your video file, and then hit upload.

2. Once the video is uploaded, the website will automatically remove the audio and provide you with a download link for the processed video. Click on the download link to download your video which now doesn’t contain any audio.

As you can see, this is the simplest process. However, for this to work you will need a stable internet connection. Also, you will need to wait while the video file is being uploaded and downloaded. There are other online services like this which can also get the job done, but none of them make it as simple as AudioRemover does.
SEE ALSO: How to Remove Noise From Audio Files in PC or Mac
Remove Unwanted Audio From Your Videos
The above tutorial shows you how to easily remove the audio from your videos. All the apps mentioned in this tutorial are free of cost and work efficiently. Also, only the iPhone app has in-app purchases, that too only to remove the ads. The free version doesn’t restrict any of its functions. I have found these methods to be the best among all the ones that I tested. If you think, you know an easier and more efficient method, do let us know in the comment section below.