Upgrading to an SSD (Solid State Drive) is the best upgrade that you can give to your computer. Whether you have an ageing machine that’s slowing down or a brand new computer that’s still spinning the good old magnetic disks, SSDs are the storage medium of the future, and the sooner you jump onto that bandwagon, the more peace of mind you’ll have. SSDs are much faster, they’re far more reliable and they make even tiresome computing tasks pleasurable.
With Windows 10, Microsoft has optimized the operating system enough that it doesn’t slow down easy. However, it’s Windows, so yeah, it will slow down, and while there are numerous measures that you can take to tackle that, nothing beats upgrading to an SSD that will pretty much take care of all your such woes. One challenge, should you decide to bite the bullet, remains that of your current Windows installation. These days, our PCs and laptops are pretty much an extension of our selves, and while we may be reluctant to admit that, it’s a pain to set up everything afresh. Hence, in this article, we’ll show you how to upgrade your machine to a new SSD and take your current Windows 10 installation with you.
It’s worth noting that while the guide is specifically for Windows 10, it applies to previous versions of Windows as well. So if you’re planning to do this with, say, Windows 8.1 (please, please upgrade to Windows 10 — 8.1 is the worst you can have on your machine), you can still safely follow these steps.
Upgrading to SSD: What you’ll need
As far as what you’ll need to make a successful move from your old hard drive to an SSD, the list is fairly simple. You’ll need your old hard drive with the current Windows 10 installation in tact, your new SSD and a tool that will take care of the transfer (in this case, EaseUs Todo Backup Free), and optionally (but highly recommended), an external hard drive to backup your data and temporarily store files to (more on that in just a bit).
Preparing your old drive for migration
Of everything that you’ll end up doing in this process, this will be the most time-consuming step. There are actually two parts to this preparation: preparing your data for migration and then preparing the current Windows 10 installation for the move. The data part is the tricky one. You see, SSDs have inherently low storage capacities that traditional hard drives, and while there are larger capacities available, the pricing goes up exponentially. Ideally, you’ll want to invest in an SSD that can hold your Windows installation AND applications without worrying about personal files like videos, photos, music etc. To that end, a 128GB SSD should usually suffice in most cases, although it would vary from user to user.

Now, here’s where the problem starts. Normally, our computers can have GBs of data stored on their hard disks, or perhaps terabytes. The cloning tool that we’ll use to migrate the installation takes everything with it, so in order for it to work, you’ll want to trim down the amount of data that you have on your hard drive. For this reason, we’d recommend moving everything unnecessary from your user folder in your Windows 10 installation to an external hard drive. That includes any music, videos or photos you may have (those take usually the most space), as well as any other files that are not critical to your Windows installation (so stay away from the Windows and Program Files folders in most cases). Essentially, you need to bring down the size of your Windows installation partition down to a level where it’s lesser than the total capacity of your target SSD.
The next step is backing up your data. While the process is mostly safe and doesn’t result in any unforeseen situations, you can’t ever be too safe. If you don’t have a backup mechanism set up already, either copy all your data over to the external hard drive or employ an online backup service like CrashPlan. It’ll be time consuming but totally worth investing into.
Once you’re done with the backup part, now you’re ready to prepare your Windows installation for the move. That’s basically defragmenting your Windows 10 installation partition before you make the move. Simply hit the Windows key on your keyboard and type “defrag” and then click the search result. Perform a defragmentation on your C: drive (usual location of Windows installation) and you’re good to go.
Migrating Windows 10 from Hard Disk to SSD
With everything else in place, all you need to make sure is that both your SSD and old hard drive are connected and powered up. It’s safer at this point that you completely remove the external hard drive that you backed up your data to from your computed. Also, if you’re using a laptop that doesn’t fit in both an SSD and a traditional hard drive at the same time, you’ll need an external adapter to hook your old hard drive with, but that’s highly optional and, again, will vary on a case-by-case basis.
Assuming that you have everything set up, make sure that you’ve formatted your SSD before making it a clone. A quick format will do, which you can perform by just right-clicking the SSD in Windows Explorer and choosing Format.
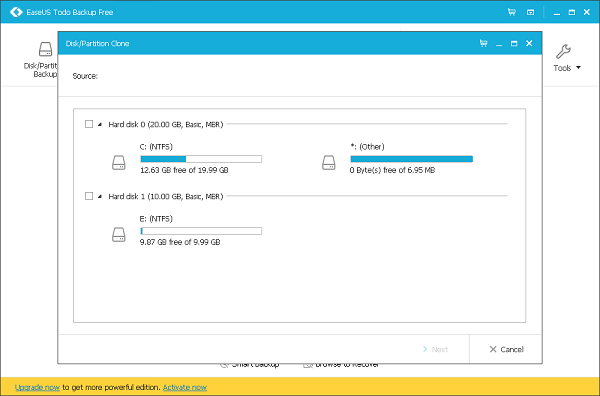
Now, fire up EaseUs Todo Backup and select “Clone.” Identify your source disk (which will be the old hard drive) and the target location (which will be your new SSD). Then, tick the box at the bottom that says “Optimize for SSD” which will ensure that your new partition performs optimally. There’s an option to Shut Down the computer when the cloning operation is complete — useful if you’re going to perform this operation overnight. Start the cloning process and wait patiently — the time taken will depend on how much data you hard on your source drive.
Booting up Windows 10 from the SSD
Once you’re done with the cloning process, the heavy lifting is pretty much done, except one key component: you now have two bootable Windows 10 installations on your computer. Shut down the device (if you didn’t already select that option in EaseUs) and reboot. Once the system boots up, you’ll be presented which Windows to boot from. Select the one that resides now on your new SSD and let Windows load fully (you’ll notice that it’s much faster than before). Once it does, find your old hard drive partition in Windows Explorer, right-click it and format the old drive to get rid of the old Windows installation. That’s it.
Restoring your data to the new SSD
Your old hard drive is now basically extra storage for all your data that you earlier moved out to make space (or a redundant drive that you have to take out). Depending on your scenario, hook up the external hard drive that you used for backup and move back your data to either the SSD or the old hard drive, based on where you have space. Just note that anything on the SSD will be accessed significantly faster compared to the magnetic drive. If you used an online tool like CrashPlan, it’s most likely that the application migrated safely with your Windows 10 installation. Just fire it up and restore your data as you please.
SEE ALSO: SSD vs. HDD: Which One Is Better, And Why?
That’s all there is to it. While the prospect of migrating your Windows 10 installation to a new SSD might seem daunting, as you can see, thanks to numerous tools at our disposal, it’s fairly simple and straightforward. The end result is a computer that’s much faster and reliable, and pleasing to use, even with Windows.
If this guide helped you, share it with your friends. If you have comments and questions, let us know below.