Microsoft r̶e̶b̶r̶a̶n̶d̶e̶d overhauled the News and Interests feature to release Widgets on Windows 11. While rumors suggest that Microsoft would eventually open the widgets panel for third-party app developers, all you get on Windows 11 widgets right now are Microsoft’s own weather, stocks, photos, and news panels, to name a few. If you prefer not to see the widgets panel, here’s how you can disable widgets on Windows 11.
Disable Widgets on Windows 11 (2021)
We have detailed four methods to get rid of widgets on your Windows 11 PC in this article. Choose the method you are comfortable with and follow the steps to remove widgets on Windows 11.
Windows 11 Widgets: How They Look and Work?
As mentioned above, the flyout widgets panel in Windows 11 is a reboot of the News and Interest feature that was first introduced in Windows 10. In Windows 11, you can access the widgets using a dedicated shortcut (white and blue icon) in the taskbar. It lives to the right of the virtual desktops button in the taskbar on your Windows 11 PC. You can also use the Windows 11 keyboard shortcut Win + W to open the widgets panel.
![]()
While the News and Interests widget opened only a pop-up window with the weather, latest news, and stock updates, the former opens up a massive flyout panel from the left. It could be a bit overwhelming for new users. However, the widgets panel shows the time and has a search bar at the top. Then, you have a cascade of widgets, which display calendar events, weather, traffic updates, your Microsoft To-Do lists, photos from OneDrive, sports and stock news, and more.
Moreover, Microsoft lets you customize the layout of the widgets panel. You can add or remove widgets, rearrange and resize them, and customize the content it serves you with ease in Windows 11. While all this sounds good, the widgets panel is lackluster, and there’s a good chance that you may want to disable it for now. So, let’s see how you can go about it.
Disable Widgets on Windows 11 from Taskbar Context Menu
- First, right-click on the Widgets icon from the taskbar and choose the “Hide from taskbar” option. This is the easiest way to remove widgets on Windows 11.

2. As you can see in the image below, the widgets button will no longer appear in your taskbar after this simple tweak.

Disable Windows 11 Widgets from Taskbar Settings
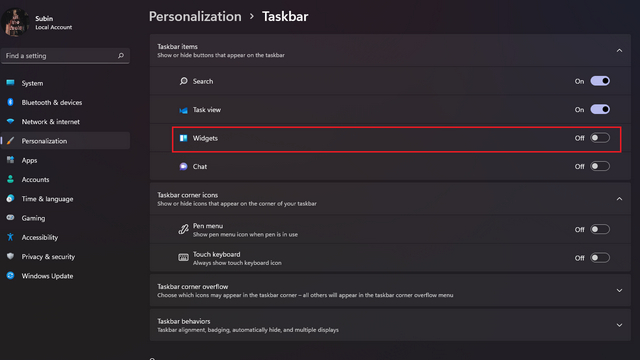
You can also go to the taskbar settings to disable Windows 11 widgets. To do that, just follow the steps below:
1. Right-click anywhere on the taskbar and choose “Taskbar settings”.

2. Then, under the Taskbar items section, turn off the “Widgets” toggle, and you are done. You have removed the widgets button from Windows 11 taskbar.

Hide Widgets on Windows 11 Using Windows Settings App
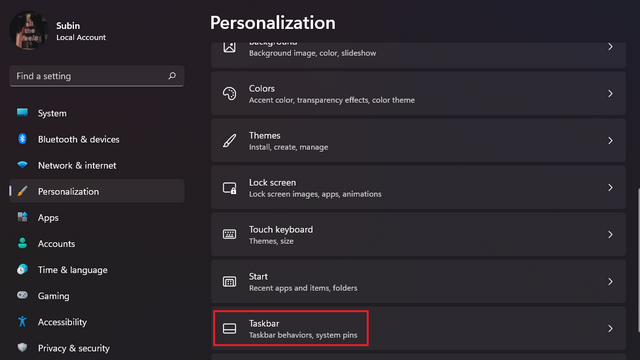
1. Another way to disable the widgets button is through the Settings app. So open the Settings app, switch to the “Personalization” tab, and click on “Taskbar”.

2. The step above will take you to the taskbar settings page. Here, you need to switch off the Widgets toggle to no longer see widgets on your Windows 11 PC.

Remove Widgets on Windows 11 Using Registry Editor
Last but not least, power users can rely on the Registry Editor to disable widgets on their Windows 11 computer. Here’s how it works:
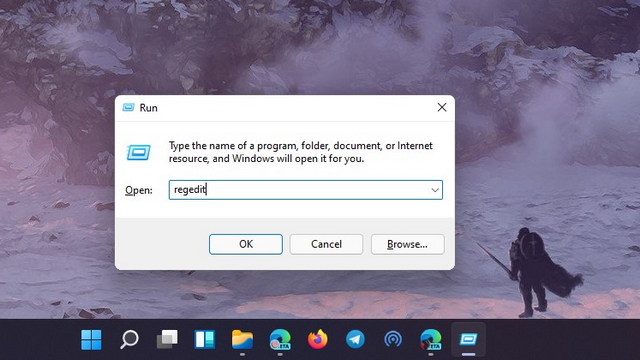
1. Open Registry Editor by typing “regedit” (without quotes) in the Windows Search bar. You can also open Run using the keyboard shortcut “Win + R” and type “regedit”.

2. When the Registry Editor opens up, navigate to the path given below, and look for “TaskbarDa”:
HKEY_CURRENT_USER\Software\Microsoft\Windows\CurrentVersion\Explorer\Advanced

2. Double-click “TaskbarDa” and change the value data field to “0”. Click “OK” and restart your computer.

Hide Widgets Button in Taskbar on Windows 11 PC
So, that’s how you can remove the widgets button from the taskbar on Windows 11. If you didn’t like widgets, you might also want to disable the Microsoft Teams Chat icon in the taskbar and turn off suggested notifications in Windows 11. If you are someone who wants to test a stable version of Windows 11, go through our guide on how to install Windows 11 beta right now. That’s pretty much it for this tutorial. If you have any questions or doubts, let us know in the comments section below.


