Forms and surveys are one of the best ways to collect data, and thanks to online forms, we can now easily collect data from hundreds and thousands of people with little effort. There are many online form building tools that let you build a form or survey, send it to people, receive responses and easily analyze the data. However, almost all of them are paid and come with limited free versions that does not work well for a big company.
So, if you are looking for a free form builder tool, Google Forms happens to be a great one. It is completely free to use, without any limitations and offers an interactive interface to easily create forms & surveys. In this post, we will show how you can create an attractive form with Google Forms and analyze the received data. Let’s get going!
Google Forms Quick Overview
Google Forms is an online form builder tool offered by Google that has a robust feature list and is very simple to use. It lets you build almost any type of forms, including surveys, quizzes, contact information forms, invitations and other types of forms. You can easily create forms by filling in the required information and also make the form attractive using themes and colors.
You can create forms and quickly share them via email or a shared link to collect data. Afterwards, Google Forms presents that data in an easy to gulp manner and you can download the data for offline use as well. Now that you have an idea as to what Google Forms offers, let’s get to creating forms.
Create a Google Form
-
Choose your template
To be able to use Google Forms you must have a Google Account first. You can just head to Google Forms and login with your Google account, which will bring you to its homepage. Here, click on the “More” button at the top right-side to see all the templates. You will see the common types of forms here, including quizzes, worksheet, contact forms, event registration forms, job application form, customer feedback form and other regular forms.


Each template is professionally designed with a related theme, example questions and proper formatting to make sure the forms meet its purpose. If any of the templates fulfil your requirements, go for it, as you will only have to enter your information and the rest will be handled by Google Forms.
For demonstration purposes, we will be creating a form from scratch, but if you find a good template that relates to your purpose, go for it instead of creating a form from scratch.
-
Edit a Blank Form and Create Questions
When you open a blank form, you will see a plain form without any themes and with a simple editable question field. To get started, you first need to provide a title for the form and a description of what it is about. Form title is of course important, but you are not bound to provide a description if you feel it’s not required.

Before you start working on the questions, you need to choose the type of form you want to create. For this, click on the drop down menu next to the “Untitled Question” and you will see multiple types of questions to choose from, including multiple choice, short answers, dropdown, checkboxes and linear scale. For demonstration, we will create a multiple choice form, but you can choose the question type you want.

Now, enter your question in the “Untitled Question” field and add the possible options below it. You can click on the “Add option” button below to add as much options as you like, although 4-5 options work fine for a multiple choice form. You can also click on the “Add Other” option to add a field for other reasons, where respondents can manually enter an answer as text.

You can create more questions by clicking on the “+” icon in the options on the extreme right of the page. This will open up another editable question field that you can edit, just like we did above. Repeat this process to create multiple questions.

-
Create Sections
The form you have created will show the questions in a list manner, but you can also divide it in sections where people can click on “Next” to answer the next questions. Click on the “Add section” button in the options on the right and you will see that a new section will be created. You can easily drag and drop questions in other sections or create new ones.


If you create sections in your form, you can also use the “Skip Logic” trick to move the respondent to your desired section, based on what they answer in the previous section. To do so, click on the three-dot menu at the bottom right corner of the question and choose “Go to section based on answer” from the menu.

This will add a drop down menu next to each of the answers, you have added for your question. By default, it is set to move the respondent to the next section in line, but you can click on the drop down menu next to any answer and choose your desired section to move the respondent if they select the particular answer.
This feature can be handy in many ways. For instance, if your respondent say “They like your product”, you can move them to a section where you ask them what they like about your product, and if they say “They don’t like your product”, you can move them to a section where you ask them why don’t they like your product and how can you make it better.

Furthermore, you can also add a photo or a video between questions to make your form even better. You will find buttons to add a video or photo in the right-hand options.

Customize your form’s looks
-
Add a Theme
Now that we have created our form, lets add a theme to spice things up. At the top of the page, click on the “Color Palette” button and you will see multiple colors to choose from. Here, you can select a plain color to add as background or click on the last icon to select a theme from Google Forms library of themes.
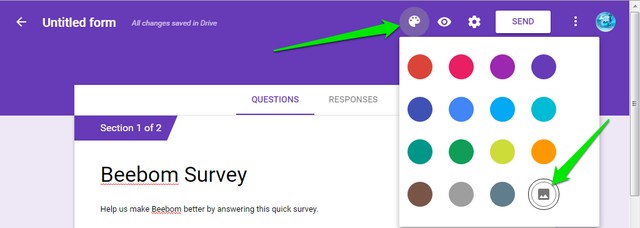
You will find hundreds of themes arranged by categories like birthday, party, food and dining, wedding, sports and more. You can choose any theme from this list or even upload your own themes (that is custom images) if you like. Once you select a theme, it will take around 2-3 seconds to apply on your form.

Check out various form settings
At the top of the page, you can click on “Settings” to further customize the behavior of your form. Let’s take a look at the important tabs available:

General: In this section, you can choose to limit respondents to only submit a survey once and they will have to sign in using a Google account to answer the survey (identification reasons). You can also allow respondents to edit their response and see what others are saying.

Presentation: Here, you can shuffle the order of questions every time someone takes the survey, and also show a progress bar to them.

Quizzes: This section allows you to turn your form into a quiz, where you can assign points to questions and Google Forms will automatically grade them (perfect for teachers).

Once you are done with the various options, click on the “Preview” button at the top to see what your form will look like to respondents.


Send the Form
Now that you are sure your form is ready to be filled, it is time to send it to the respondents. Click on the “Send” button at the top and you will see three different ways to reach your respondents. You can send the survey via email, if you know their email addresses or get a link to share it anywhere you like or use the “Embed HTML” section, to put the form on your website.
If you are going to send the form as an email, you can also embed the form right inside the email, so that the respondents can easily answer it without clicking on any “Take Survey” button.


Analyze Responses
You can see individual responses or a summary of responses by going to the “Responses” section. Here, you will see a summary of the answers through a pie chart for each question and the total number of respondents and their choices.

You can click on the “Individual” button to see the response of each individual who has answered the survey. Furthermore, you can also click on the “Create Spreadsheet” icon at the top to arrange all the responses in Google sheets.

You can also click on the three-dot menu button and click on “Download responses” to download them as a .CSV file or simply print them.

When you are done collecting the data, you can turn off the button next to “Accepting Responses”. This will make sure that when people open the form, they get notified that the form is not open to responses anymore. However, the data collected will stay here forever and you can wish to see the data any time you want.
Tip: If you find creating forms a little too much work, you will be pleased to know that you can also invite friends to edit the forms and help you create the perfect form. Just click on main menu next to the “Send” button and select “Add Collaborators” to add other people.
SEE ALSO: 10 Useful Google Docs Add-ons You Should Use
All set to create interactive forms and surveys with Google Forms
Well, that’s how you create an interactive form or survey using Google Forms. I, personally, found Google Forms to be very intuitive and perfect for both beginners and advanced users, who are looking for a free online form builder. Google Forms may not be able to offer some advanced features like data encryption, electronic signatures or ability to receive payments using the forms, but if you just want to create a quick form, it is the best solution indeed.
What do you use for creating forms? Have you tried Google Forms? Let us know in the comments section below.


