MAC address, or the Media Access Control address is a unique address assigned to the network interface of a device. On your Android smartphone, or tablet, network cards such as those for WiFi, Bluetooth, etc. will have unique MAC addresses assigned to them. These addresses are used to uniquely identify devices on a network. While the IP address is assigned by network interfaces such as routers, MAC addresses are fixed for devices, and are assigned by the manufacturer, hardcoded into the network hardware that the device is using. However, while changing the MAC address of a device isn’t possible unless you replace the network hardware itself, there are ways to fool the OS into broadcasting a different MAC address to the network.
Spoofing MAC address can help in situations like, if your friend blocked you from using their WiFi network out of spite, you can most probably get access by spoofing your MAC address. So, if you want to change the MAC address of your Android device, here is how you can do it:
Find Android MAC Address and Interface Name
Before you can change the MAC address of your Android device, you will need to figure out (and note down) the default MAC address for your device. You will also need to know the interface name for your WiFi network card. To do this, just follow the steps below:
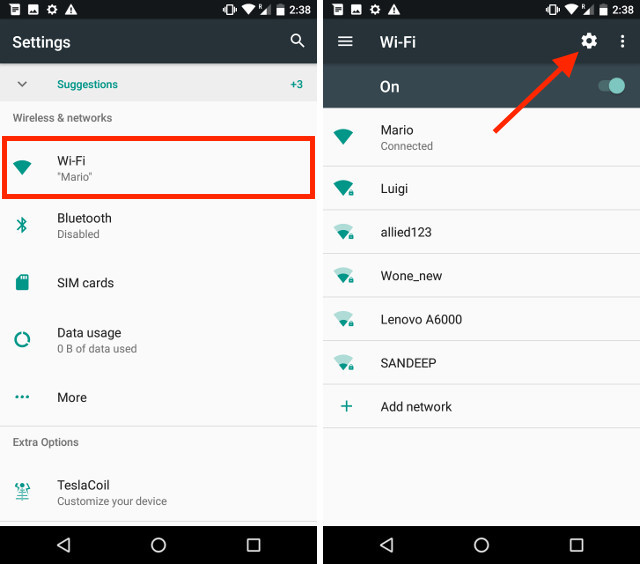
- On your Android device, go to Settings -> WiFi. Here, tap on the Settings cog icon, to open the “Configure WiFi” screen.

- On the bottom of the screen, you will be able to see the MAC address of your WiFi network card. Write it down, in case you need to revert your MAC settings back to their original state.

To find the interface name for your WiFi network, you’ll have to install the “Terminal Emulator for Android” app (free) from the Play Store. Once you’ve done that, just follow the steps mentioned below:
- Open the Terminal Emulator app, and type the following command:
ip link

- A whole lot of information will get printed out to your screen, simply scroll down to the bottom, and check the value for which the “link/ether” value matches the MAC address of your WiFi. In my case, it’s “wlan0“. For most modern devices, the WiFi interface name will be “wlan0”, but in some cases it could be something like “eth0” as well.

Change MAC address with Terminal Emulator
Now that you’ve figured out the interface name for your device, you can go ahead and change the MAC address to a new value. To get a random MAC address that you can use, just head on over to any random MAC address generator website. Once you have the new MAC address you want to use, just follow the steps below:
- Launch Terminal Emulator for Android, and type the following command:
su
This will get you superuser access on your Android device. You will require a rooted device for this.

- Next, type:
ifconfig [interface_name] hw ether [new_mac_address]
Hit enter, and your MAC address will have changed.

- You can confirm the change in your MAC address, by running the following command:
iplink show [interface_name]

Note: I tried various MAC address changing apps for non rooted devices, but either they asked for Root access (weird), or they only supported devices using MediaTek processors.
SEE ALSO: How to Change MAC Address on Windows 10 PCs
Spoof MAC Address in Android Easily
Now that you’ve successfully changed the MAC address of your Android device, you can easily connect to any networks that may have blacklisted you by your MAC address. Since the most common method of banning devices from networks uses MAC addresses to do this, so changing MAC addresses should usually allow you to connect to most networks. However, if a network is using a MAC address based “whitelist”, to only allow devices with specific MAC addresses to connect to the network, then this method will not work… that is, unless you change your MAC address to the MAC address of a device that is allowed on the network, and is not currently connected to it; the chances of which are pretty slim.
So, have you ever changed the MAC address on your Android device? How did you do it? Also, if you know of any other method to change the MAC address on an Android device, do let us know about it in the comments section below.


