Google made a slight change to the Wi-Fi toggle in the Quick Settings panel with the Android 12 stable release, and the change comes as a disappointment to power users. The change involves merging the Wi-Fi and Mobile data toggles into a single ‘Internet’ toggle for the sake of simplicity. If you are not the biggest fan of this approach, here’s how you can bring back a dedicated Wi-Fi toggle in the Quick Settings panel on Android 12.
Bring Back Wi-Fi Toggle in Quick Settings on Android 12 (Updated October 2021)
We have added all the steps and instructions you need to follow to bring back the Wi-Fi toggle in Android 12. Other than the ADB method, we have also explained an alternate method that involves using Tasker and a few add-on apps. Read till the end to learn everything about it.
What’s the Problem with Wi-Fi QS Toggle on Android 12?
If you have not tried Android 12 yet, let me quickly explain what’s wrong with the Wi-Fi toggle on Android so we are all on the same page. With the second Android 12 beta that started rolling out earlier this month, Google combined the Wi-Fi and mobile data quick settings toggles and named it “Internet”. Here’s how it looks:
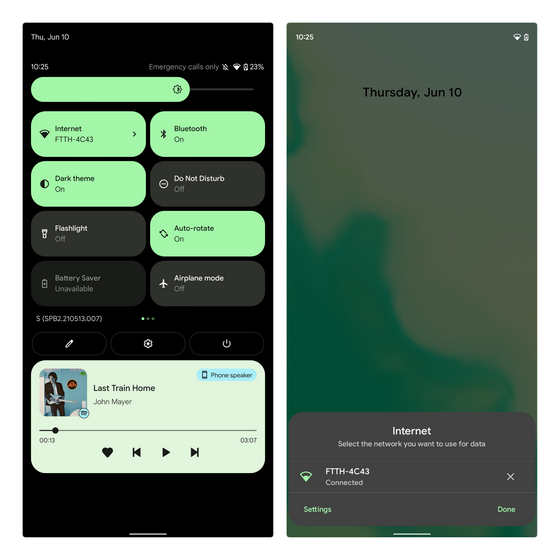
As I pointed out in our coverage of the best Android 12 features, the implementation of this Internet toggle isn’t ideal. It takes three taps and a swipe-down gesture to turn off Wi-Fi on Android 12.
To put that in perspective, you can swipe down and tap on the Wi-Fi toggle to turn off Wi-Fi on Android 11. As someone who turns off Wi-Fi before going to bed every night, I was clearly not amused by this change and was looking for workarounds. That’s when I came across a new Tasker project that fixes this issue. With all that said, let’s get started with the steps.
Method 1: Use ADB to Bring Back Wi-Fi Toggle in Android 12 (Easiest Method)
This method requires ADB to bring back the Wi-Fi toggle. As Mishaal Rahman first pointed out on Twitter, you can get back your beloved Wi-Fi and Mobile data Quick Settings toggles with a single command. If you don’t have ADB yet, read our guide on how to install ADB on Windows, macOS, Linux, or Chrome OS.
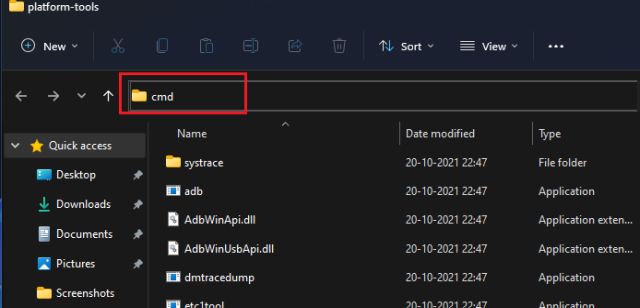
1. Open Command prompt at the root of your ADB installation. To do that, type cmd in the address bar of the File Explorer. If you have set up ADB in your system’s PATH variable to work anywhere, you can skip this step and directly open a Command prompt window.
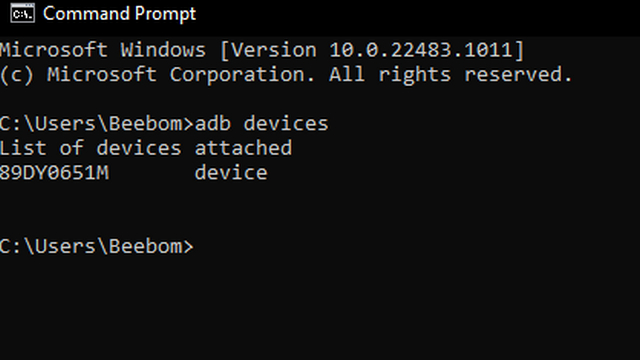
2. Connect your phone to your PC and allow the USB debugging permission from the prompt that appears. If you haven’t yet enabled USB debugging, go to Settings -> Developer options -> USB debugging on your phone to toggle it on. To make sure your device has connected successfully, run the command adb devices.
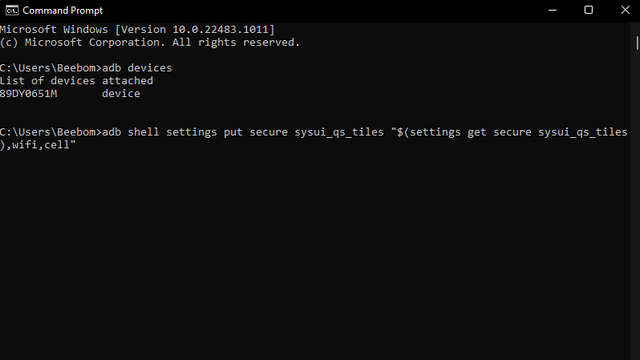
3. Now, paste the following command into Command Prompt and hit the Enter key:
adb shell settings put secure sysui_qs_tiles "$(settings get secure sysui_qs_tiles),wifi,cell"
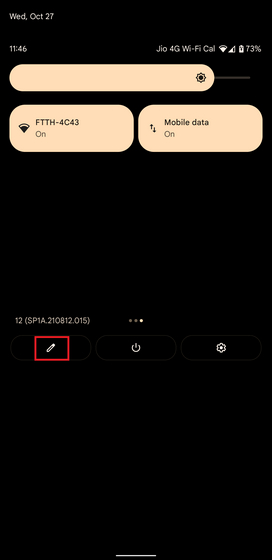
4. You will now see dedicated Wi-Fi and mobile data toggles on the last page of the Quick Settings panel. To bring them to the front, press the pencil icon at the bottom of the Quick Settings panel.
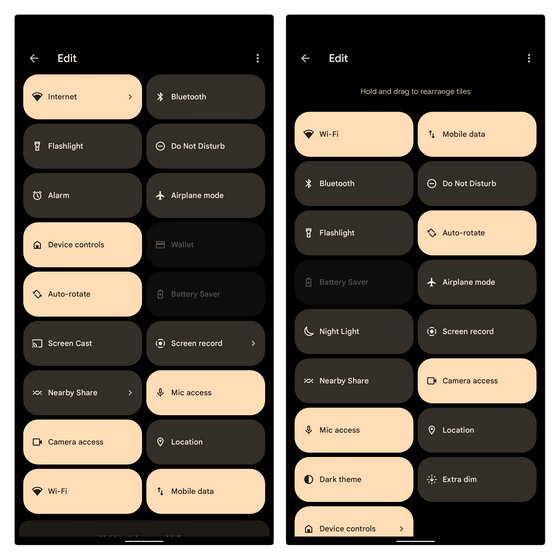
5. Press and drag Wi-Fi and Mobile data toggles to the top. To avoid redundancy, you can choose to move the “Internet” toggle to the inactive tiles area.
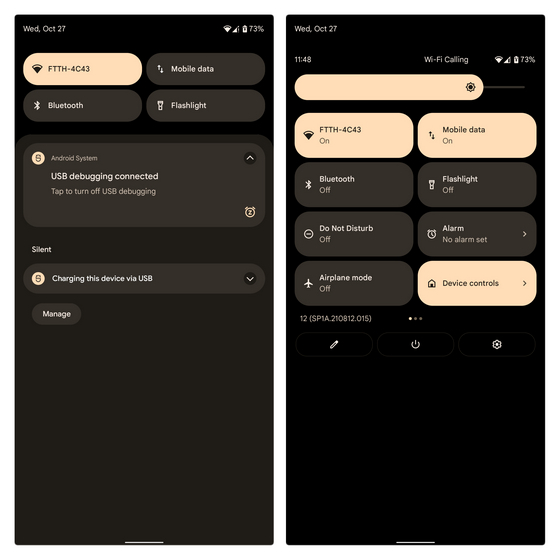
6. And there you have it. You can now enjoy dedicated toggles for Wi-Fi and Mobile data on your Android 12 phone.
Method 2: Use Tasker Project to Bring Back Wi-Fi Toggle on Android 12
Before we move to the step-by-step process, here are all the apps and files you need to download before proceeding further.
Tasker and Other Download Requirements
- Tasker
If you are a power user, chances are, you have already purchased Tasker. In case you are hearing about it for the first time, Tasker is a powerful automation app that you can use to set rules and automate tasks on your Android phone. Tasker has been around for over 10 years, and in fact, we have written multiple guides on using Tasker and using AutoTools with Tasker in the past.
Although the original developer stepped down in 2018, developer João Dias took over the project and is actively maintaining the app. You can purchase Tasker from the Play Store or opt for the free 7 days trial before making your purchase decision.
Download Tasker from Play Store ($3.49 / Rs.310) | Free Trial (7 Days)
- AutoNotification
Once you have downloaded Tasker, it’s time to download AutoNotification. We will be using AutoNotification for the new Wi-Fi toggle that’s all set to replace the Internet toggle. Unlike Tasker, you can download AutoNotification for free from the Play Store.
Download AutoNotification from Play Store (Free)
- Tasker Settings
Another app required to get this setup running is Tasker Settings. So, what exactly is Tasker Settings? Starting with Android 10, Google has stopped letting apps toggle Wi-Fi status. This is applicable to apps that target API level 29 (Android 10) and above. That’s where Tasker Settings comes in. It targets API level 21 (Android 5.0 Lollipop) as a workaround.
Long story short, install the Tasker Settings app from GitHub to let Tasker toggle Wi-Fi status. This is an important step, and the toggle won’t work unless you install Tasker Settings.
Download Tasker Settings from GitHub (Free)
How to Get Wi-Fi and Mobile Data Toggles Using Tasker
After installing all the three aforesaid apps, you are all set to resurrect the Wi-Fi toggle in the Quick Settings panel on Android 12. Here’s how to do it:
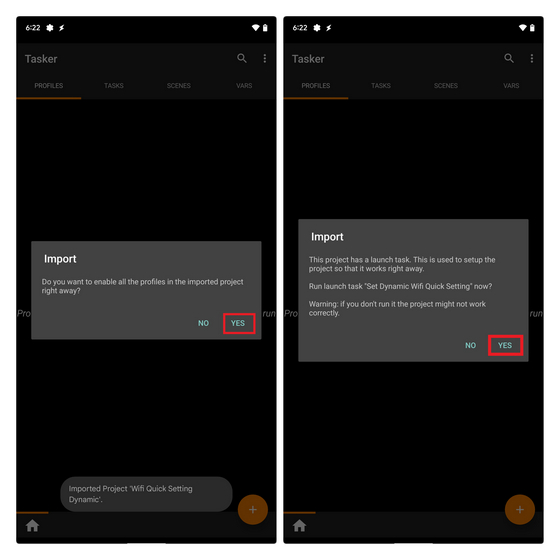
1. Visit the Tasker project from here and tap on the green “Import” button. You will now be redirected to the Tasker app. Press “Yes” to import the project.
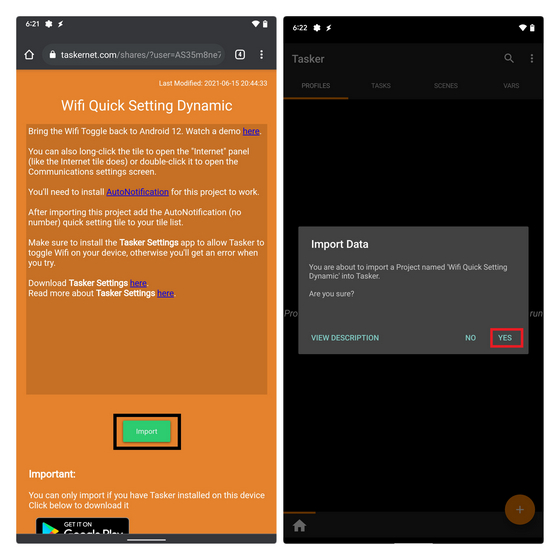
2. You will now see two pop-ups to enable the profile and run the launch task of the project. Tap on “Yes” twice to proceed further.
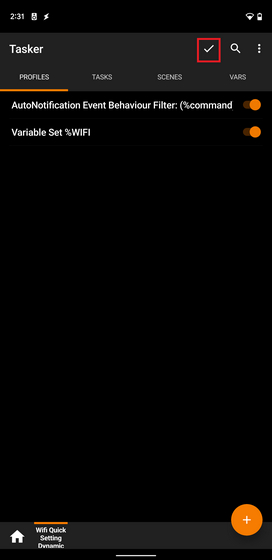
3. Once you have imported the project, tap on the checkmark at the top right corner to apply it on your Android 12 device.
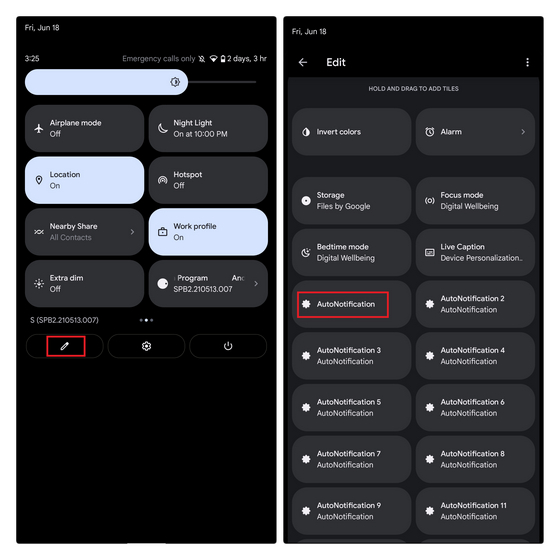
4. Now that you have set up the project, you should add a new AutoNotification toggle QS tile to your QS panel. To do that, tap on the pencil icon and hold & drag to add the tile. It is worth noting that you should add the AutoNotification toggle that doesn’t have a number. In this step, you can also choose to hide the Internet QS toggle to avoid redundancy.
5. You should now see the Wi-Fi toggle in the Android 12 Quick Settings panel. If you are not seeing it, open Tasker and re-run the project. And there you have it! You now have a Wi-Fi toggle that you can use to toggle Wi-Fi status with a single tap.
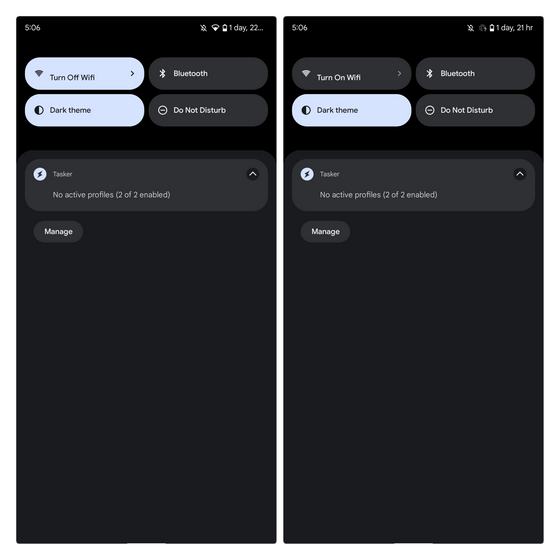
The best part of this new Wi-Fi toggle is that you can long-press it to access the Internet panel that would usually show up when you single tap on the Internet tile. Furthermore, you can double-tap on the toggle to access the Network & Internet page of the Settings app.
Fix Wi-Fi and Mobile Data Toggles on Android 12
So, that’s how you can bring back the old Wi-Fi toggle on Android 12. While the chances are slim, I hope Google officially brings back dedicated toggles for Wi-Fi and mobile data before the final Android 12 release later this year. As the old saying goes, if it ain’t broke, don’t fix it. Anyway, I’m glad this workaround exists to get the dedicated Wi-Fi toggle. If you are curious to know what else has changed with Android 12, go through our article on the best Android 12 features and know when to expect Android 12 for your phone.


