When it comes to managing storage on your Mac, understanding what exactly is eating up your disc space is the first step toward a more efficient and responsive system. However, one mysterious category that often puzzles users is “System Data,” you will be surprised to learn that this category occupies a dozen gigabytes. Now, the question arises: What is this “System Data”? More importantly, how can you manage it to reclaim your previous precious storage space and revitalize your Mac’s performance? Keep reading to learn What the System Data on Mac comprises and safe methods to manage and delete or clear System data on your Mac.
What is System Data in Mac Storage
The System Data on your Mac includes vital files necessary for the macOS to function smoothly on your Mac PC or MacBook. These system data files encompass system logs, caches, temporary files, and various essential components that the macOS relies on for the day to day operations. While these files are crucial for your Mac, they can accumulate over time and consume a significant portion of your Mac’s storage, leading to lower system performance.
Generally, macOS manages this system data automatically, and you do not need to interact with or clear these files manually, as even attempting to clear the system data without proper knowledge can lead to system instability and other critical issues.
How to View System Data on Your Mac
The macOS on your Mac PC or MacBook does not provide you with a direct and detailed view of system data for you to explore. macOS intentionally hides and manages the system data files to maintain system stability and security. However, macOS does allow you to get a general overview of your storage usage, including the system storage in the settings app. Here’s how you can get a general overview of system data on your Mac:
- Click the Apple Menu and select System Settings. Alternatively, you can open the System Settings by clicking the settings app icon in your dock.
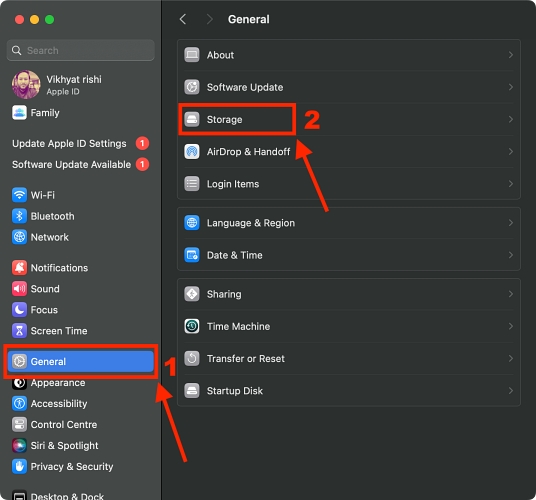
- Here, locate and click the General Settings tab at the left.
- Now, locate and click the Storage tab at the right.

Here, you can see the visual breakdown of how your Mac’s storage is being used, including but not limited to Applications, Documents, System and more. While you won’t get a granular view of your Mac’s System Data, you can get a general idea of how much space your Mac’s system files are occupying in your Mac’s storage.

How to Delete or Clear System Data on Mac
While the prospect of reclaiming storage space might be appealing, tampering with System Data is a high-stakes gamble. Deleting essential files without understanding their roles can disrupt your system’s delicate equilibrium, potentially leading to system crashes, application errors, and even data loss. macOS is finely tuned to manage these files automatically, ensuring your Mac functions optimally.
If you’re concerned about your Mac’s storage space, it’s best to focus on managing other types of data, such as applications, documents, and media files, or use built-in macOS tools to optimize your storage. This approach ensures that your Mac continues to function smoothly without risking the integrity of its system data.
Now that you know what system data on your Mac is and what effect it will have on your Mac if you temper with it, here’s what you can do to manage your Mac’s system data to free up some space:
Use Disc Utility
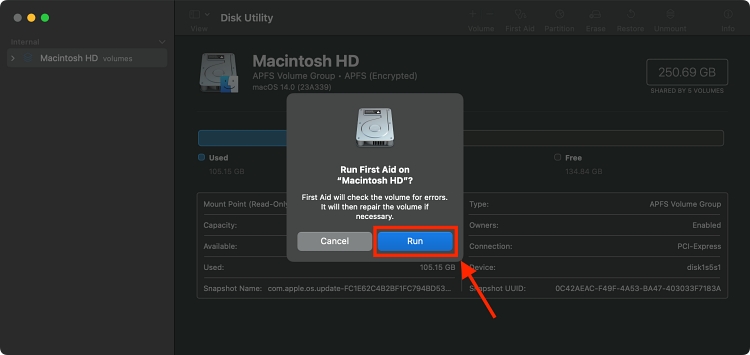
Disc Utility is a powerful tool built into your Mac that allows you to manage your disc and its associated files. Using this Mac storage manager tool, you can view and manage external drives too, which comes in handy. Now, you can run First Aid, a disc utility feature, to identify and fix any to all issues present on your disc, which might also include deletion of unnecessary system data present on your Mac. Here’s how:
- Press the Command + Spacebar keys on your Mac’s keyboard to access the Spotlight.
- Now, type Disc Utility and hit Enter.
- Here, click the First Aid button, then click Run.

Remove Old iOS Backups
The older backups of your iPhone or iPad can eat up a significant amount of storage space on your Mac, especially if you have multiple devices or large backups. Thus, removing those older and unnecessary iOS backups can certainly have a positive effect on your system data storage, as the process frees up space on your Mac’s hard drive or SSD. Here’s how you do it:
- Open the Finder app on your Mac, and click on your iPhone in the left menu pane.
- Here, locate and click the Manage Backups tab and select the backups you no longer need.
- Now, click the Delete Backup button to remover the selected backups from your Mac.
Delete Unwanted Data from Library Folder
The Library folder on your Mac contains essential files and settings for applications and the operating system. So, altering or deleting files from the Library folder should be approached cautiously, as removing the wrong files can cause applications to malfunction or your system to become unstable. However, if you’re sure about the files you want to delete and understand the potential consequences, follow these steps:
- Open a Finder app on your Mac.
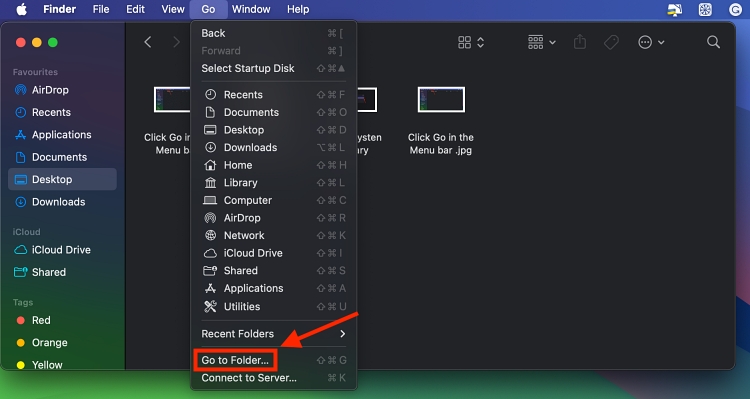
- Click the Go button in the top menu bar, then click the Go to Folder tab in the drop-down menu.

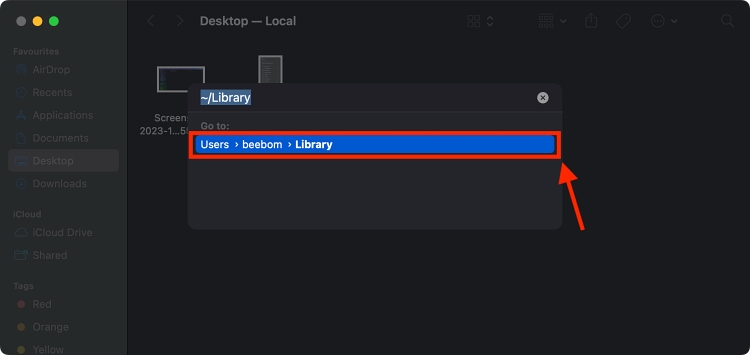
- Now, type in ~/Library and hit Enter in the dialog box that appears.

This will take you directly to your user Library folder. Be careful not to confuse this with the main Library folder located at the root level of your Mac’s hard drive, which is essential for macOS.
- Within the Library folder, navigate to the specific subfolder where you want to delete files.
- Find the files you want to delete and simply drag them to the Trash. Alternatively, you can right-click and select “Move to Trash.”
- Once you’ve moved the files to the Trash, right-click the Trash icon in your Dock and select “Empty Trash.” Confirm the action in the dialog box that appears.
iCloud Optimization
iCloud offers an “Optimize Mac Storage” feature that automatically manages your storage space. When enabled, it stores full-resolution photos and videos in iCloud and keeps only smaller, optimized versions on your Mac. Similarly, it does the same for documents and files, storing them in iCloud and downloading them on-demand when you need them. This approach saves local storage space while ensuring your files are accessible whenever needed.
Regular Software Updates
Keeping your macOS and applications up-to-date is crucial. Developers continually optimize their software, including enhanced management of system resources. When you update your software, you benefit from these improvements, leading to a more efficient use of your Mac’s storage.
Use a Reputable Third Party Cleaning Application
Bear in mind that not all types of files are deleted permanently on Mac. That means even after you have deleted an app or any obscure files, your Mac storage will continue to have some remnants. But bother not, this is where the best Mac cleaner software packages come into play.
Though there is no dearth of Mac storage cleaners in the market, not all do what they advertise. However, in my testing, I found CleanMyMac X, the best third-party app macOS storage cleaner.
CleanMyMac is a popular third-party application designed to identify and remove unnecessary files on your Mac. It scans your system for caches, logs, language files, and other data that can be safely deleted to free up space. The app provides a user-friendly interface, allowing you to review files before deletion, ensuring you don’t remove anything important accidentally.
At the time of writing, it’s $35.67 for a one-year subscription for one Mac. It’s also available to buy as a one-time purchase for $91.79 if you don’t want to get into a subscription. Plus, there’s a free version available to download if you’d like to try it before you buy.

Along with CleanMyMac X, other macOS storage cleaning tools like MyCleaner Pro, Daisy Disk, and Parallels Toolbox are among the best macOS storage cleaning software out there.
By following these tips and being mindful of your storage usage, you can ensure your Mac runs smoothly and efficiently. Regular maintenance and occasional clean-ups are essential for a clutter-free and high-performing system. Remember to back up your important data before significantly changing your storage settings. Keep your Mac optimized, and you’ll enjoy a faster and more responsive computing experience.


