While Apple Mail has got the bases covered to be a reliable email app, it lacks many pro features. One of the important features that it lacks is “Scheduling”. Considering how essential this feature is, I have been waiting for its inclusion for a long time. And I guess I’m not alone who is asking for it. Thankfully, there is a workaround to schedule emails in the Apple Mail app on Mac. In this hands-on guide, I’m going to show how you can schedule an email in the Mac Mail app.
Schedule Emails in Apple Mail with Automator on macOS
First and foremost, let’s get to know how this workaround works! Well, we are going to first create an Automator application. And then, set it up to send the composed email at the specific date and time using the Calendar app.
Yes, it involves a bit of workaround. However, once you have perfectly set the application, it works reliably. What’s more, you can also reuse the Automator application to schedule emails, which saves you from going through the entire process again.
Set Up Email with Automator on macOS
- Launch the Automator app on your Mac. (Simply, search Automator in the Spotlight Search and open it).

2. Now, click on New Document and choose Application.

3. Next, ensure that the Actions option is selected in the left-hand sidebar. After that, choose Mail under the Library option.

4. Next up, select New Mail Message and then drag it to the workflow space. After that, write the message in the New Mail Message box. Be sure to enter the email address of the recipient and subject. Then, choose an account, if required.

Do note that you can repeat the same steps to add more messages which you want to schedule for the same time.
5. Select Send Outgoing Messages from the list and then drag it to the workflow window located under the New Mail Message box.

Then, click on File and choose Save. Make sure to give a suitable name to your application. Then, select the preferred destination and click on Save.

Schedule the Email with Calendar on macOS
Once you have created the application, you can schedule the email using the Calendar app.
- To get started, launch the Calendar app on your Mac. Then, navigate to the date when you want to send the composed email.

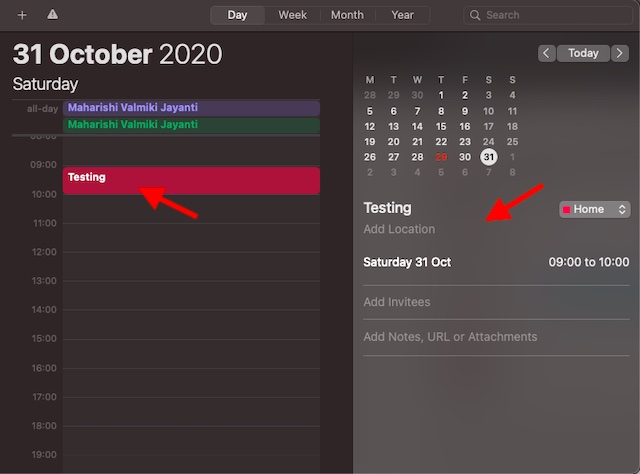
2. After that, create an event on that date and choose the preferred time. Depending on your needs, you can also add invites, notes, URLs, and even attachments.

3. Now, click on the time.

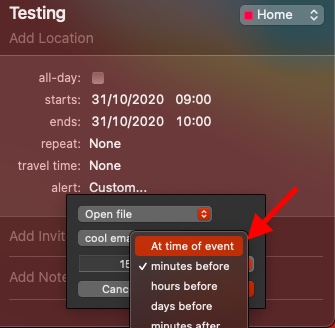
4. Next, choose Custom located under Alert drop-down.

5. In the drop-down box, select Open File.

6. Now, choose the application you have just created. Click on Other and then head over to the location where the file has been saved and then select the application.

7. Be sure to select At Time of Event for the alert timing.

8. Finally, click on OK to finish.

That’s pretty much it! The scheduled email will be sent at the stipulated date and time. Do note that the app may ask for your confirmation for the first time it runs. So, make sure to allow it.
Note:
- As mentioned above, you can reuse the application to schedule emails a bit faster. To do so, launch Automator -> open the existing document. After that, find the application and click on Open. Now, make the necessary changes in the New Mail Message box.
- Once you have made changes, click on File and choose the save option. Then, add an event to your calendar.
Best Apple Mail Alternatives for Mac
If you don’t want to go through this rigamarole, you will be better off using a third-party email client for Mac, to take control of your emails. If you want to have a fast and highly efficient email client with a number of helpful features like scheduling, batch archiving and pinning, I suggest you go with Spark Mail (free).
If your need warrants a feature-rich email client with features like read receipts, send later, and more, you should try out Newton Mail ($49.99/year). Just in case you wish to have a simple, reliable, and highly productive email client, look no further than Gmail.
If you want to see the features, pros, and cons of the apps mentioned above along with other top notch Apple Mail alternatives, click on the link to read the article.
Take Advantage of the Trick to Schedule Emails in Apple Mac Mail App
So, that’s the way you can schedule an email in the Mail app on macOS. Though the workaround seems a bit tedious, it works as expected. Notably, the process becomes a little easy-going once you have set it up thanks to the reuse feature.
Just in case you find the process inconvenient or wish to make the process of scheduling straightforward, try out the above-mentioned third-party email clients as they are fully equipped to let you manage emails with ease. Have any feedback? Be sure to share it in the comments section below.


