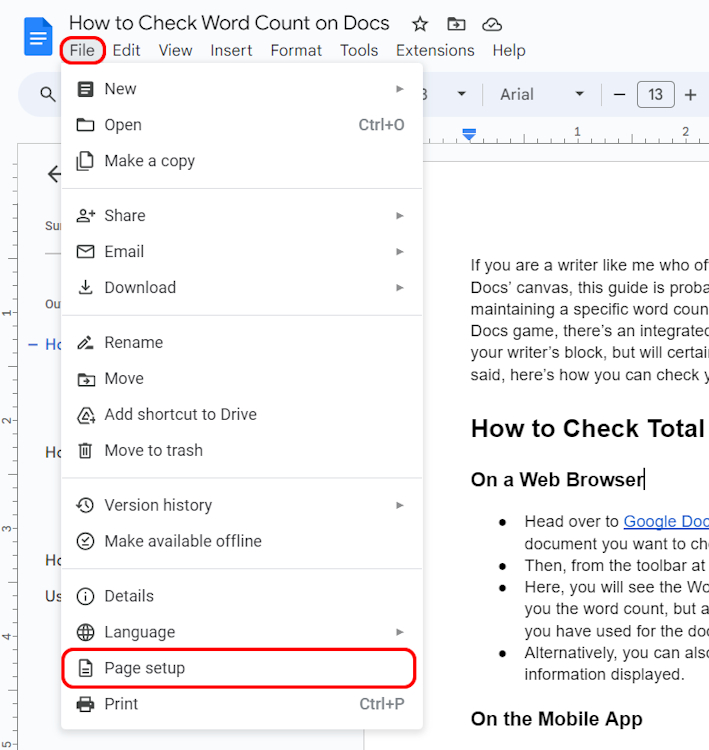
- Users on a web browser can change the margins in Google Docs easily by going to File > Page setup.
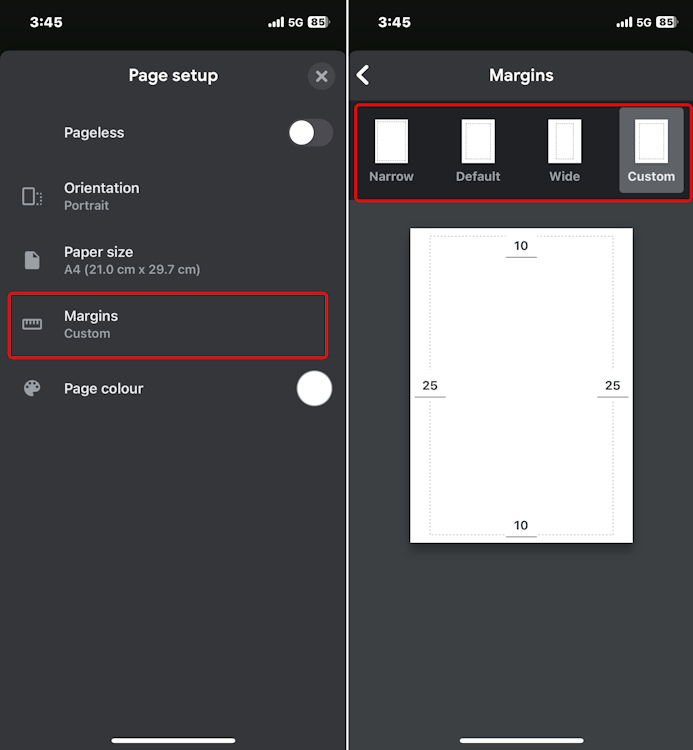
- iPhone users can go to Google Docs app > open a document > Edit icon > 3-dots icon > Page setup > Margins.
- Google Docs app on Android doesn't currently offer the ability to change margins inside documents.
When you type anything out on Google Docs, you will notice these white spaces surrounding your document from every side. This is the ‘margin’ of your document, and you can modify this as well on Google Docs. Sometimes, dissertation and assignment guidelines can specify the margin spacing as well. You can also experiment with customized margin spacings to make your document tidier. If you are unaware, here’s how to change these margins in Google Docs.
How to Change Margins on Google Docs Website
It’s worth noting that the web version of Google Docs has a lot more to offer. The Android version lacks the ability to change margins, whereas the same is preset in the iOS app but is limited.
Method 1: Change Margins Using the Ruler Tool
Google Docs comes with a Ruler feature, which you can enable to change the default margin settings. Here’s how to enable and change margins on Google Docs using the Ruler:
- In the Google Docs toolbar, click on the View tab and select Show ruler.

- You’ll see a horizontal ruler at the top of your document and two small blue down-facing arrows on each side.
- Select the portion of your document you want to adjust the margins for, or select the entire document using the Ctrl+A keyboard shortcut.
- Drag the blue arrow icons left or right to adjust the margins accordingly.

- Spot the vertical ruler to the left side of your document. Drag it up or down to adjust the height of your document.
Method 2: Change Margins Using Page Setup Tool
Another easy way to change the margin in Google Docs is by using the Page Setup option. Here’s how to do it:
- Click on the File tab from the top toolbar and select Page setup from the available options.

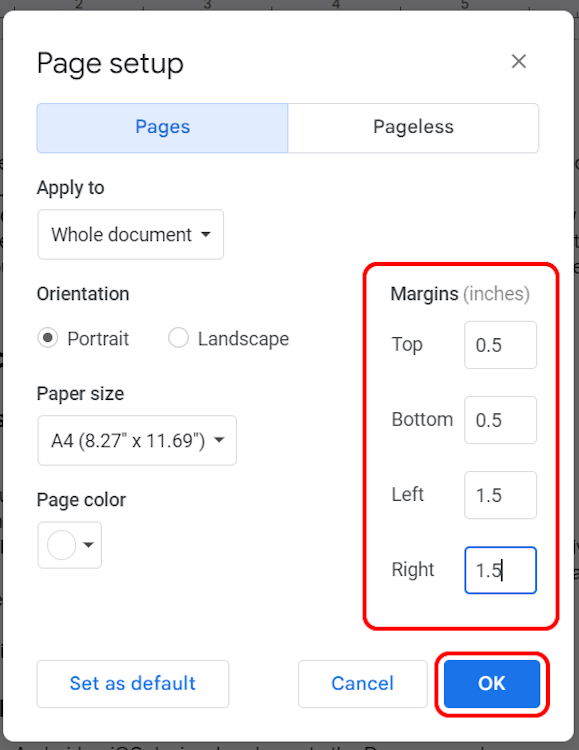
- A “Page setup” pop-up window will appear. Enter the values. For example, I went ahead with 0.5 inches for the top and bottom margins. Meanwhile, chose 1.5 for the side margins.
- You can also choose the paper size, change the document’s orientation, set the page color, etc. Modify these settings as per your preferences and hit OK.

While the ruler is an easy way to go about it, we’d suggest using the page setup as it offers more control.
You can also mess around with different values to see how your document aligns with the canvas. Or, if you already have been given specific margin values, page type, and more, page setup makes the process faster.
How to Change Margins on Google Docs App (Android and iPhone)
When it comes to the dedicated mobile app for Google Docs, things are a bit different. Not just interface-wise, but platform-wise too. While the Google Docs iOS app lets you change margins, the Android app doesn’t. However, you can’t use the ruler on iOS and will have to use Page setup to make the changes. Here’s how:
- Open a document on the iPhone app and double-tap the text to enter edit mode. You can also tap on the edit icon at the bottom left.
- Tap on the 3-dots icon at the top right and select Page setup.
- Now, tap on Margins in the Page setup page.

- Next, you can choose from the Narrow, Default, or Wide templates.

- Or, select Custom and specify the margin values by tapping on the numbers shown on each side and altering them.
- Once done, tap on Apply at the top right.
With that, you know how to go about changing margins on Google Docs through both a web browser and a mobile app. However, I’d highly recommend using the web browser, as it is a lot more convenient. Well, at least for me, it helps me accurately edit a document without my big fingers causing a typing mishap.
Well, I certainly do hope that the guide comes in handy for you. Do let me know in the comments down below if you have any related queries!


