- To add a regular heading in the web version of Docs, select the text > select Normal text from the toolbar > choose heading.
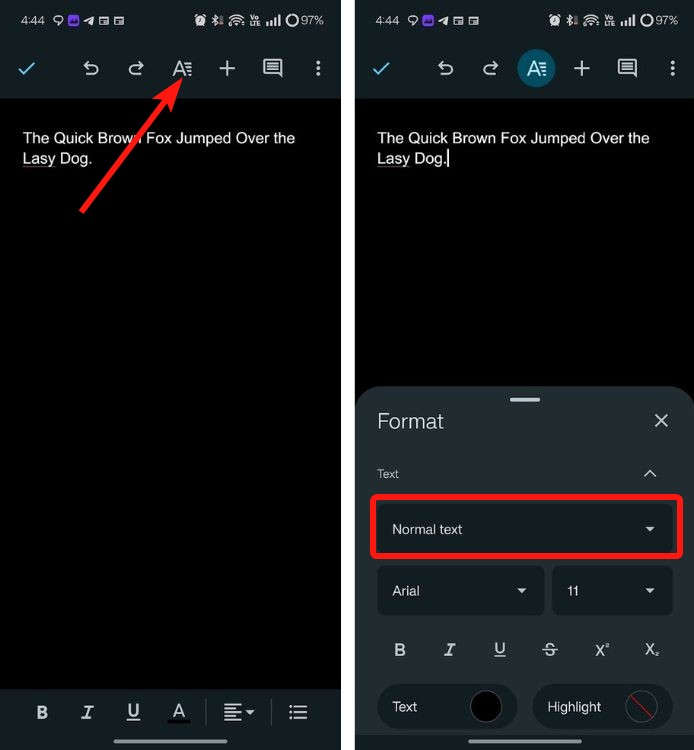
- On the mobile app, select the text > A icon > Normal text > select the desired heading.
- To add collapsible headings, use the web version to get into pageless mode and all headings will become expandable.
If you’re new to the Google Docs experience, there is a slight learning curve even for the smallest of things like making headings and collapsible headings. Knowing how to add different kinds of headings could make your document reader-friendly and can elevate its aesthetics to a great extent. Therefore, here’s how to add headings and collapsible headings in Google Docs.
How to Add Headings in Google Docs
When it comes to regular headings, you can easily add them in Google Docs on both the web and mobile versions.
Method 1: Using the Google Docs App on Android and iPhone
The process of adding heading is very similar on both the Android and iPhone app versions of Google Docs.
- Launch the Google Docs app and open a document.
- Select the text you want to convert into a heading.
- Once selected, tap on the A icon in the top panel to open the formatting options.

- Click Normal text and select a Heading size.
- Once done, exit the formatting menu by tapping on the X icon.
Method 2: Add Headings on Google Docs Website
Adding headings is easier when using the Docs website on a desktop. Here’s how:
- Head over to Google Docs (website) on your PC’s web browser.
- Click and drag your mouse to select the sentence you want to turn into a header.
- Once selected, click on the Normal text dropdown from the top toolbar
- Hover your cursor over any heading from the drop-down menu and click on Apply Heading.
- Alternatively, you can also use the Ctrl + Alt + 1/2/3 keyboard shortcuts for H1, H2, or H3 respectively.
How to Add Collapsible Headings in Google Docs
While adding those standard headings certainly makes your document read better, longer documents may still look messy. Well, enter Collapsible Headings. As the name suggests, a collapsible heading allows you to hide the content under the heading so that the documents look neat.
While you can easily add collapsible headings on Google Docs web, you can’t add them in the Google Docs app on Android and iPhone. With that said, let’s take a look at the steps:
- In Google Docs, open a document and click on the Format tab from the top toolbar.
- Then, click on Switch to Pageless format.
- Every heading in your document should become collapsible, alongside any new ones that you add.
- A small arrow will appear beside every heading in the document. Clicking on it expands the heading to reveal the text.
And, that’s it. You can easily create as many collapsible headings as you want this way.
That brings us to the end of this guide. With Gemini and tons of new features, Google Docs is easily one of the best Microsoft Office alternatives for Windows, Chromebooks, and Android. Check out our interlinked guide to know how. Meanwhile, if you have any further queries, do drop them in the comments down below!