- Google offers a dedicated tool called Takeout to let you download all or some of your data from the Google apps and services you use.
- To use this, go to the Google Takeout web page -> choose services to download data from -> select file formats -> choose destination and frequency of export -> download selected data.
- You can use Takeout to export data from apps like Drive, Contacts, Calendar, Photos, Fit, Keep, YouTube, or from your Android device.
Let’s admit it, we have to rely on Google and its services way more than we may want to in our day-to-day lives. The good thing is that all that we do with our Google account is backed up to the cloud, making it easily restorable. Hence, there’s no need to worry about losing your data at any point. You can also download your data for additional measure or before deleting an account, and that’s where Google Takeout comes in.
Google Takeout allows you to download all of your Google account data in case you want to delete an associated Google service or wipe out your account altogether. In that case, knowing how to download your Google data using takeout becomes necessary. So, we’ve got you covered on that front, and here’s a guide to help you go seamlessly about it.
Download Google Data Using Takeout on PC
The process in itself, although straightforward, has multiple layers to it. So, it may get confusing to see so many settings and options on your screen. To simplify the process, we have divided it into stages. With that being said, allow me to take you through it:
Select Your Google Data Options
- Head to the Google Takeout web page, sign in using the Google account credentials you want to download the Google data for, and complete the two-step verification (if you have any) process.
- This will land you straight on the main Google Takeout page. Here, the first thing you need to do is click on Deselect all under the “Select data to include” panel. This will deselect all the selected services and allow you to target download your Google data as most of this may be irrelevant to you.
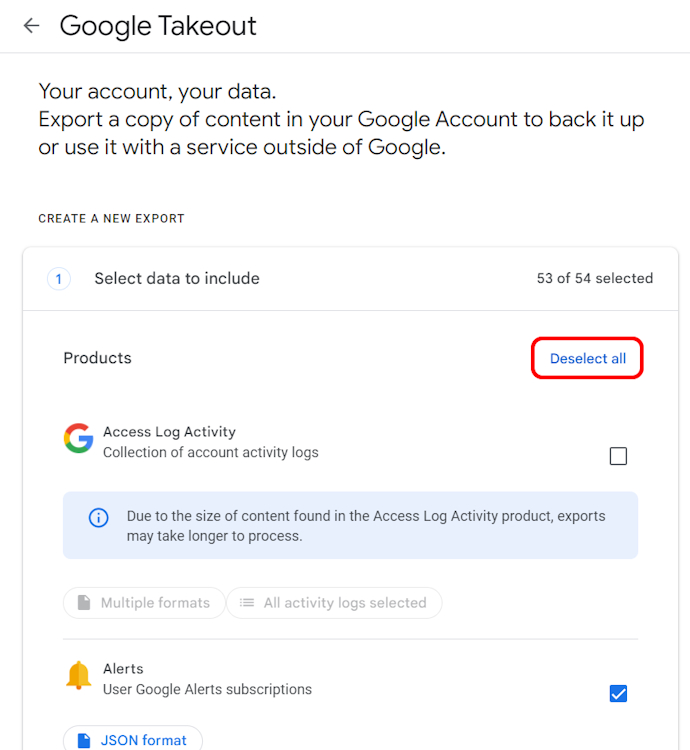
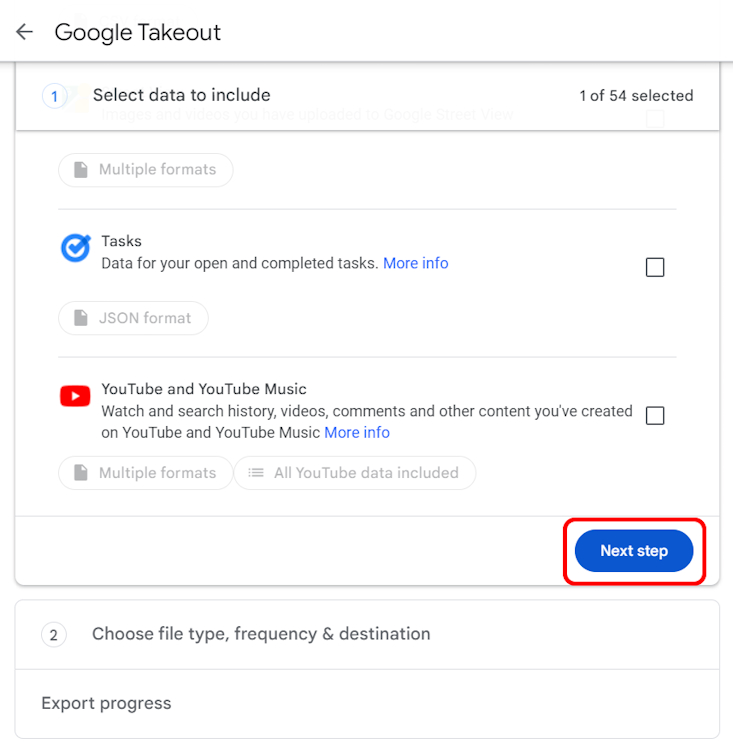
- Next, scroll through this page to see the full list of Google services you want to download the data from. Here, click the checkboxes to select the services whose data you wish to download. To make things simpler for you, in this case, we are going with only downloading our Google Drive data.
- Then, as soon as you click on the checkbox and select Google Drive, three other settings underneath it will become available.

Specify Your Google Data’s File Format
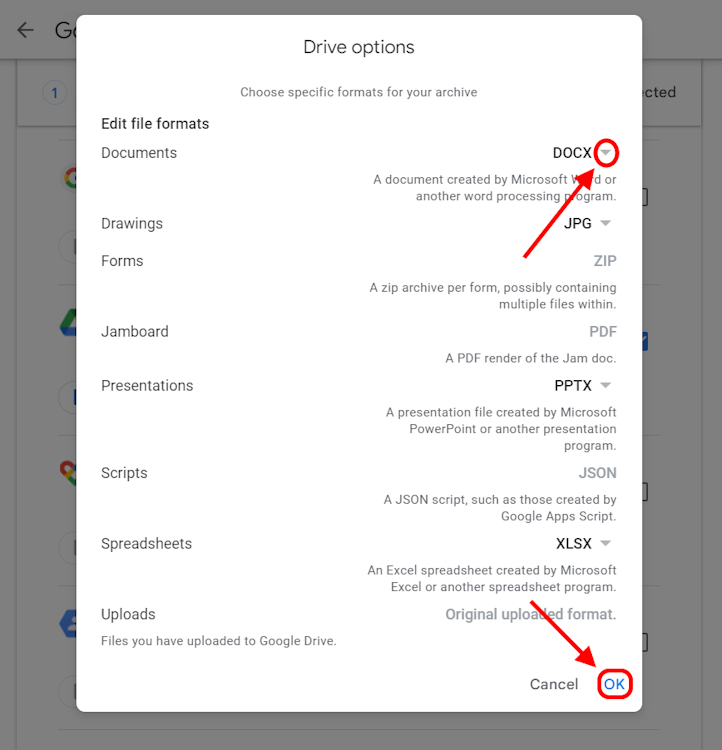
- Clicking on the Multiple formats option will summon a pop-up window that allows you to select which format you want specific types of files in your Google Drive to be downloaded in.
- Click on the drop-down menu adjacent to these file types to select the desired file format.
- Once done with the selection, hit the OK button on the pop-up window.
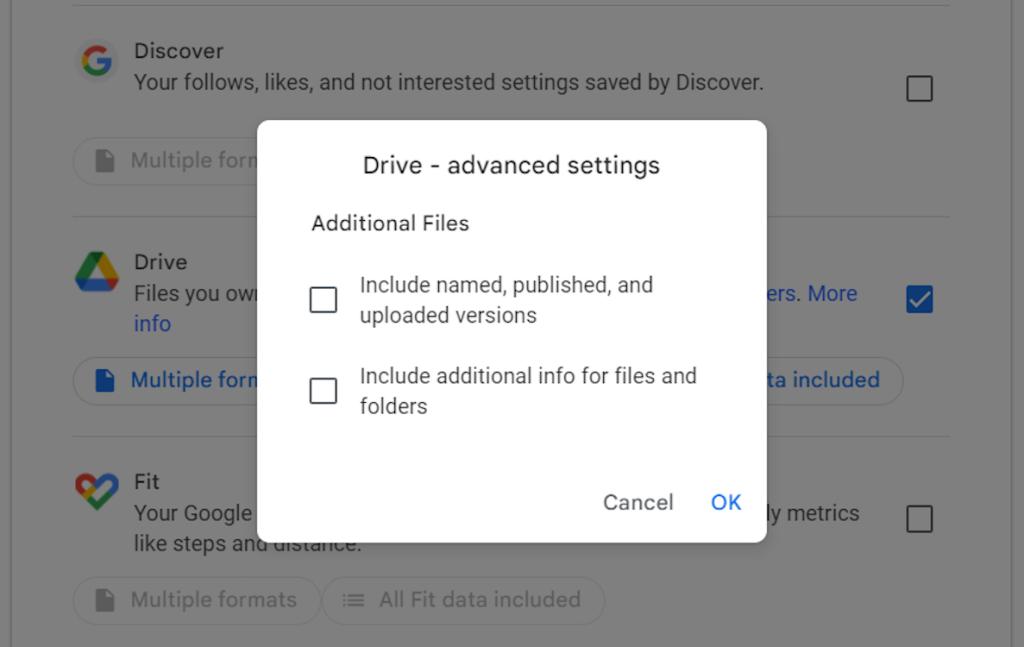
- Next comes the Advanced Settings, which is not as important, and you can check these options if you want to and click on OK.
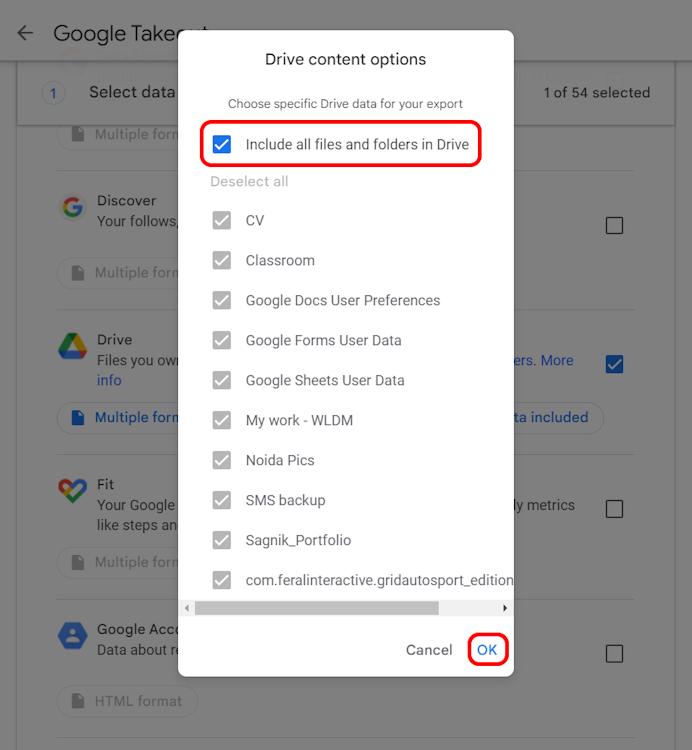
- Finally, you will see the All Drive data included option. Clicking on this lets you select specific Drive data that you want to download. If there’s anything you want to omit from it, uncheck the Include all files and folders in Drive checkbox and manually check the data you want to download from the options underneath. Once done, click on OK.
- Once you’re done specifying the data you want to download, scroll down to the bottom of the page and click on Next step.
Choose Your Google Data’s Destination, Frequency, and File Type
- This will take you to the next panel, where you can Choose file type, frequency & destination.
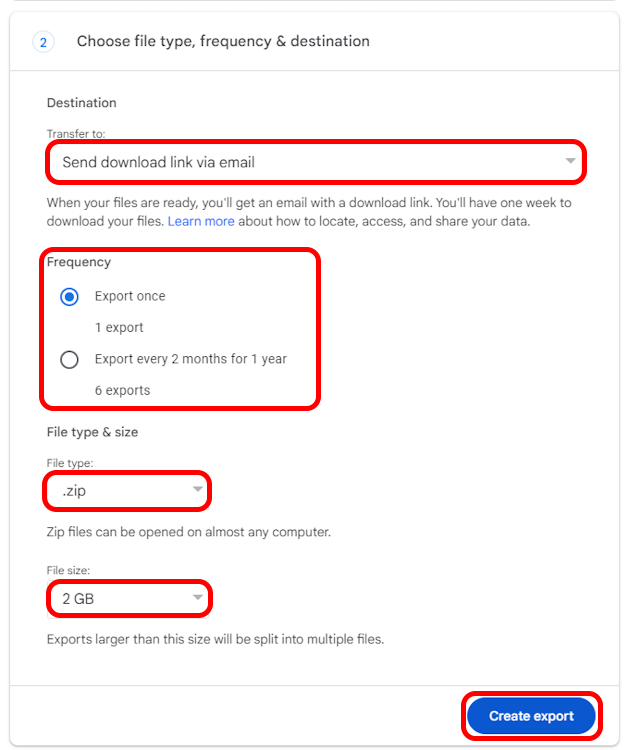
- Firstly, you will have to specify the Destination of your Google data download. To do so, tap on the Transfer to drop-down menu and choose from the available selections. We recommend going with the Send download link via email option as it lets you directly download files through a link without cramming up your Drive further. Moreover, since we are dealing with possibly GBs worth of files, it’s the best way to go.
- Then, you will need to specify the Frequency of download. You can choose Export once to receive your files for download right now or select Export every 2 months for 1 year to receive 6 exports, once every 2 months for the next year. We recommend making a manual export once every 6-8 months.
- Once that is done, you can move on to selecting the File type & size. Click on the File type drop-down menu and select your desired file type. Here, if you want to download your Google data to a Windows system, go with the .zip format. Select the .tgz type if you have a Linux system instead.
- Moving on, you can specify the File size from the drop-down menu. You can choose up to 50GB of file size, depending on the level of compression you want for your data. However, do note that files over 2GB will be compressed in the zip64 format. Older systems will not be able to open this. So, if you are on Windows 10 or 11, you are good.
- Anyway, once you are done specifying the File size, hit the Create export button.
Manage and Download Your Google Data
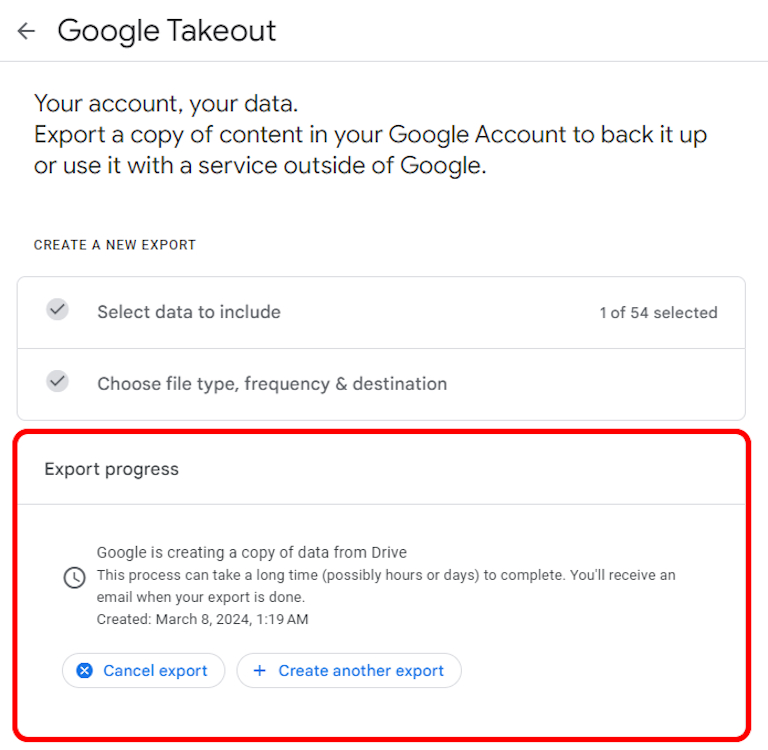
- You will then see the Export progress panel which warns you that the “process can take a long time (possibly hours or days) to complete.”
- You can check your inbox for a mail similar to this:

- In the mail, you will get to see dedicated buttons to Manage exports or Download your files.
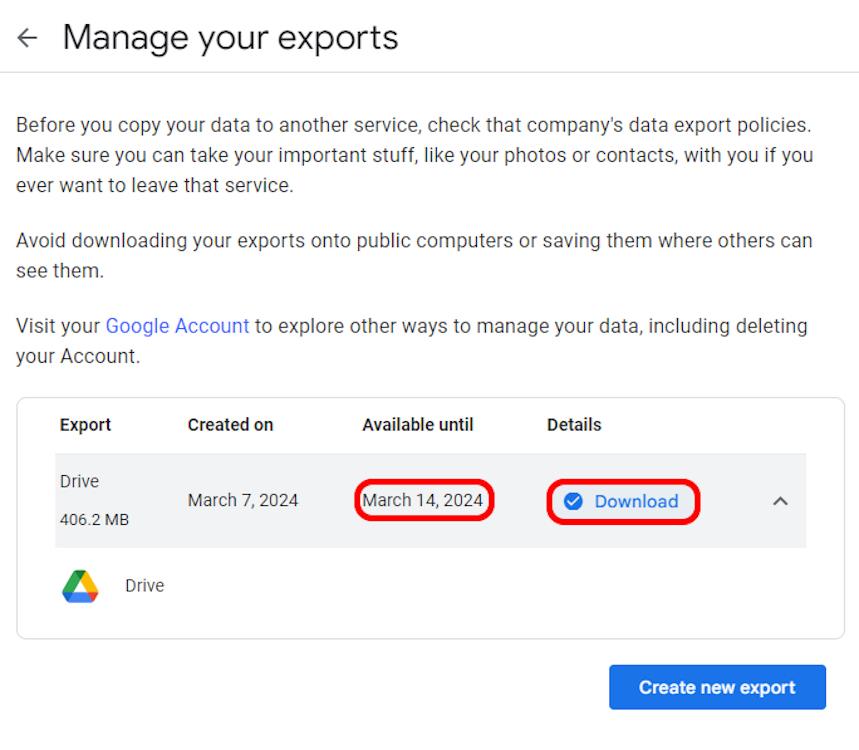
- When you click on the former option, you will be redirected to a page that shows you the file size, and timeframe till when the download link will be available. Post that timeframe, you will have to create another export since this will be rendered useless. So, do keep that in mind. Meanwhile, the latter option will directly and instantly download the files to your computer.
Download Google Data Using Takeout on Phone
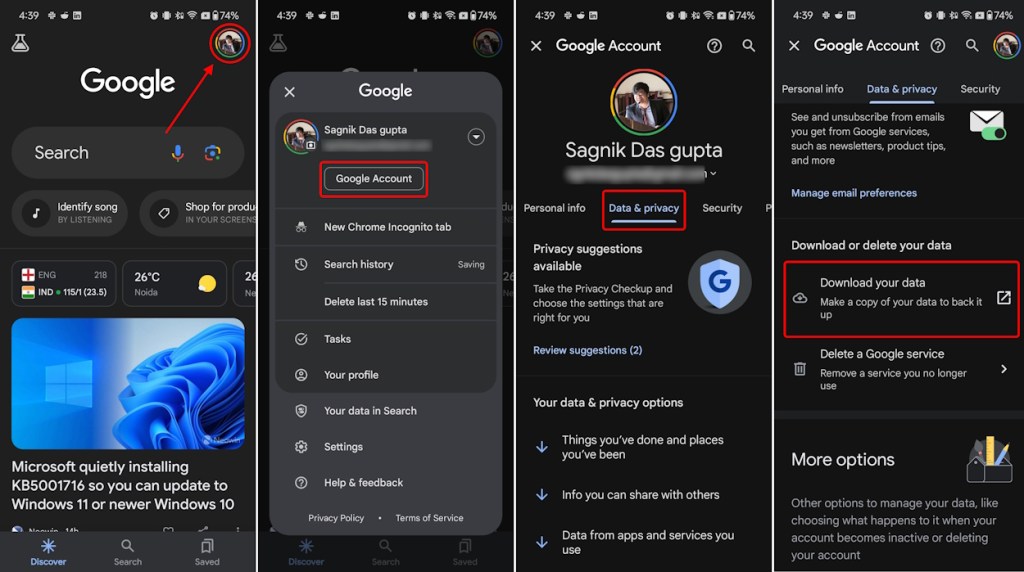
- Open the Google app on your Android or iOS device.
- Then, tap on your profile icon at the top right corner and select Google Account (on Android) or Manage your Google Account (on iOS) underneath the Gmail address currently in use.
- Swipe leftwards until you reach the Data & privacy panel, scroll downwards, and tap on Download your data.
- Next, you will be redirected to the Google Takeout page via your default browser where you follow the same steps as you did on your PC.
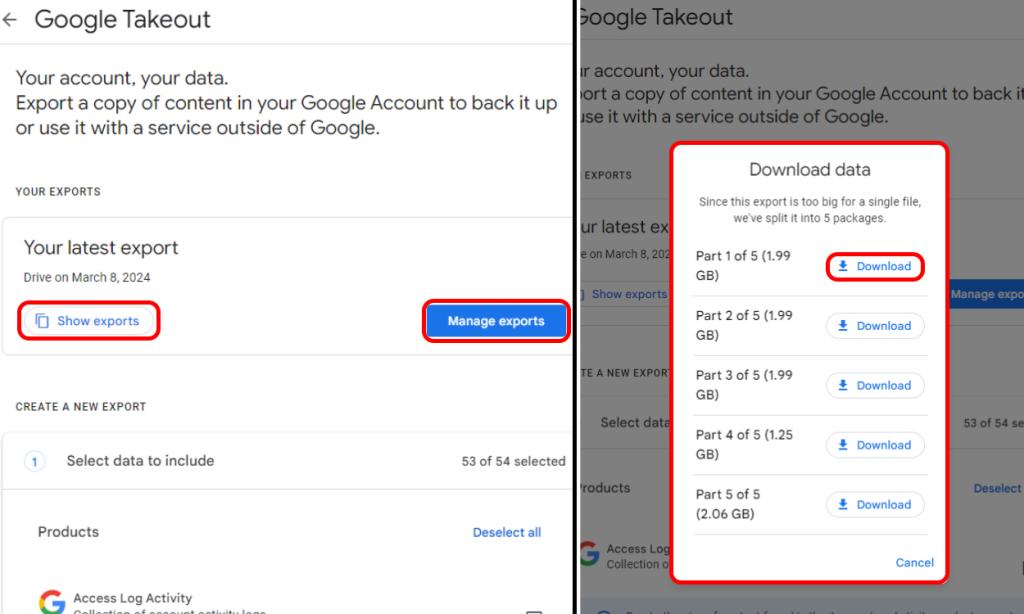
- Once you export your data from Google Takeout and get it ready for download from either your PC or mobile device, the next time you head to the Takeout page, you will see your latest export at the top.
- Right underneath it, there will be dedicated buttons to Show exports and Manage exports. Selecting the first option will show a list of all your exports and their sizes with a download button adjacent to them. The second option takes you to the Export Manage page.
What Data Can You Download from Google Takeout?
From the Google Takeout page itself, you can see the complete list of all the Google Services’ data you can download. However, that’s a long list, and here’s a handpicked rundown of the most vital services you can download the data from:
- Your Google Chrome Data like history, bookmarks, extensions, device information, OS settings, etc.
- Data from your Android device, like its software versions, user settings, performance, and account identifiers.
- Google Calendar data.
- Google Classroom data like posts, submissions, etc.
- Contacts and the associated images that are saved on Google Contacts.
- All likes and other settings like Not interested in this or Not interested in a topic settings.
- Files and folders that are saved on Google Drive.
- Google One membership data.
- Sleep and activity data on Google Fit like your steps, workouts, etc.
- Your photos and videos that are stored and backed up to Google Photos.
- Google News data like the sources of information you are interested in.
- YouTube and YouTube Music data, including playlists, Watch and Search History, comments, and videos you have made on the platforms.
- All your Google Voice data like call history, messages, voicemails, and more.
- Your Google Keep notes and attachments on it to date.
- Google Play Store data like which apps you have installed, app ratings you have dropped, and more.
- Google Pay data like your transaction history, and every other payment made or service subscribed to using the service.
- Google Play Movies & TV data like watchlist, preferences, etc.
- Google Play Games data like achievements and scores.
- Google Play Books data like purchased books, uploaded titles, and more.
- All records of your Google Developers profile.
- Blogger posts, comments, settings, and your complete profile.
That brings us to the end of this guide and we hope it made the process of downloading your Google data using Takeout simpler. That being said, creating Google Takeout exports from time to time is a good practice and we definitely recommend getting a physical copy of your data rather than trusting the cloud completely. You never know what can go wrong, and it’s always good to be on the safe side of things. If you run into any issues, do drop a comment and we will get back to you!

 Ishan Adhikary


