- To deactivate Facebook Messenger, go to the Messenger app > hamburger menu > cogwheel icon > Accounts Center > Personal details > Account ownership and control > Deactivation or deletion.
- If you don't want unwanted attention on Messenger, then you can hide your active status on the app instead.
- You can also use features like Screen Time on iOS or Digital Wellbeing on Android to limit your Facebook Messenger usage.
Messenger used to be a popular way to communicate with your Facebook friends back when the platform was at its peak. Nowadays, I rarely use the app as most of my friends and family have moved on to other messaging apps like WhatsApp and Telegram. I bet many others are in the same boat as me and don’t feel compelled to continue using Messenger. So, if you wish to deactivate your Facebook Messenger account, then follow the guide below.
Steps to Deactivate Facebook Messenger
Since Messenger is an extension of Facebook, therefore you can’t get rid of it without deactivating your main Facebook account first. However, credit where credit is due – Facebook has streamlined the process, making it easy to deactivate accounts for both services at once.
The steps to deactivate Facebook Messenger is the same on iPhone and Android, so let us go over them.
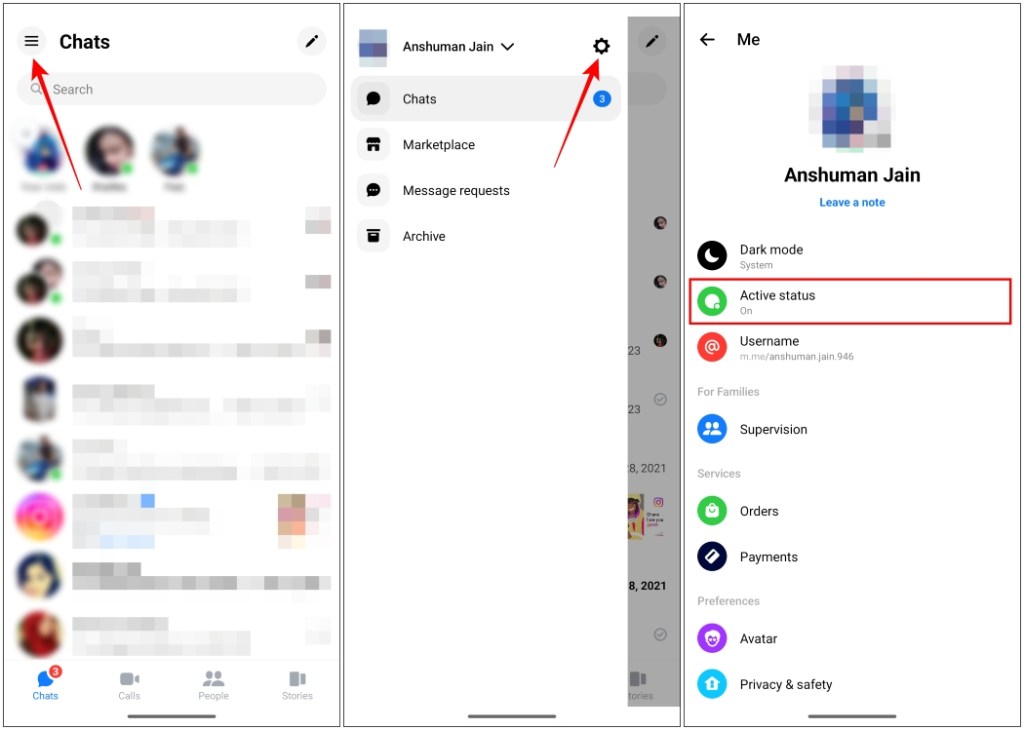
- Open Messenger and tap on the hamburger menu at the top left.
- Tap on the cogwheel icon next to your profile name.
- Scroll down to the bottom and tap on Accounts Center.

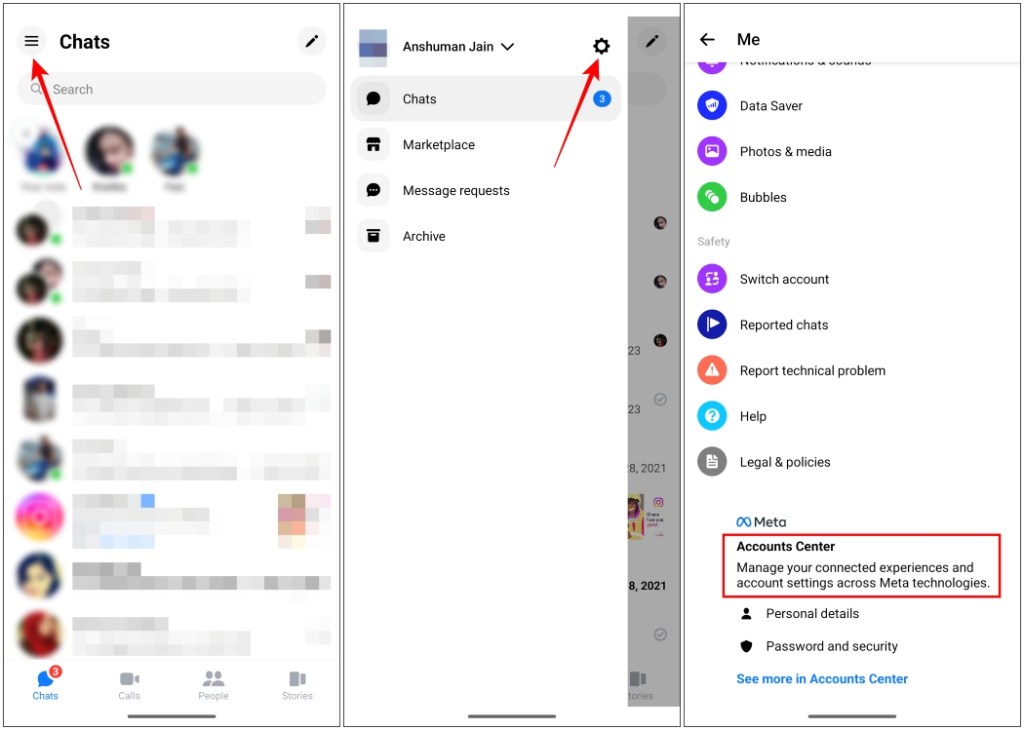
- Here, tap on Personal details under Account settings.
- Then, go to Account ownership and control.
- Select Deactivation or deletion.
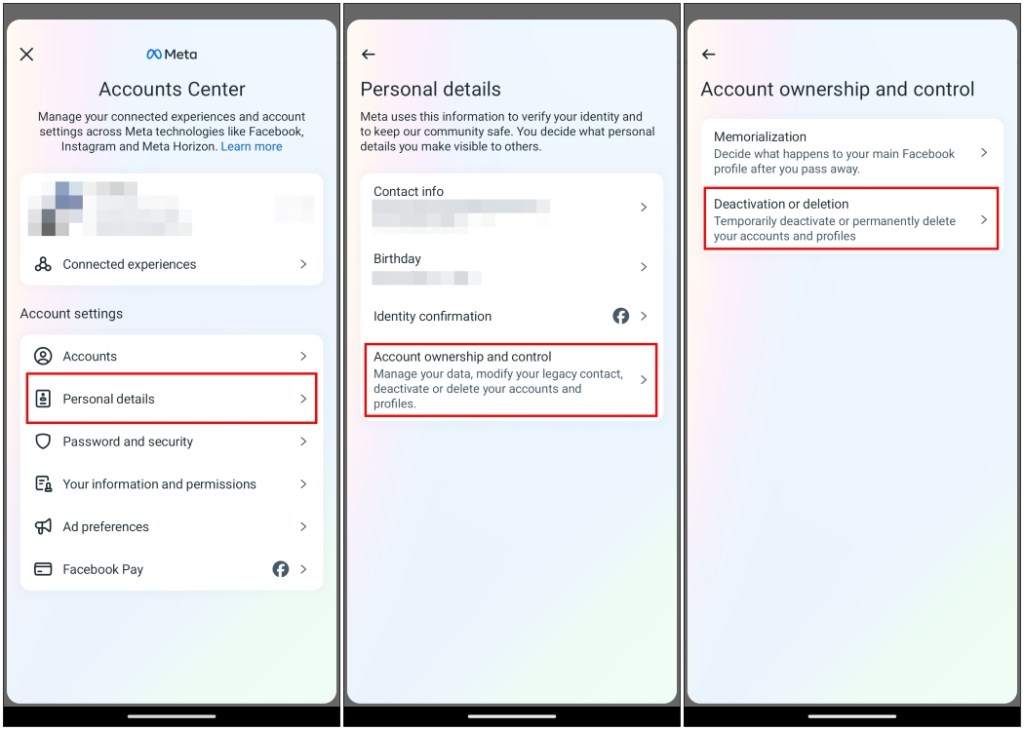
- Choose the Facebook account that you want to deactivate.
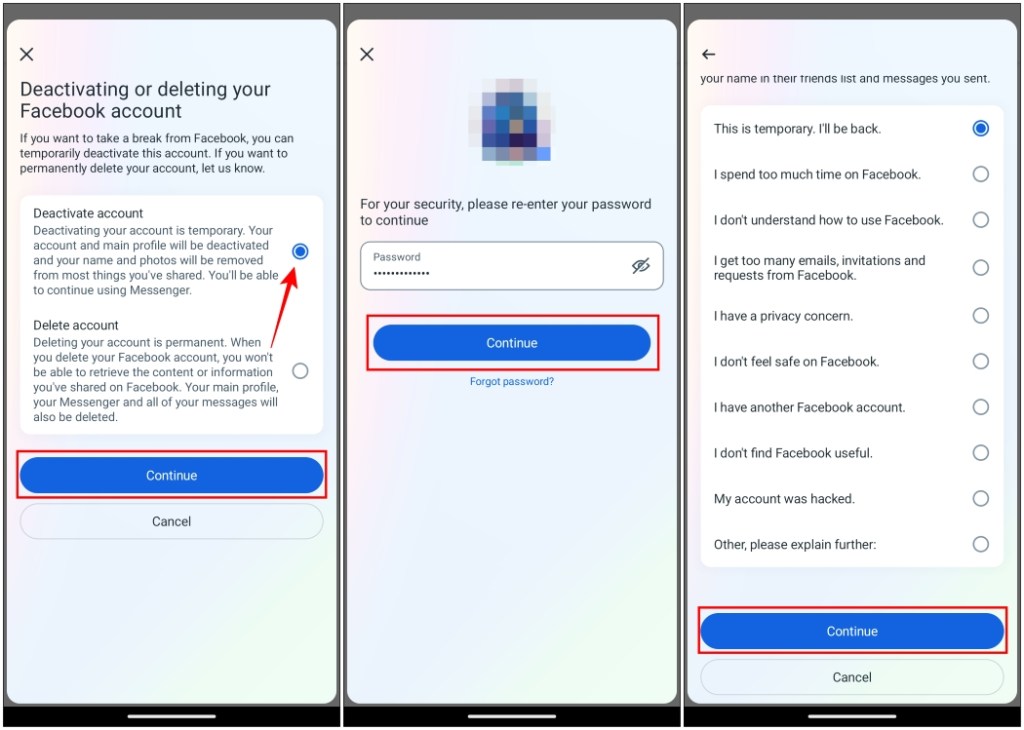
- Pick Deactivate account and tap on Continue.
- Enter your account password and press Continue again.
- Choose the reason for deactivating your account and press Continue.
- On the last page, make sure the Continue using Messenger option is unchecked.
- Then, tap the Deactivate my account button.

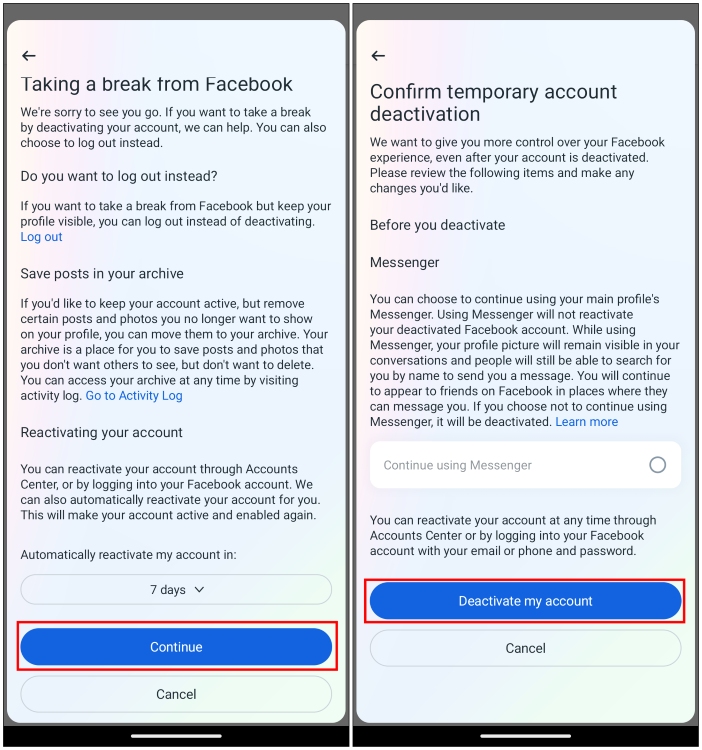
Now you will be logged out of both Facebook Messenger and the Facebook app. Your account will be deactivated until you log in again. Other users will be unable to discover or message you on the app, but your account data will remain intact.
How to Hide Active Status on Facebook Messenger
In case you don’t wish to deactivate your account but just want some peace of mind from friends on Messenger who keep pinging you whenever you go online then you should disable your active status. This won’t let other users know that you are online, so you can avoid unwanted attention.
Follow the steps below to hide your active status.
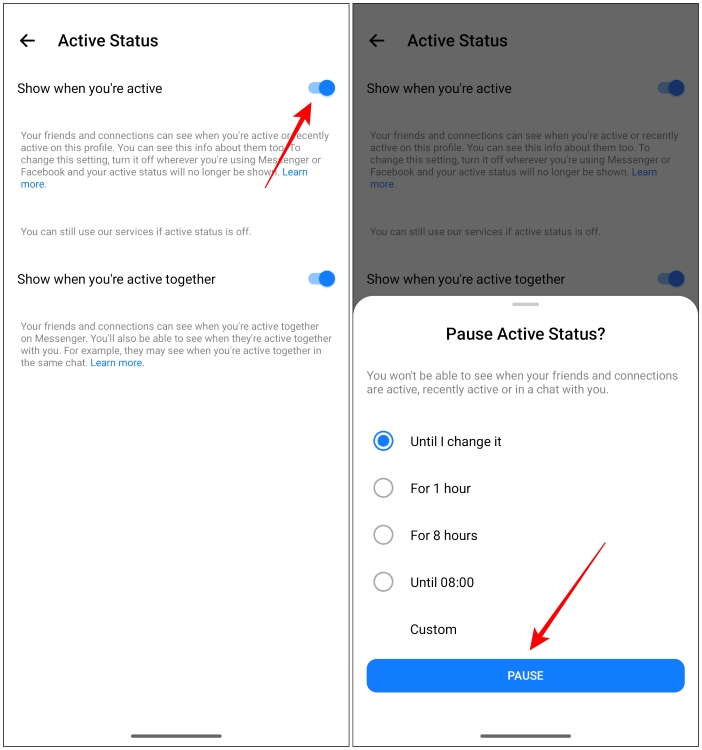
- Tap the hamburger menu icon at the top left.
- Now tap on the cogwheel icon to visit settings.
- Tap on Active status.
- Here, turn off the Show when you’re active toggle.
- Select the duration for which you wish to hide your active status.
- Then, press the Pause button.
Disabling both options won’t show a green circle next to your name anymore even if you are active.
How to Limit Your Facebook Messenger Usage
Now this is a workaround for those who can’t keep their hands off of Messenger. So to manage your usage, you can use tools like Digital Wellbeing on Android or ScreenTime on iOS. Both will help you limit your usage, so you can use the app responsibly without having to deactivate it.
Using Digital Wellbeing on Android
Digital Wellbeing comes built-in with every Android phone. It’ll block the app and its notifications after a certain time limit is exceeded. So this can be a great way to silence the app on your phone.
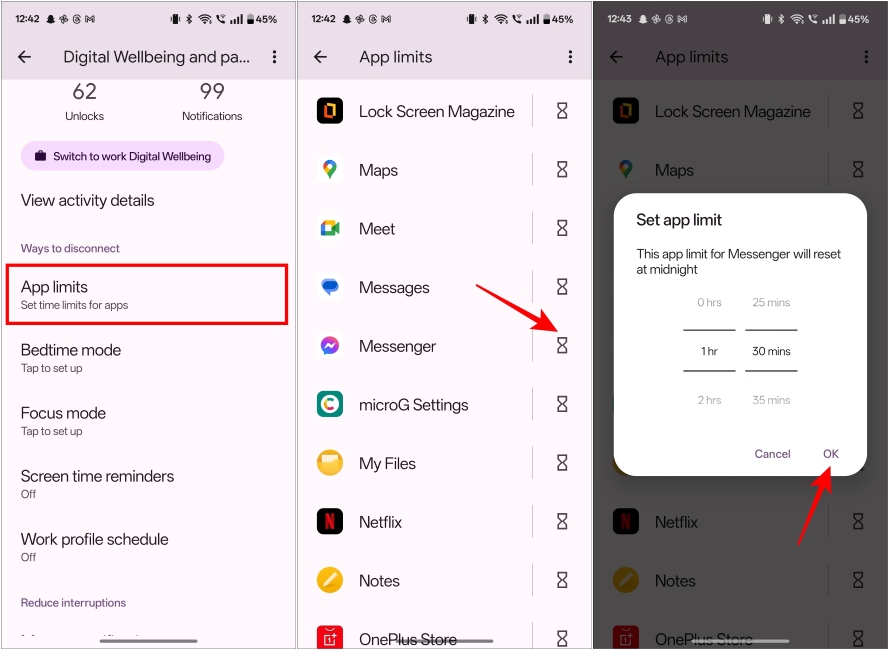
- To set up Digital Wellbeing, go to Settings.
- Scroll down to Digital Wellbeing & Parental Controls.
- It’ll show you a complete view of your phone usage. Tap on App limits.
- From the list of apps, go to Messenger and tap the hourglass icon next to it.
- Now set your daily time limit and press OK.

Using Screen Time on iPhone
Screen Time shares the same traits as Digital Wellbeing helping you limit app usage. However, the process is a bit different. So here’s how you add a limit to the Messenger app on iOS.
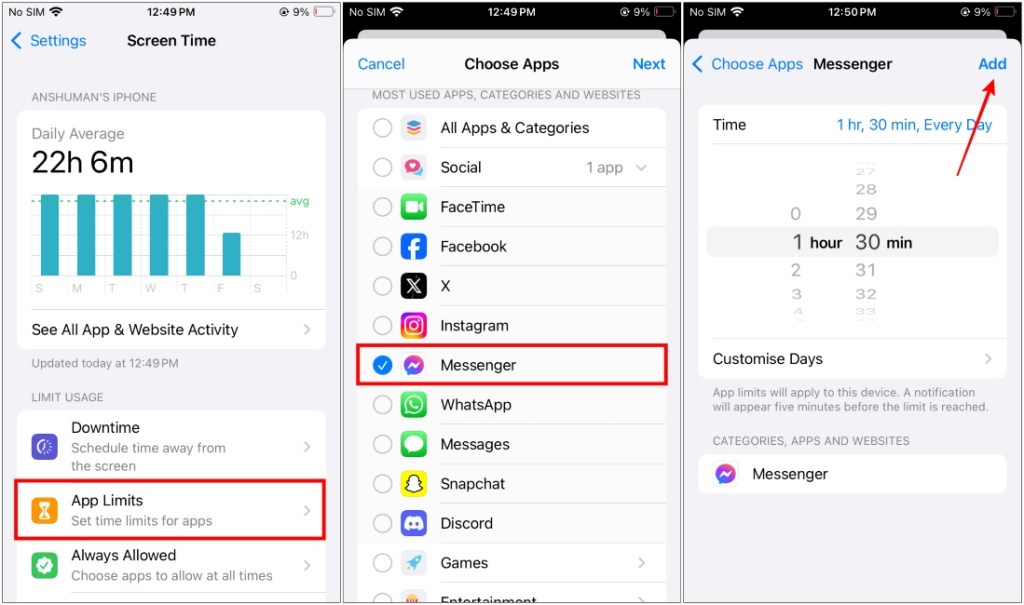
- On your iPhone, open Settings and go to Screen Time.
- Here, tap on App Limits > Add Limit > Social and select Messenger.
- Tap on Next, and set the daily limit for the app.
- Screen Time lets you manage limits on a per-day basis. Go to Customize Days to tweak that.
- Now tap on Add to save changes.

Now, Facebook Messenger will be blocked after you reach the time limit.
So these are all the ways to not only deactivate Facebook Messenger but also to limit your usage of the app on your device. There is no doubt that the app is quite addictive, but there could be reasons you wish to stay away from it. But I hope you found these methods helpful, and in case you have any issues with any of the methods mentioned above, then let us know in the comments below.