Kodi is an excellent application to stream and organize all our media content in one place. However, there are times when we face issues with constant buffering, low-quality streaming, and usual hang-ups. While you may have a pretty fast internet connection, sometimes the cache files create problems for Kodi to function properly. In such cases, clearing the cache keeps Kodi free from any obstruction. Also, clearing the cache regularly makes Kodi quite fast and responsive. So in this article, I am going to share two easy ways you can clear cache on Kodi on device.
Note: We have tested both the methods and found them working properly. You can use either of the methods to clear cache on Kodi.
Clear Cache on Kodi on Any Device in 2020
Kodi doesn’t have a native option to clear the cache or remove any junk files. However, there are add-ons which do the job quite well. I have used two popular repositories, SuperRepo and TVAddons to install the necessary add-ons. You can clear the cache on Kodi using Merlin Wizard or Indigo add-on. Both the add-ons are quite good and you can use any one of them.
Since you can install these addons on Kodi on any device, you can use these to clear Kodi cache on Android, Mac, Windows, Linux, and yes, even on Kodi for iPhone. So, without taking any more of your time, let’s see how you can clear Kodi cache to make it faster and more reliable.
Clear Cache on Kodi Using Merlin Wizard Add-on
1. To download Merlin Wizard add-on, we need specific Kodi repository. So get the SuperRepo repo from here.
2. Now open Kodi and switch to the “Add-ons” tab. Here, click on “Install from ZIP file”.

3. A file browser window will open. Here, navigate to the download folder and select the SuperRepo ZIP file. The repository will be instantly installed on Kodi.

4. Now move to the “Add-ons” tab again and open “Install from Repository”.
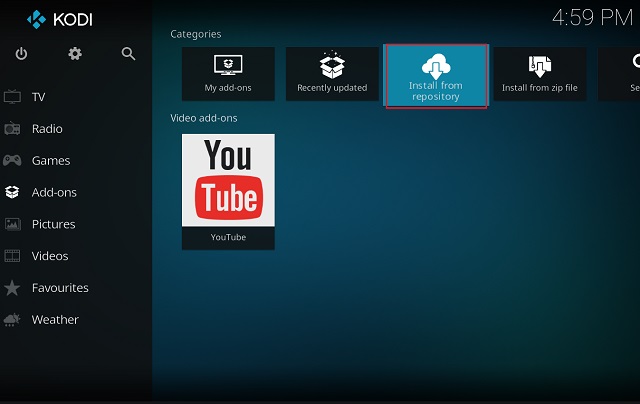
5. On the next screen, click on “SuperRepo Repositiries [Krpton][v7]”.

6. Now you are into the SuperRepo repository. Here, click on “Add-on repository” and then open “SuperRepo All [Krpton][v7]”.

7. Now, click on the “Install” button and wait for the installation to complete.

8. Come back to the “Add-ons” tab and open “Install from Repository” again. This time open “SuperRepo All[Krypton][v7]”.

9. On the next screen, open “Program Add-ons”.

10. Now, scroll down and find “Merlin Wizard”.

11. Open Merlin Wizard and click on the “Install” button.

12. After the installation is complete, click on the “Open” button. The Merlin Wizard will initiate its process so wait for a while.

13. On Merlin Wizard page, click on the “Tool Box” button.

14. Finally, click on the “Clear Cache” button to remove all the cache accumulated behind Kodi. The status will change to “Healthy” after cache deletion.

15. Next, you can choose to “Delete Packages” and “Delete Thumbnails” as well. Do note that, deleting thumbnail will force-close Kodi.

16. After you are done, click on the “Exit” button twice. Now you have successfully cleared the cache on Kodi.
Clear Cache on Kodi Using Indigo Add-on
To have Indigo add-on, we need TVAddons repository first. Download the repo from here.
1. Now open Kodi and switch to the “Add-on” tab. Here, click on “Install from ZIP file”.

2. After that, locate the downloaded ZIP file on your PC and open it. The repository will be installed instantly.

3. Now come back to the “Add-on” tab and click on “Install from repository”.

4. Here, open “TVAddons” repository.

5. Further, open “Program add-ons”.

6. After that, find “Indigo” from the list and open it.

7. Now click on the “Install” button.

8. After the installation is complete, click on the “Open” button.

9. Here, open “Maintenance Tools” on the very first page.

10. Finally, you will get the option to clear cache on Kodi. Click on “Clear Cache” to completely delete the cache from Kodi. You can go through other options too. Now, you have successfully cleared the cache on Kodi.

Clear Cache and Enjoy Kodi Without Any Issues
So that is how you can clear cache on Kodi. As we said above, you can use both of the methods on Windows, macOS, Android, and Linux. While the process is lengthy, it’s definitely not hard and you can easily clear cache if you follow the steps diligently. Also, if the first method is not working and you are still facing problems with Kodi, then try out the Indigo add-on. Both the add-ons are pretty good and you should have no junk files after clearing the cache. Anyway, if you liked this nifty guide then comment down below and let us know your thought on this subject.


