Lately, Chrome OS has been gaining a lot of consumer-facing and enterprise features. You can now view photos from your Android phone on Chromebook and seamlessly share Wi-Fi passwords between Android and Chrome OS devices. For business users, manufacturers have released Chrome OS Enterprise devices that can also run Windows using Parallels Desktop, which takes advantage of the Linux container. Further down the line, Google also introduced a Verified Access feature on Chromebooks. But what is it and should you enable it? Well, to answer your question, we have come up with an explainer on what is Verified Access on a Chromebook, why it is important, and why you should enable it.
Verified Access on Chromebook: Explained (2022)
In this article, we have explained Verified Access in Chrome OS and how to enable it on your Chromebook. That said, let’s dive right in.
What is Verified Access on a Chromebook?
We are increasingly seeing that Chromebooks are now used not just for educational purposes in schools, but corporates and enterprises are also taking a keen interest in Google’s lightweight Chrome OS. It’s one of the most secure and safest OS out there, and Chromebooks are also much easier to deploy and manage for administrators.
Recently, we learned that a prominent Finland-based hotel chain moved from Windows to Chrome OS in just 48 hours after a ransomware attack. All these benefits make for a great operating system for enterprise institutions.
Having said that, for businesses, it’s important to ensure that the computers they are connecting to are secure and validated and that their identity is not compromised. To solve this, Google has deployed a Verified Access API that allows companies using a Chromebook to check for policy compliance and verify the identity of the computer. Only after you’ve gone through this process will the data be transmitted.
In simple terms, Verified Access on a Chromebook is a security method for enterprises to verify identity, ensure compliance, and validate company policies.
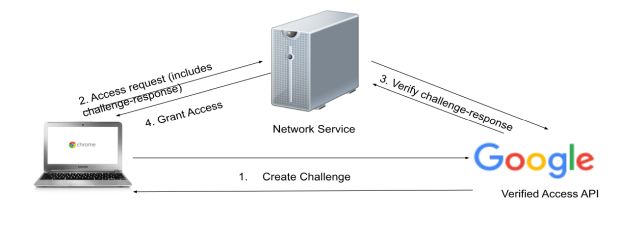
To validate a Chromebook using the Verified Access API, Chrome OS uses the hardware TPM chip available on the device. It generates and stores cryptographic keys through a hardware-level attestation, making Chrome OS a trusted platform for enterprises.
Another aspect of Verified Access is more consumer-facing. If you want to play DRM content from streaming services like Netflix and Prime Video in HD or FHD resolution, the internet services will verify whether you are playing the content on a certified Chromebook. If your Chromebook verifies the key and issues a grant certificate, then only enhanced playback will be unlocked on your Chromebook.
To sum up, Verified Access on a Chromebook is mainly an enterprise feature for ensuring trusted communication, but general users have some benefits too.
How to Enable Verified Access on a Chromebook
Now that we have learned what Verified Access is on a Chromebook, let’s go ahead and find out how to enable this feature. I would suggest turning on Verified Access on your Chrome OS device for enhanced playback on video streaming sites. Note that some users have reported that keeping the feature enabled prevents the Chromebook from connecting to a public Wi-Fi access point. In that case, you will need to disable the Verified Access toggle if you wish to work out of a coffee shop or a library. With that said, let’s jump to the tutorial and learn how to turn on Verified Access.
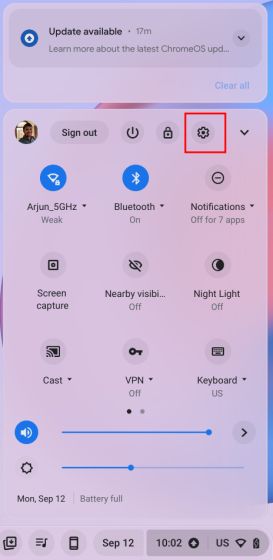
1. Open the Quick Settings panel from the bottom-right corner and click on the cogwheel icon to open the Settings page.
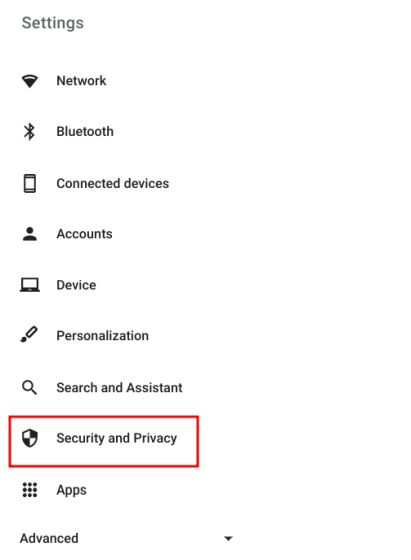
2. In the left sidebar on the Settings page, move to “Security and Privacy“.
3. Here, enable the “Verified Access” toggle in the right pane, and you are done.
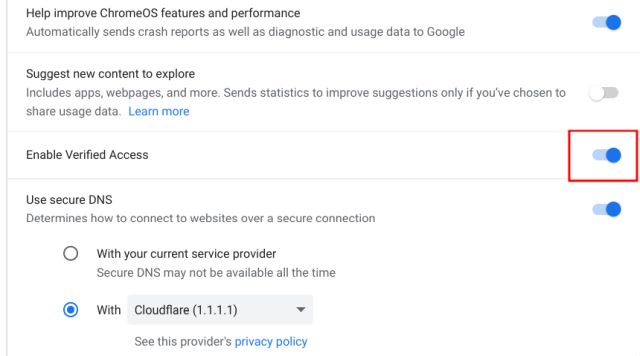
4. To turn off Verified Access, you just need to disable the toggle.
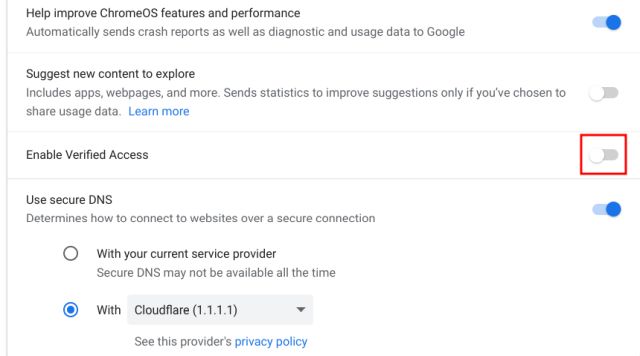
Turn on Verified Access on Your Chromebook
So this is our explainer on Chromebook’s Verified Access feature and why you should enable it. As Chrome OS becomes more feature-rich over time, both in terms of functionality and security, it poses a threat to dominant desktop operating systems like Windows and macOS. Anyway, that’s all from us. If you want to try out Chrome OS on your Windows PC or MacBook with Chrome OS Flex, head to our in-depth guide linked here. And for more such Chrome OS tips and tricks, we already have a detailed guide in place. And if you have any questions, let us know in the comment section below.


