Thanks to smartphones, we can now stay connected with our near and dear ones via calls, messages, social media mentions, and more. However, continuous pings can sometimes distract us and we may find it difficult to focus on other important things. Even if you put your iPhone on mute, the screen still lights up every time you get a new notification or call. That’s exactly where the iPhone’s Do Not Disturb focus mode comes in handy. This focus mode silences all the notifications and calls on your iPhone, and won’t even light up the screen. Read on to learn how to use Do Not Disturb on iPhone to boost your productivity.
Reduce Interruptions in iOS 18
On Apple Intelligence-compatible devices, iOS 18 brings Reduce Interruptions, a new Focus Mode that uses AI to surface only the important notifications while filtering out everything else. Unlike Do Not Disturb which blocks all notifications, Reduce Interruptions prioritizes notifications to reduce distractions while making sure you stay informed about what matters most. When enabled, Reduce Interruptions will only send you notifications that might require immediate attention, like notifications about an early pickup from playschool or a doctor’s appointment.

You can set up and use Reduce Interruptions like any other Focus mode on your iPhone. Again, bear in mind that you can only use Reduce Interruptions on iPhone 15 Pro, iPhone 15 Pro Max, iPhone 16 models, A17 Pro or M-series iPads, and Apple Silicon Macs.
Let’s move to the below sections to learn how to enable a Focus mode on an iPhone.
How to Turn on Do Not Disturb Manually on iPhone
Go through the following steps to turn on Do Not Disturb mode on your iPhone manually:
1. Unlock your iPhone and swipe down from the top right corner of the screen to pull down the “Control Center.”
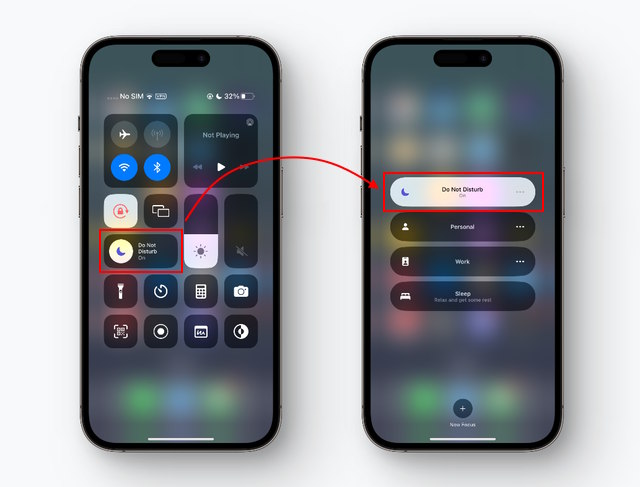
2. In the Control Center, look for the “Focus” tile and tap on it to reveal all the focus modes you can choose from.
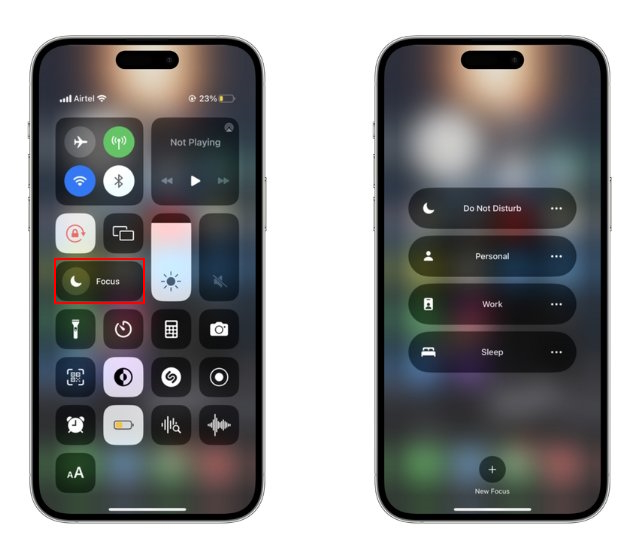
4. From the list of options, tap on “Do Not Disturb” to enable it.
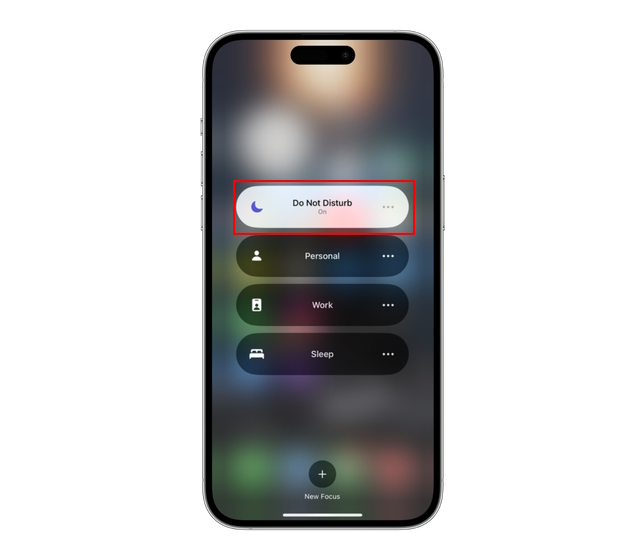
That’s it. You have successfully turned on the Do Not Disturb mode on your iPhone. Also, there are numerous tweaks you can make to the Do Not Disturb mode to use it more effectively. We will talk about these in a later section.
How to Set Do Not Disturb Mode to Turn on Automatically
Apart from turning it on manually, the iPhone allows you to create a routine to automatically turn the Do Not Disturb mode On and Off. Users can set this focus mode to automatically turn On when going to bed and turn it Off when they wake up by adding a schedule. Here, we have explained how you can do this:
1. Open the Settings app on your iPhone and head to the “Focus” option.
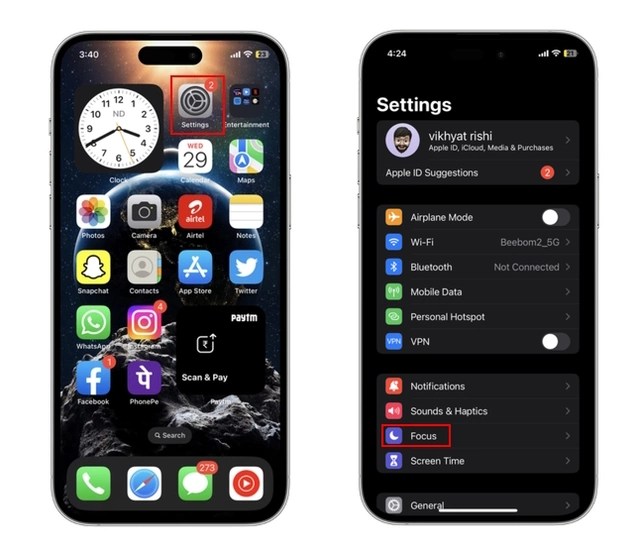
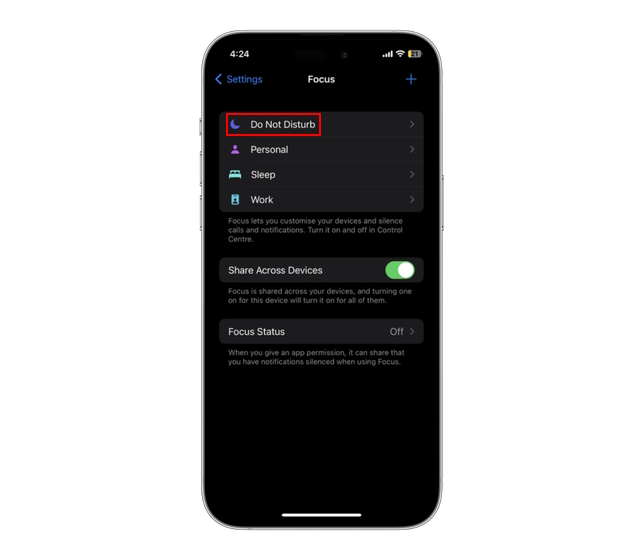
2. Here, tap on the “Do Not Disturb” option from the Focus modes list.
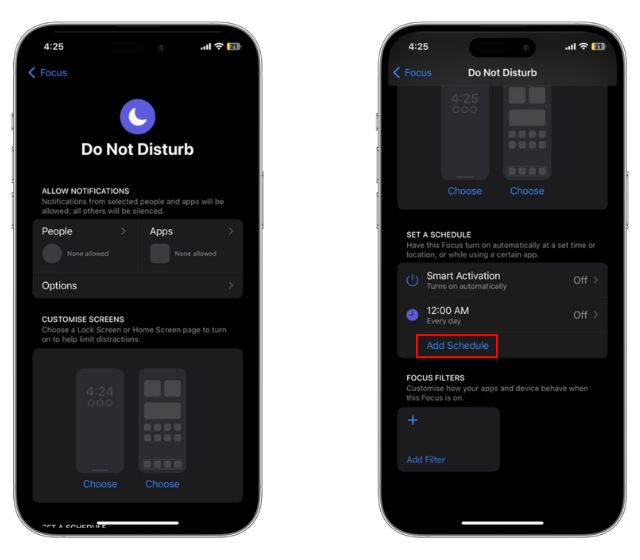
3. Next, scroll down until you reach the “Set A Schedule“ section and tap the “Add Schedule” button.
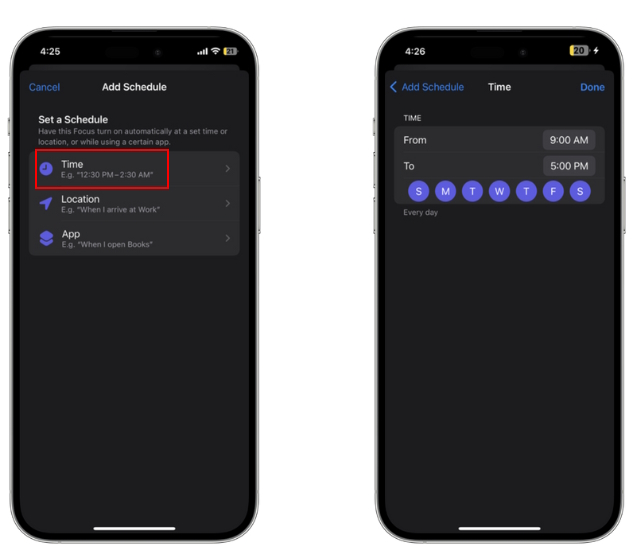
4. Here, you will see a list of options to choose from such as Time, Location, and App.
5. Tap on the “Time” tab to set a schedule for automating the Do Not Disturb mode. You can set the time duration using the “From” and “To” options, along with the days on which you want this schedule to work.
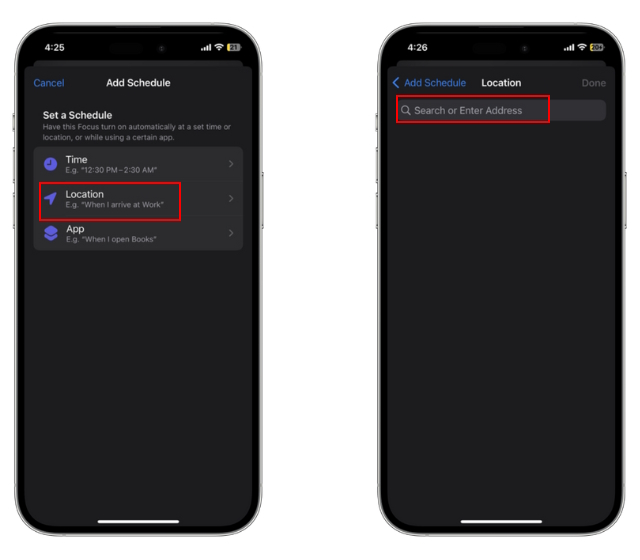
6. If you want the Do Not Disturb Mode to turn on at a certain location automatically, tap on “Location“ and choose a location by entering an “Address” in the search bar.
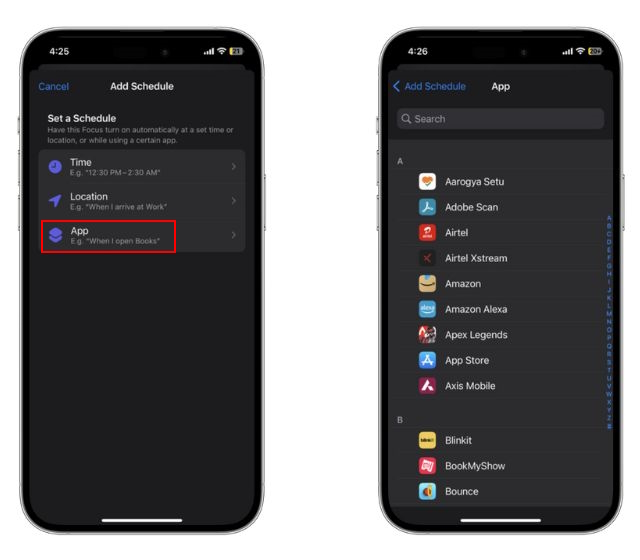
7. You can also automatically turn the Do Not Mode on when you open a specific app. For this, tap on “App” and choose an app from the list of installed apps on your iPhone.
Now, whenever the conditions you set here are met, the Do Not Disturb mode will automatically be enabled on your iPhone. That said, let’s look at what other settings you can customize for this focus mode.
Customize Do Not Disturb Mode on Your iPhone
One of the best things about the iPhone’s Do Not Disturb mode is that you control and customize it as per your whims. You can enable specific contacts to bypass the Do Not Disturb mode, customize app notifications, and focus filters. Below, we have detailed all the customizations you can do with Do Not Disturb mode on iPhone.
Customize Notifications from People
To set contacts for whom the Do Not Disturb mode will not apply, follow the below steps
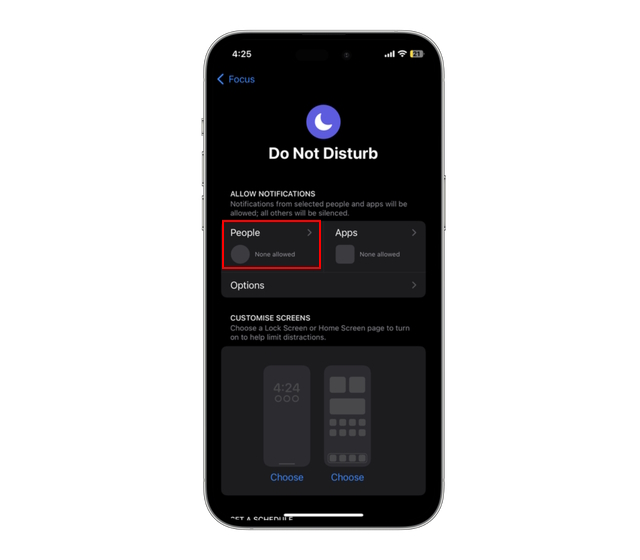
1. Open the “Do Not Disturb” focus mode screen (Settings -> Focus -> Do Not Disturb) on your iPhone. Here, tap on the “People” tab in the left section of the screen.
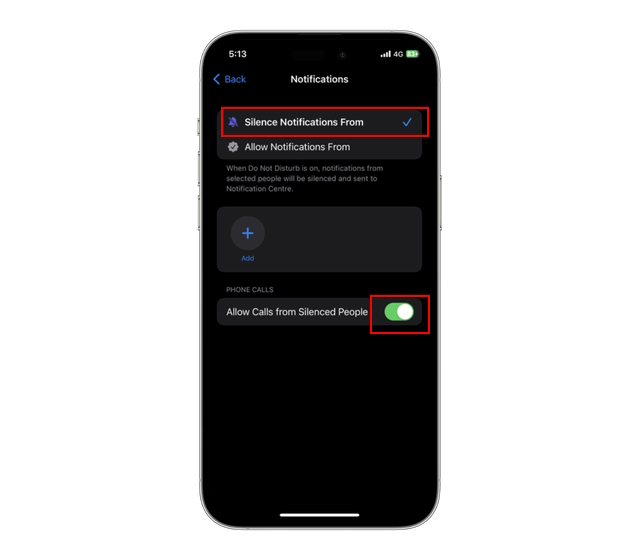
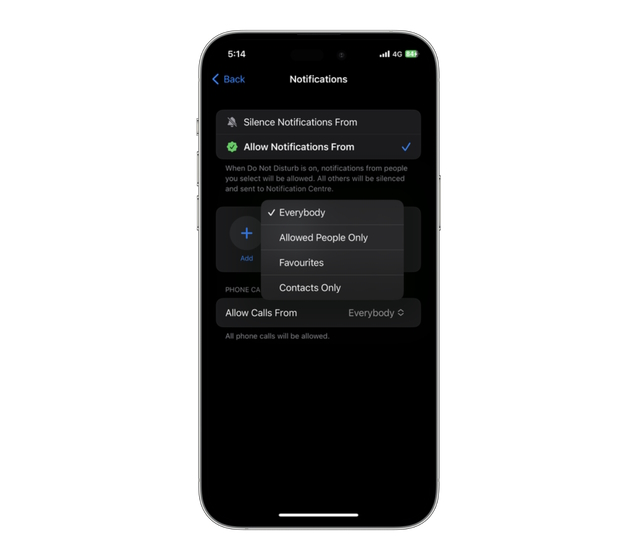
2. You will see two options on the following screen – “Silence Notifications From” and “Allow Notifications From.”
3. Choose the “Silence Notifications From” option to mute all notifications from specific contacts. If you want to receive only calls and no notifications from the chosen contacts, turn on the “Allow Calls from Silenced People” toggle.
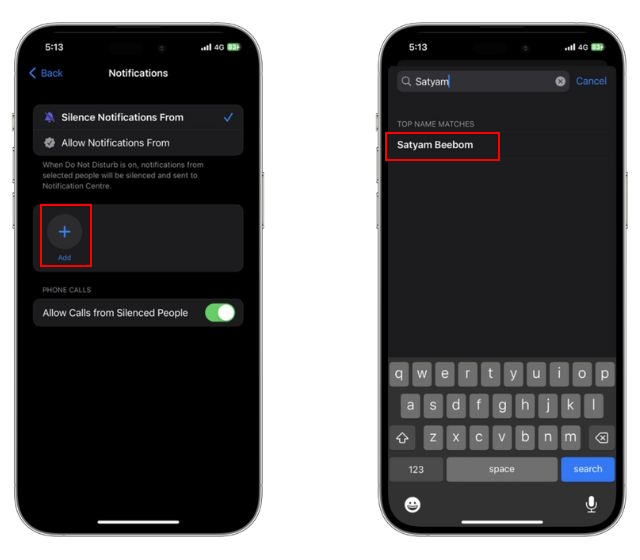
4. Tap the “+” icon to add contacts to make a list of people you want to silence notifications from when you enable Do Not Disturb mode.
5. Alternatively, Choose “Allow Notifications From” to receive notifications from chosen contacts when using Do Not Disturb on your iPhone.
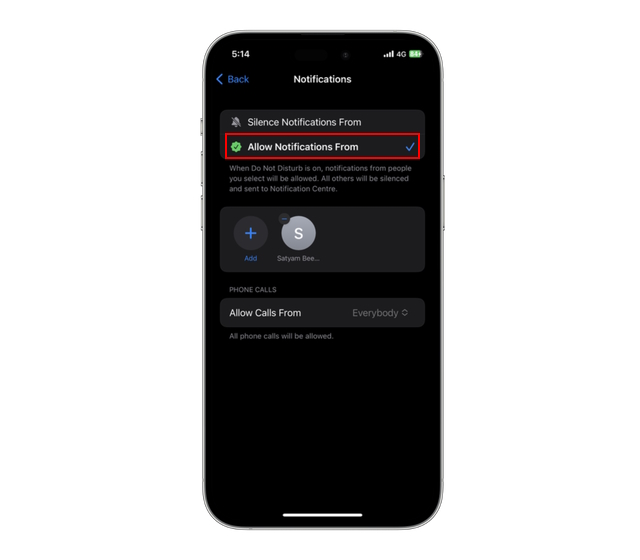
6. Under this option, you can also allow calls from select people by tapping the “Allow Calls From” tab and choosing an option from the list that appears.
Customize App Notifications
Customizing app notifications lets you choose the apps for which notifications will be allowed even when this mode is enabled. Let us show you how to set it up:
1. Open the “Do Not Disturb” focus mode settings on your iPhone and tap on the “App” tab on the right side.
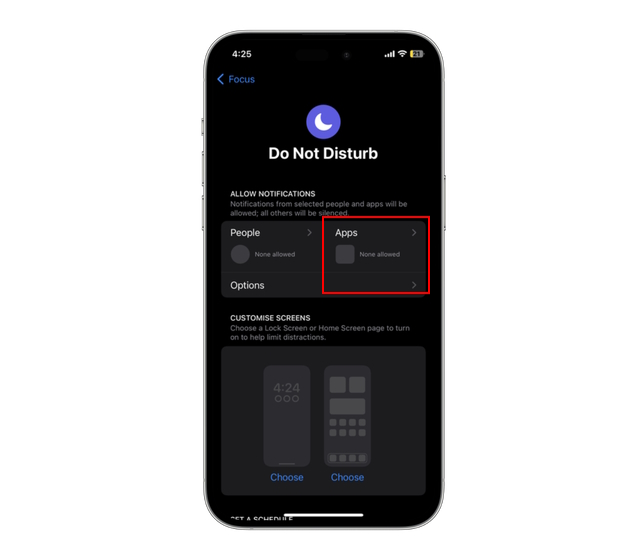
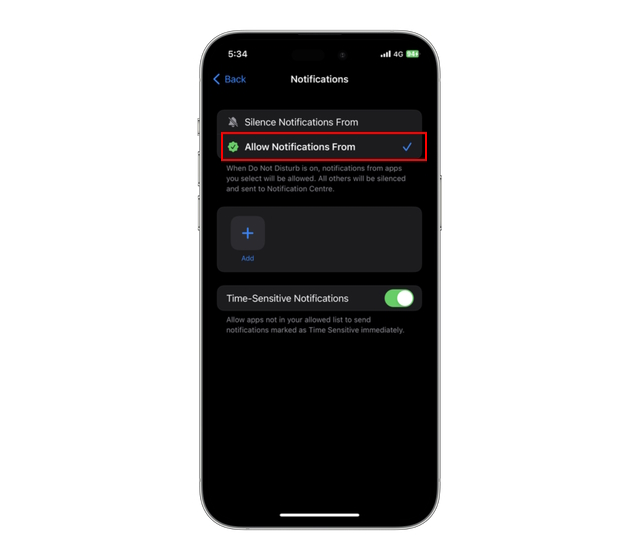
2. Like the people section, you will see two options on the following screen — “Silence Notifications From” and “Allow Notifications From.”
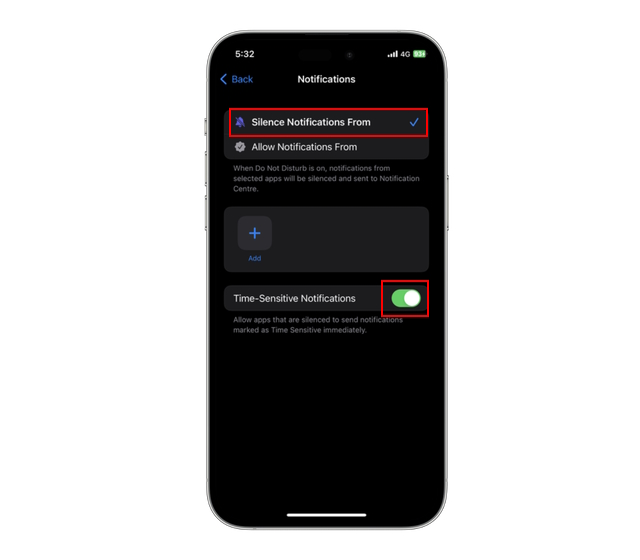
3. Choose the “Silence Notifications From” option to stop receiving notifications from selected apps. You can toggle on the “Time Sensitive Notification” to see notifications from the silenced apps. Though, remember they could be distracting and defeat the purpose of the Do Not Disturb mode.
4. To make an allowed list for apps, tap the “+” icon and choose the app you want to add to the allowed list. We would suggest not adding social media apps to this list, as the notifications from these apps can distract you from your work.
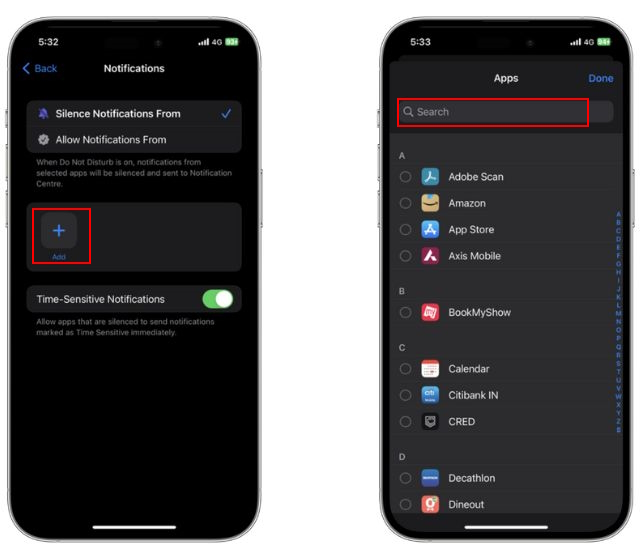
5. Instead of silencing specific apps, you also have the option of receiving notifications from certain apps while silencing others. Tap on “Allow Notifications From” to get notifications from the chosen apps.
Customize Focus Filters
Finally, you can also add Focus Filters, such as App Filters and System Filters, in the Do Not Disturb focus mode. These filters allow you to modify in-app and system settings when a focus mode is enabled. Focus Filters allow granular control over different focus modes. While app filters allow you to customize apps when the Do Not Disturb mode is enabled, system filters offer overall setting customization options. Follow the steps below to learn how to add Focus Filters:
1. Open the Do Not Disturb settings screen on your iPhone and scroll down until you find the “Focus Filters” option. Now, tap the “Add Filter” button
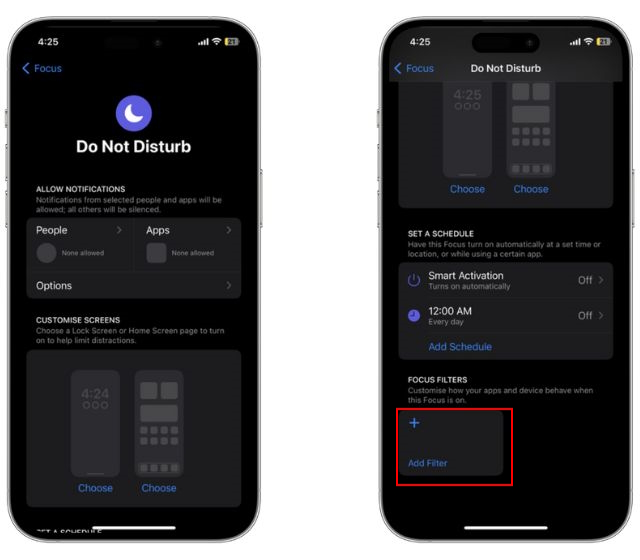
2. Here, you will see two sections — one for “App Filters,” and the other for “System filters.”
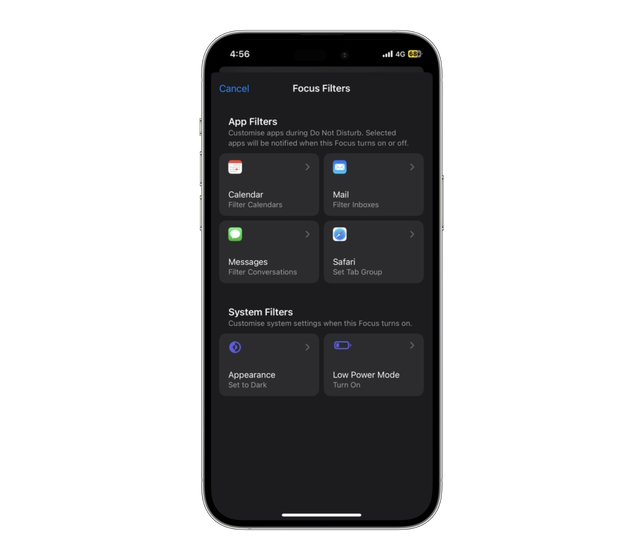
3. Under the App Filters, you will find four apps you can add Do Not Disturb mode filters –
- Calendar: To choose which calendar to show and when.
- Mail: To set mail focus filters
- Messages: To allow or deny message notifications from selected people.
- Safari: To allow a particular tab group to be used when the Do Not Disturb mode is turned on.
4. Under the System Filters section, you will see the following two options –
- Appearance: Sets dark or light appearance when the Do Not Disturb mode is on.
- Low Power Mode: Automatically enable or disable low power mode with Do Not Disturb mode.
How to Enable Do Not Disturb from the Lock Screen
iOS 16 brought with it the ability to customize the lock screen of your iPhone and add widgets to the lock screen. You can now set multiple lock screens with different wallpapers and home screens. While this is no news for many, some users might still be unaware that they can link the “Do Not Disturb” focus mode to a particular lock screen. This means the Do Not Disturb mode will automatically turn on when a user switches the lock screen on their iPhone. Here, we have explained how you can link Do Not Disturb mode to a particular lock screen:
1. Unlock your iPhone and long press on the lock screen to enter the lock screen editing mode.
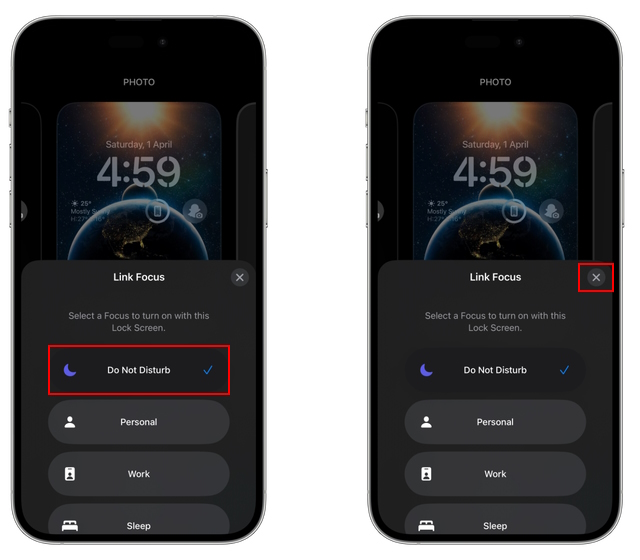
2. Now, tap on the “Focus” icon at the bottom center of the screen.
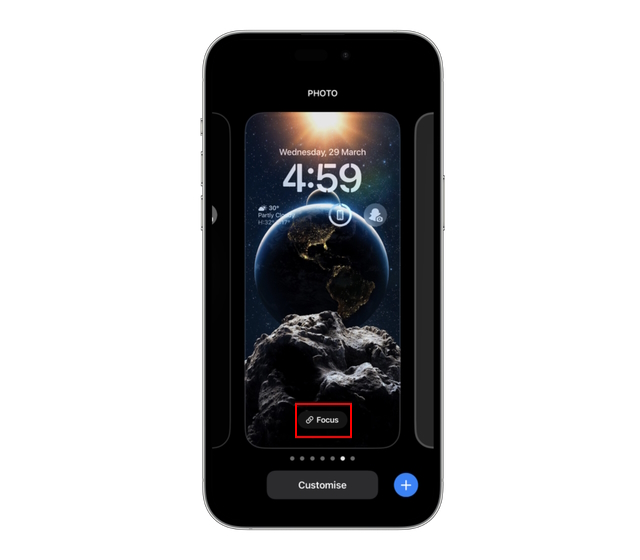
3. Next, a new “Link Focus” pop-up window will appear with the focus modes list. Tap on “Do Not Disturb” to link this focus mode to the current lock screen. Then, tap “X” at the top right, and you will see a Do Not Disturb icon at the bottom of your screen. This indicates that the Do Not Disturb mode has been linked with the lock screen.
How to Enable Do Not Disturb Mode Using Siri
This is by far the easiest method to turn on the Do Not Disturb mode on your iPhone. Here’s how to ask Siri to turn Do Not Disturb On and Off.
1. First and Foremost, activate “Siri” on your iPhone by saying “Hey Siri” if you have enabled it or long-press the power button.
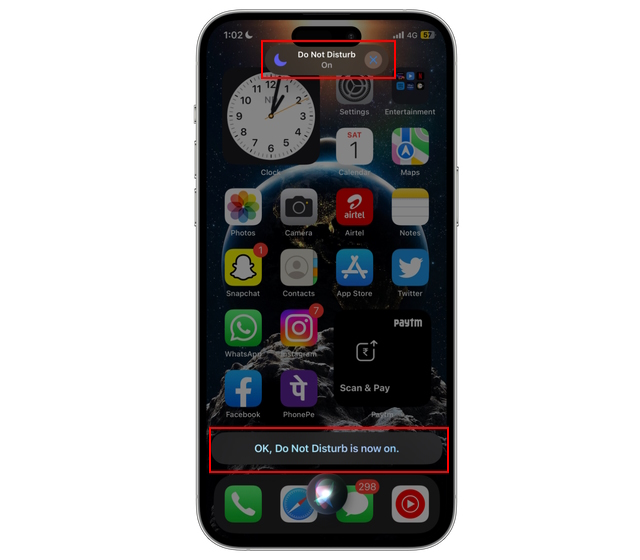
2. Once Siri is activated, say “Turn On Do Not Disturb,” and Siri will revert with “Ok, Do Not Disturb is now on.” You will also see a “Do Not Disturb On” pop-up at the top center of the screen.
How to Turn Off Do Not Disturb Mode on iPhone
You can easily deactivate the Do Not Disturb Mode on your iPhone using the Control Center. Below, we have explained how:
- Swipe down from the top right corner of your iPhone’s screen to access the “Control Center.”
- Tap on the “Do Not Disturb” tile and then tap on “Do Not Disturb” again to turn off the focus mode.
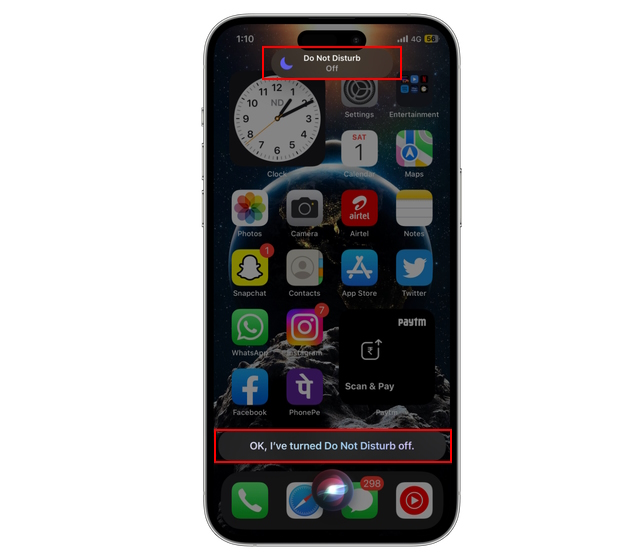
3. Alternatively, you can ask Siri to “Turn Off Do Not Disturb” for you. Siri will revert with “OK, I’ve turned Do Not Disturb off,” along with the “Do Not Disturb Off” pop-up.
We are sure that by now, you must have understood how to set up and use Do Not Disturb mode on your iPhone effectively. This will help improve your focus and boost your productivity. So, go ahead and customize this focus mode as per your needs. Furthermore, if you’re an Apple Watch user, we have also explained how to turn on do not disturb on Apple Watch in the guide linked here. Finally, if you have any questions, do let us know in the comments below.
There could be various reasons that might be causing this problem:
1. The “Allow Repeated Calls” toggle is on in the Do Not Disturb mode settings.
2. The “Allow Calls From” setting is set to Everybody.
3. You are actively using your iPhone when the call comes.
4. The “Allow Calls From” setting is set to favorites, as favorite contacts are immune to the Do Not Disturb mode restrictions.
All the phone calls you receive when the Do Not Disturb mode is active will go directly to your mailbox.
You can easily view all those calls in the “Missed Calls” section.


