The Minecraft 1.18 update has the community pumped with its amazing new features. We get world generation updates, cross-functioning seeds, and more in this update. And with such a grand update comes the literal pressure of performance for many medium and low-end PCs. Fortunately, the team at OptiFine is here for your rescue. But that’s not the only benefit. Combined with some Minecraft shaders, OptiFine in Minecraft 1.18.1 can also help you drastically improve the game’s graphics. Do keep in mind that OptiFine only works with Minecraft Java Edition due to the programming differences in Minecraft Java vs Bedrock editions. Though, Bedrock players can still enjoy RTX in Minecraft just fine. With that out of the way, let’s figure out how to install OptiFine in Minecraft 1.18.1 for better graphics and FPS.
Guide to Install OptiFine in Minecraft 1.18.1 (2022)
Thanks to the beautiful terrain generation in Minecraft 1.18.1, installing OptiFine is extra rewarding with this update. Since its release, OptiFine has had multiple competitors, but it’s still the most effective way to improve performance in Minecraft. We will even cover how it can help you get the best graphics in the game without compromising FPS. But let’s take it slow and download OptiFine for Minecraft 1.18.1 first.
Download OptiFine for Minecraft 1.18.1
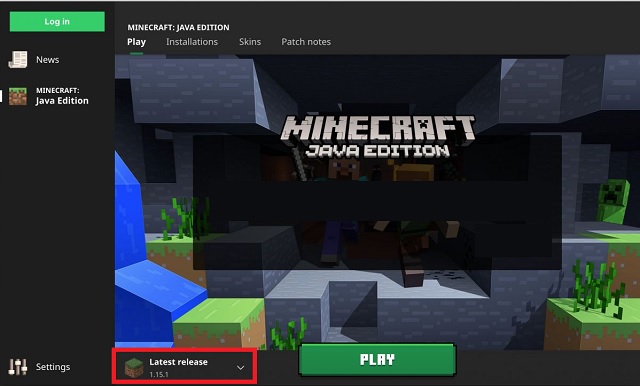
Since the programmers behind OptiFine focus on inclusivity, there are no minimum requirements to install it. Just make sure you are running a version of Minecraft 1.18 or later. You can check your game version in the bottom left corner of your game’s home screen. It also shows if your game is modded or not.
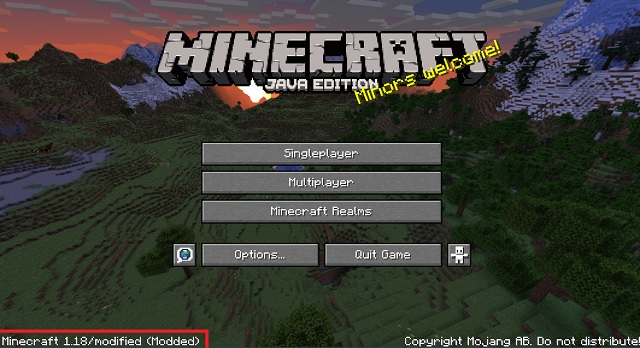
You can update the game using the Minecraft launcher if your game version is older than 1.18. Once you are ready, here’s how to download OptiFine for Minecraft 1.18.1:
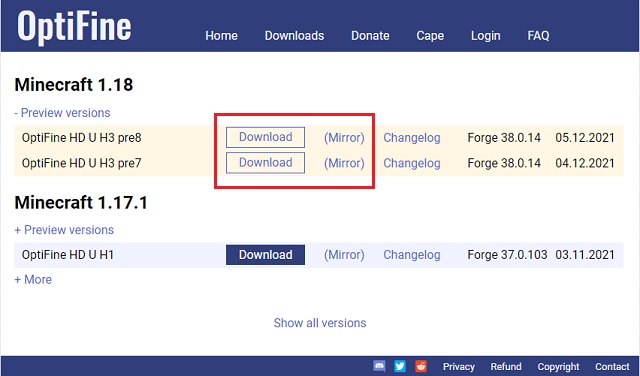
1. To get started, open the downloads page of OptiFine. Here, you can find OptiFine for all the available versions of Minecraft. The list is sorted by release date. Once you find the latest Optifine version under the Minecraft 1.18 section, click the “Download” button or use the (Mirror) link for an alternate download path in case of any problems.
We will use the Optifine 1.18 HD U H3 P8 version in this tutorial, but there might be a newer version available by the time you install it. So, make sure to download the latest version of Optifine for Minecraft 1.18.1 to avoid any glitches.
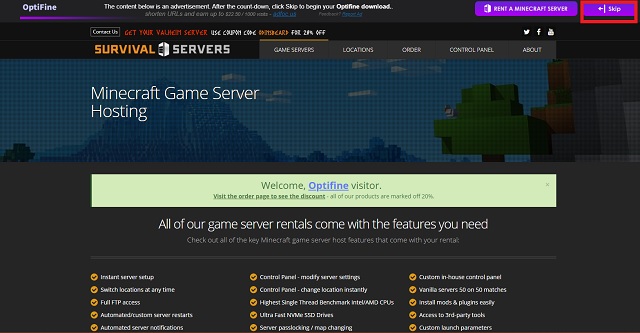
2. The download button leads to a skippable ads page. You need to wait for 5-10 seconds until the “Skip“ button shows up at the top right corner. Click “Skip” to proceed.
3. Once you skip the ad, a downloads page is going to appear. As soon as you click the “download” button on this page, the file will begin downloading.
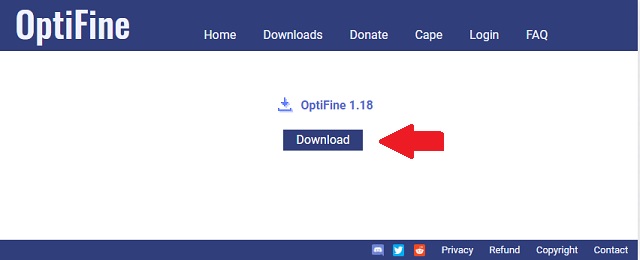
4. The Optifine installer is a Java (.jar) file. So, the browser might warn you about the file being a potential virus. Click the “Keep“ button to save the file when prompted. You can rest assured that it’s not as we have scanned it ourselves, and thousands of users are using Optifine daily.

How to Install OptiFine in Minecraft 1.18.1
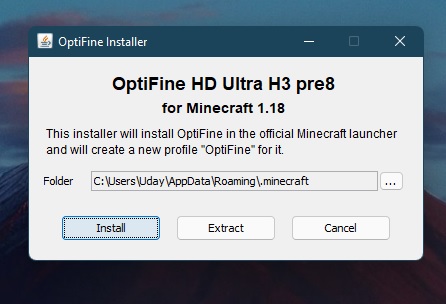
As soon as the download finishes, double-click the file to open it. The .jar file will open in the Java compiler as an installer. Some users might face a few errors here. But worry out, we have added a FAQ and error section at the end of this article to help you out. So follow the steps below closely:
1. After the installer opens, it will already have the default installation location filled in. If you have it installed somewhere else, click the ellipsis (three dots) icon to change it manually. Then, click the “Install” button.
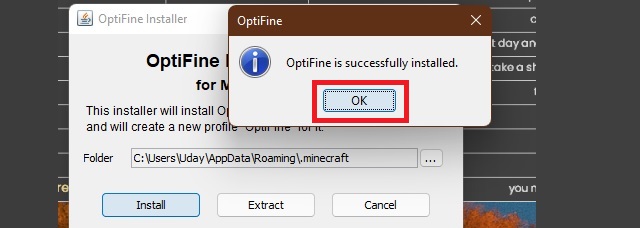
2. It will only take a few seconds for the installation to finish. Once it’s done, click “OK“ to close the installer. This will automatically install Optifine in the vanilla (unmodded) Minecraft.
3. After installation, open your Minecraft launcher, and you will find Optifine pre-installed in there. To select it, click on the “downward arrow” next to the play button, select Optifine from the list, and click Play.
How to Install OptiFine with Forge and Minecraft Mods
If you are planning to install Optifine in Minecraft 1.18.1 along with mods, the process is a little different. But worry not, it is even easier than installing Optifine in general. Make sure to install Forge in Minecraft beforehand. Then, download the Optifine.jar file using the method mentioned earlier and open the folder where it is downloaded.
Then, copy or cut the “.jar” file and paste it into the “mods” folder of your Minecraft installation. If you are unable to locate it, paste this address – %appdata%\.minecraft\mods in your Explorer address bar or in the Run window. You can access the Run window through the Windows 10 keyboard shortcut Win + R. You can even create a new folder and name it “mods” if it doesn’t already exist.

Doing this will let you run Forge and its mods alongside Optifine in Minecraft 1.18.1 without any problems. Do not worry if Optifine doesn’t show up in the “mods” section in the game. That’s because of compatibility between Forge and Optifine. You can still notice additional options in video settings like shaders, quality, etc to check if Optifine is running or not.
High FPS Settings for Minecraft 1.18.1
Now that you know how to install Optifine in Minecraft 1.18.1, let’s figure out how to make the most out of this tool. If performance is your key motivation to install Optifine, it’s easy to get the most out of it. Just be ready to bear below-average graphics if you are of a lower-end PC.
If you are in your Minecraft world, press the ESC key and go to “Video Settings“. You can also click the “Options” button on the home screen and select “Video Settings” to reach this location. Here, you need to replicate the basic settings that we have shown below before changing the in-depth settings.
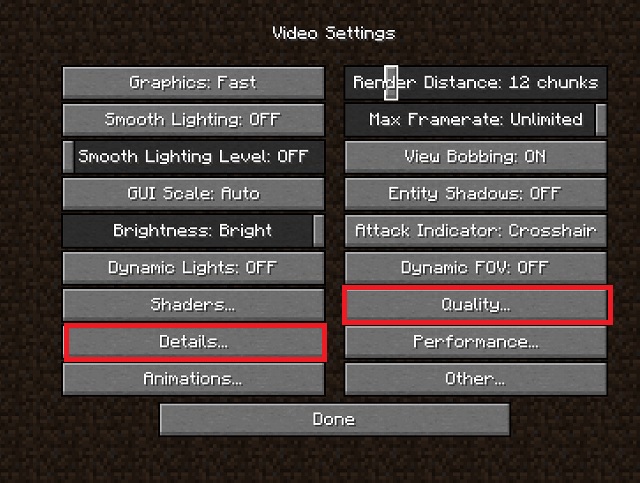
We have set the Graphics to Fast, which lowers the texture quality and makes them smoother. In contrast, the Smooth Lighting & its Levels are Off because they take too much GPU power to operate. Then, the render distance should be between 8 – 12 chunks to keep the game playable. You can reduce it further if your PC demands. Finally, the framerate can be unlimited because it won’t ever go beyond your monitor’s refresh rate anyways.
Other settings, such as GUI Scale, brightness, and bobbing, have little to no effect on the GPU memory. That means you can leave them as they are. But you can turn off Entity Shadows to reduce GPU load even further. Though, it isn’t necessary as the textures are already at their lowest. A more effective alternative is turning off a few other in-game elements. You can use the details and quality section under the video settings to do so.
Quality Settings for High FPS
Head to the “Quality“ settings page under video settings. It is highlighted in the screenshot above. The setting brings in-game additional options that don’t impact the core gameplay. You can understand them as additional bonus features that Minecraft is giving us graphically. As for the edits here, you need to turn off every single one of these features.
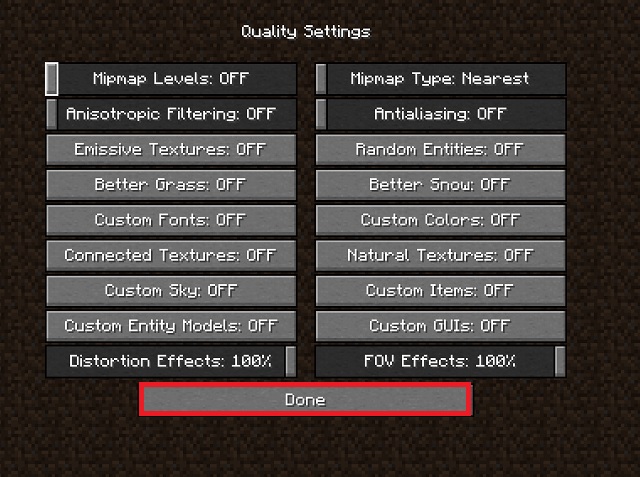
While turning off the features, the game might restart a couple of times. Do not panic, as it’s a regular process to apply your changes. Once you have turned everything off, don’t forget to set Mipmap type to Nearest. Then, click the “Done” button to save the changes and exit.
Details Settings for Better Performance
Unlike quality settings, the “Details” section of video settings does affect your gameplay. The features here do not have a major impact on most GPUs. But you can still change a few of the features as per your personal preferences. What we think works the best without major gameplay compromise is the following settings:
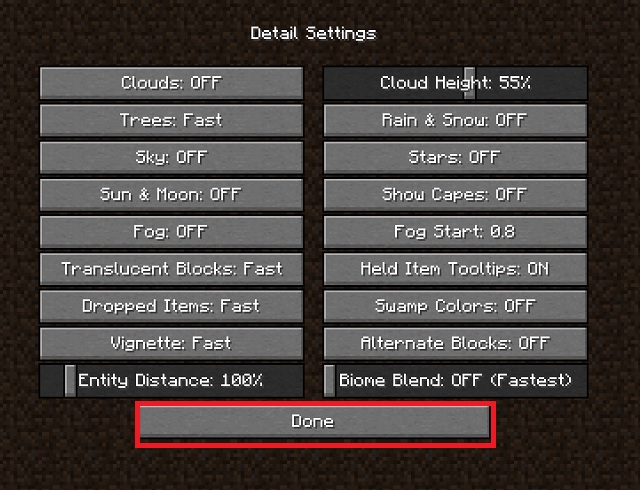
To begin, set all the values without a slider to “OFF” or to “Fast”. Turning it off will completely remove the feature, meanwhile turning it fast will lower its texture quality. Features like cloud height, held items tooltips, and fog start do not affect your graphics quality at all. So feel free to experiment with these settings without any problems. If your version of Optifine 1.18 in Minecraft has a setting you don’t understand, hovering your cursor over it will reveal more details for better decision-making.
Keep the entity distance between 75% – 125% to avoid trouble during gameplay. It’s the distance at which a player can see the in-game mobs. Use the slider to set Biome blend as “off” for the fastest performance. Once all the settings are to your liking, click “Done” to save the settings.
How Different Does the World Look with High FPS Settings
Once you have applied the high FPS settings in Minecraft using OptiFine 1.18, your in-game world would look like the following:


The differences are significant. Trees lose their translucency, entities their shadows, and the world seems to have lost its mountains. With lower render distance, you cannot see the Minecraft world beyond a certain point. The overall quality of the texture also gets reduced with lower graphics settings. Even though these changes won’t affect your overall gameplay, they also might not suit everyone’s visual appeal. So, try experimenting with the settings before finalizing what suits you the best.
How to Get Best Graphics on Minecraft 1.18.1
Now, it’s time to focus on the other end of the spectrum. If FPS isn’t your main goal or if your PC is powerful enough, OptiFine 1.18 in Minecraft also supports shaders. Since the game’s Java edition doesn’t support RTX on Minecraft unlike the Bedrock edition, shader packs are the only way to get the best in-game graphics.
There are numerous best shader packs for Minecraft 1.18.1 for you to choose from. You can download them online and place them in the %appdata%\.minecraft\shaderpacks folder. But how much of a difference would that make in the already aesthetic Minecraft 1.18.1 update? Gamechaningly lot. See for yourself:

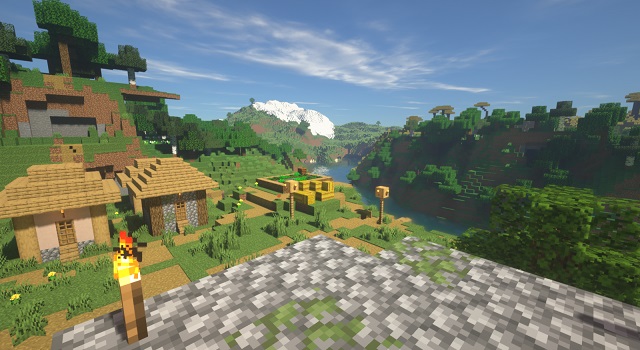
Even at the highest settings, the world of Minecraft feels pretty dull in front of the shaders. You get better texture mapping, realistic sky and water textures, and even the general world lighting feels more dynamic. The shader pack we used in the guide is Seus Renewed. But you can choose the one that suits your taste the best. Continuing the comparison, mountain cliffs aren’t the only locations benefitting from shaders in Minecraft 1.18.1.

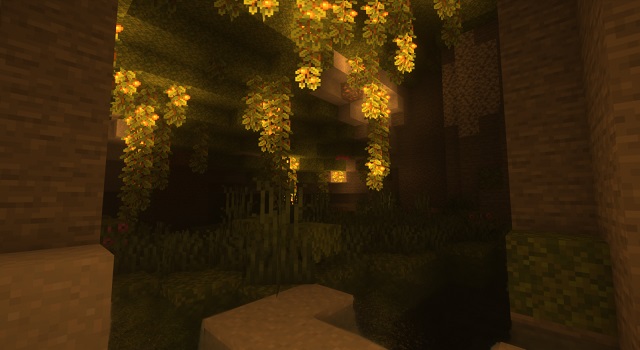
Once you activate the shaders, caves (especially Lushcaves in Minecraft) look cinematic. The glow berries have an actual glow that interacts with the environment. Meanwhile, the overall caves are also darker, adding the teased mysterious vibe to them. Plus, the best part is that since all shader packs are community-based, you don’t have to pay anything to get these high-quality graphics in Minecraft.
How to Uninstall OptiFine from Minecraft 1.18.1
OptiFine can have some compatibility issues with a few of your favorite Minecraft mods. For such scenarios, uninstalling it can be the only solution. Fortunately, the uninstallation of Optifine is as easy as installing Optifine. Make sure your Minecraft launcher or the game isn’t running, and let’s get started:
1. First, open your Minecraft directory or the folder where your game is installed. You can do so by right-clicking on the game’s shortcut and choosing “Open file location“. Or, you also can type the following in your explorer’s address bar or use the Run command (Win + R): %appdata%\.minecraft\
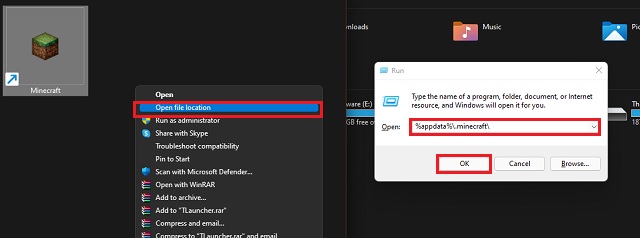
2. Then, in your Minecraft directory, delete the optifine.jar file or any folder with “Optifine” in its name from the following locations:
- .minecraft/mods/
- .minecraft/versions/
There can be multiple copies of Optifine installed in your game. Make sure to remove each one of them to avoid any errors. However, if you are having compatibility issues, deleting one of them at a time and testing the game might be a better method.
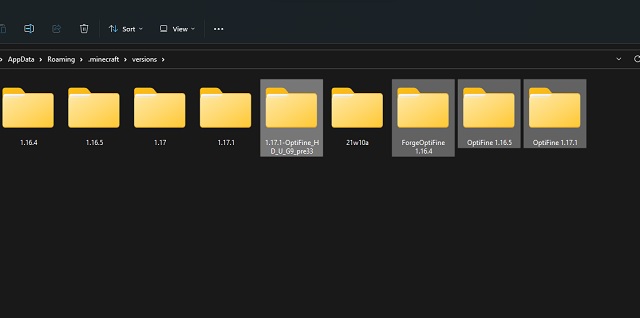
Do not forget to delete the OptiFine files and folders from your recycle bin as well. Alternatively, you can remove them permanently at the source by using the Shift + Delete keyboard shortcut. Once OptiFine is removed, the game’s video settings will return to default, and the additional options will be gone.
OptiFine in Minecraft 1.18.1 – FAQs & Potential Errors
JNI Errors
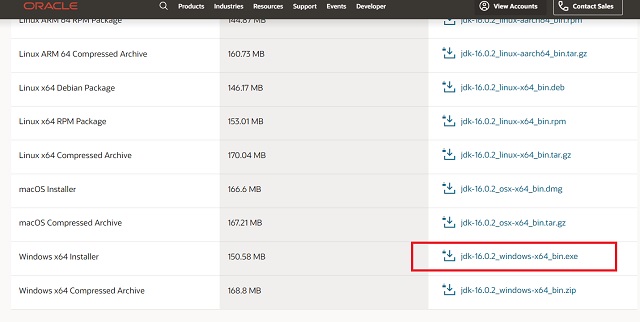
All JNI errors are Java-based errors that are caused due to outdated Java compilers on your system. Many users face it while installing the optifine.jar file. Fortunately, you need to download and install the latest version of Java to fix these errors. All Java versions are available here.
Performance Issues
Players on lower-end PCs can face lagging in the game when using OptiFine for the first time. Fortunately, the solution is to use the high FPS settings mentioned above in this article. If using those settings doesn’t work, make sure you use a version of OptiFine compatible with your version of Minecraft.
How Much Does OptiFine Cost?
Like most Minecraft mods, OptiFine is free-to-use. There are additional add-ons like capes that you can purchase. If you want to support the developers of OptiFine, you can use the “donate” option on their website.
What is the Size of OptiFine 1.18?
Even with diverse options, OptiFine’s setup is only 6-8 MB in size. After installation, it never takes more than 20 MBs of your storage.
How to Install OptiFine in Minecraft Bedrock?
Unfortunately, OptiFine is only available for the Minecraft Java Edition. And since Bedrock Minecraft doesn’t support most java-based mods, there’s no workaround to make it work too. You will either have to make do with whatever Bedrock offers or you will have to install Java Minecraft if you want OptiFine.
Note: If you’re testing Minecraft 1.19, or you simply don’t want to install OptiFine, you can check out some of the best Minecraft 1.19 texture packs to improve FPS or improve graphics on your game.
Install OptiFine in Minecraft 1.18.1 to Improve Graphics
Minecraft 1.18.1 has plenty to offer, and players are all-in for it. Now, you can push your graphics for the new update to the highest. And also the ability to sacrifice the graphics quality to focus on improving FPS output. Whatever you choose, the terrain generation of Minecraft 1.18.1 will cater to an audience of both types. And if you are interested in exploring the best new Minecraft biomes and more, check our collection of best Minecraft 1.18.1 seeds. Not to forget, we have compiled a separate list of the best Minecraft 1.18.1 Bedrock seeds to make your selection easier. There is plenty to explore in both articles. So, don’t waste a moment and install Optifine in Minecraft 1.18.1 to explore your Minecraft world with the best graphics.


