At Google I/O 2014, Google announced its vision to adopt the Material Design standard for all its major platforms including Android OS, Chrome OS, and the Web. The reason behind adopting the same design language for all its platform was Google’s vision to provide a unified user experience to its users across all its services. Since its launch, we have seen Material Design language being incorporated heavily in Google’s Android and Chrome OS platforms. However, although Android and Chrome OS have received a significant facelift with Material Design, Chrome browser has still been stuck in the past. But, this doesn’t mean that Google has abandoned Chrome browser completely (when it comes to Material Design).
In fact, since 2016, we are seeing a lot of experimental Material Design elements being incorporated in the Chrome browser. Quite recently, the Settings page of the Chrome browser was updated to the Material Design language. However, still, most of the Chrome’s UI doesn’t support the Material Design as the changes are still in the developmental phase. Since these changes are still in “beta” they don’t appear by default on your Chrome Browser. However, there is a way to enable them if you want to. Just remember that these features are still in development, so they might suffer from some bugs here and there. So, with that out of the way, let us see how to enable Material Design in Chrome browser:
Enable Material Design UI in Chrome
Before you start, you should understand that there are a lot of design elements in the Chrome browser. Many of these elements have a corresponding Material Design element in the development. Before you start activating the Material Design elements, you should read a bit about them first, just to get a hang of what are the changes that you are making.To make things easy for you, I will include a short description for all the changes. All right, let’s don’t waste any more time and get started.
1. Go to Chrome’s “Flags” page by typing “chrome://flags” in the address bar and hitting the enter/return key. As I warned you above, on this page, Chrome will show you a warning statement. Don’t worry too much, it will be just like using a beta version of the software. You may experience some bugs but nothing major.
 2. Now, hit Ctrl+F (Cmd+F if you are on a Mac) and in the pop-up box type in the words “material design” (without the quotes).
 3. Now, depending on the when you are using this tutorial, the number of hits that you will get can change (I got 13). This is because Google keeps adding and deleting these elements. Now, Use the “arrow buttons” next to the text field to move between the hits.

Enable Material Design in Different Elements of Chrome
Now, that you know how to move between the elements, let us take a look at the ones which we are going to change. Whenever we make a change, Chrome will ask you to restart the browser to reflect the changes. However, you don’t have to do it for every single change, just restart the browser after you have made all the changes.
- Material Design in the rest of the browser’s native UI: Use the arrow keys to find this subheading on the “Flags” page and then enable it. Enabling this setting will apply the material design to finer design elements present in the Chrome browser such as dialogue boxes, bubbles etc. On Mac, this setting will enable the MacViews.

- Enable Material Design policy page: This will change the Chrome’s policy page (
chrome://policy) to reflect the Material design.

- Enable Material Design bookmarks: When you enable this setting, the “
chrome://bookmarks” URL will load the Material Design bookmarks page. To do this click on the drop-down menu marked on the picture and select “Enabled”.

- Enable Material Design feedback: As the name suggests, this will change the feedback page to incorporate the Material Design language.

- Material Design Incognito NTP: This setting will allow your Incognito New tabs to adhere to Material Design.

- Enable Material Design settings: If you are on the latest version of Chrome, your Settings page should already be sporting the new Material Design. However, if it’s not, this is where you can enable it.

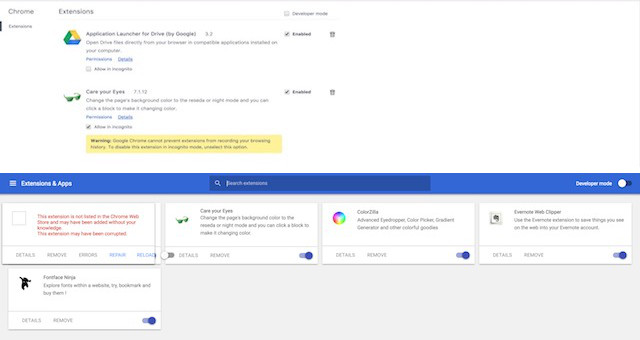
- Enable Material Design extensions: This will change the “Extensions” page of Chrome (
chrome://extensions) to adopt the Material Design.

- After you have enabled all of the above options, just click on the “Relaunch Now” button at the bottom of your browser to bring these changes into effects.

At the time of writing this article, these are the only options available. However, as I mentioned earlier, these options keep on changing from time to time. So, be sure to check the “Flags” page once in a while for getting the latest updates. Also, I have attached the before and after photos of my Extensions page. In the photo, you can see the effects of making these changes.
SEE ALSO: 10 Best Security Extensions for Google Chrome
Enable Material Design in Chrome
I really love Google’s Material Design language. It makes everything look beautiful and feel fluid. The animations are just perfect. It’s good to see that Google is trying to unify the user experience across all its platforms. This move will benefit all the users. But that’s my point of view, what about yours? Do you feel that the new Material Design in Chrome browser will change it for better? Let us know your thoughts by dropping them down in the comments section below.