Discord is a relatively new VoIP service for gamers, like TeamSpeak, that was introduced a couple of years ago. Currently, it’s rapidly growing to be the most sought after service that people use for communicating with others during their gaming sessions. First of all, you need to have a good headset for seamless voice communication. However, if you have a mediocre headset that picks up a chunk of background noise, or if you’re using the internal microphone on your computer or laptop, the other people in your voice chat will be irritated by all the background noise and echos that your microphone creates. So, if you’re one of the people causing these issues, and affecting the gameplay of others as well, we highly recommend you to take advantage of the “Push to Talk” feature available in Discord. Well, if you have no clue how to turn it on, let’s take a look at how to enable push to talk in Discord:
Enabling Push to Talk in Discord
First of all, you need to log in to Discord by making use of either the browser client or the desktop client that’s available across Windows, macOS and Linux. After you’ve successfully signed in, simply follow the steps below to turn on push to talk feature within minutes:
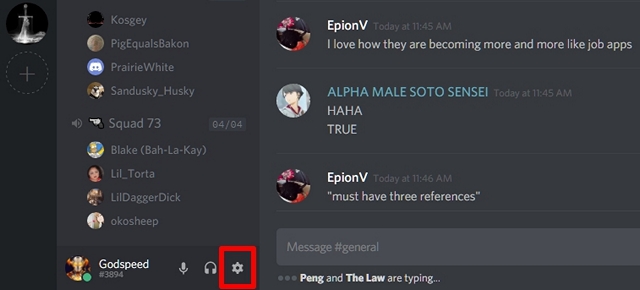
- In the Discord app, click on the gear-shaped icon, located beside your name at the bottom-left corner of the client, in order to get into Discord settings.

- Now, go to the Voice section in the Settings page and click on “Push to Talk” in order to turn it on.

Configuring Push to Talk in Discord
Well, you’ve successfully managed to enable this nifty feature. However, you won’t be able to use it right away, as you haven’t set a key for the Push to Talk feature. Simply follow the steps below to get this done in a jiffy:
- In the Discord Settings page, head over to the “Keybinds” section and click on “Add a Keybind”. Well, this can be done in the voice section as well, but here you can add multiple keybinds, meaning you can add multiple shortcut keys for the Push to Talk feature, by simply clicking on “Add a Keybind”.

- Now, for Action, choose “Push to Talk” from the drop down menu. Once done, click on “Record Keybind” and press the key that you want to use for Push to Talk feature. Now, click on “Stop Recording” in order to save the Keybind.

- Now, head back to the “Voice” section of Discord Settings. You’ll notice a slider right beneath “Push To Talk Release Delay”. This is essentially the delay that’s taken by Discord in order to cut off the voice signal, once you release the Push to Talk key. By default this is set to 20 ms, but you can adjust this slider between 0 ms and 2000 ms.

SEE ALSO: How to Enable Two-Factor Authentication in Your Discord Server
Ready to Try Out Push to Talk in Discord?
Well, Push to Talk is pretty useful, especially if you have a mediocre microphone that’s picking up a lot of background noise and echos. It’s also useful if you’re using the internal speaker/microphone combo on your desktop or laptop. By using Push to Talk, you’re cutting off the voice signal completely as long as the key is not pressed. Users only have to press the key once they want to convey something, so the rest of the users in the voice channel will not be affected a lot by the background noise and echos their mics pick up.
So, are you ready to try out this nifty feature that Discord has to offer? After using it, do let us know your thoughts on Push to Talk feature by shooting your valuable opinions in the comments section down below.


