Linux lets you control every element, and that’s one of the reasons why almost every service in the world runs on servers that are managed using Linux. This pinpoint control is not only available on servers, but also to users who use Linux distros on a daily basis. One of the advantages of having control is you could limit other users on Linux to how much information and files they can access, and if you didn’t already know you could do that, here’s how to change the directory owner in Linux.
How to Check the Owner of a File or Directory in Linux
Before we delve into the command to change directory ownership in Linux, it is important to know how to check who is the current owner of a directory. To check if a file or directory belongs to you or others in the group, all you need to do is use the following command:
ls -l <File_name> or
ls -l <Directory_name>
This should give you the following output, which tells you whom the file or directory belongs to. In the above example,

Now that you know who’s the owner of the file/directory, you can proceed with the transfer of ownership.
How to Change Directory Owner in Linux
Linux commands, from their names, are pretty straightforward to guess and explain, and the same goes with Chown. It stands for “Change Ownership“, and it does exactly what the name suggests, i.e., change the ownership of directories and files. Here’s the basic syntax of the chown command.
sudo chown -R $USER /directory- Chown is for changing ownership
- -R stands for Recursive and helps change the ownership of the subdirectories
- $USER is your username
- /directory should be replaced by the directory you want to change the ownership of.
An example of a valid chown command would be the following:
sudo chown -R abubakarmohammed /example_directory
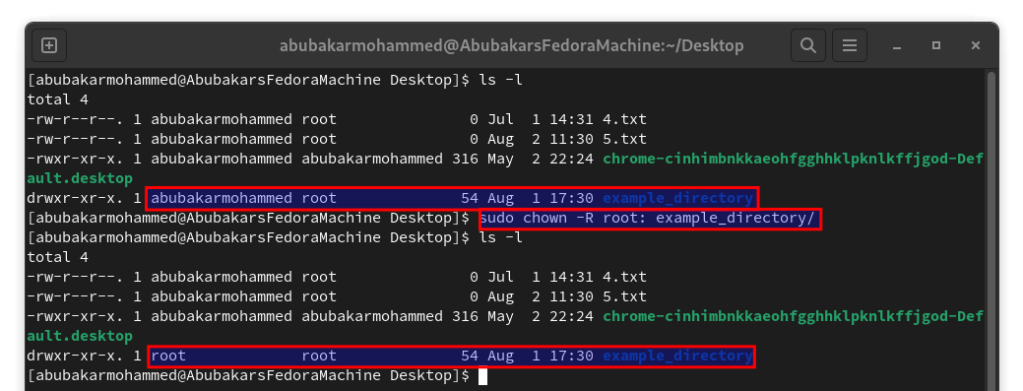
Considering the /example_directory is owned by “/” or the superuser, using the above command would transfer the ownership to the user “abubakarmohammed.” Failing to use -R will result in internal, nested directories still belonging to the previous owner.
If you want to transfer the access back to the superuser, use the following command:
sudo chown -R root: example_directory
Using “-R” is crucial here too because it recursively applies the chown command to all the internal files. Forgetting to use the same would mean the original directory would be transferred but its contents would still remain accessible to other users to modify.
How to Change File Owner in Linux
As expected, Chown is not limited to directories but also applies to files. The basic syntax for changing file ownership in Linux is as simple as it can get.
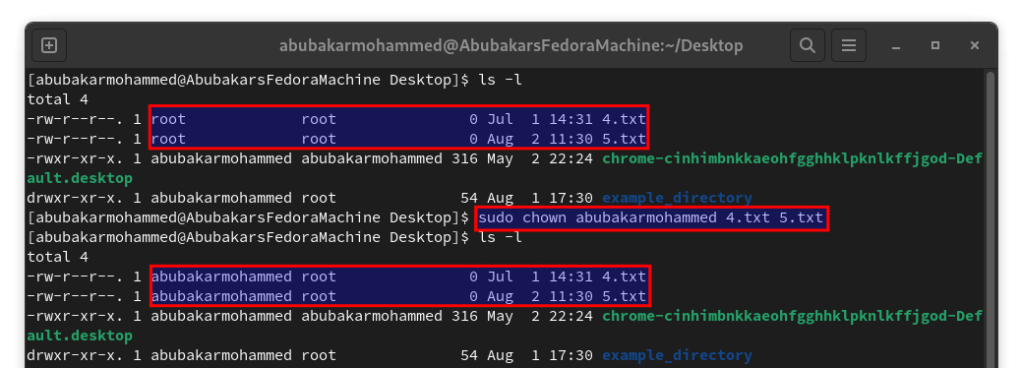
sudo chown $USER file1 file2An example of this is changing the ownership of files called 4.txt and 5.txt from the user “abubakarmohammed” to superuser.
sudo chown abubakarmohammed 4.txt 5.txt
Not all usernames are the same, and some can be exhaustive to type out multiple times. Hence, an alternative to typing usernames is using user IDs. All you need is to find out the user ID of the user you want to transfer the ownership to and replace it with the username. To find the user ID of a user, use the following command:
id -u $USER
Now that you know the user ID, use it in the chown command in the following way:
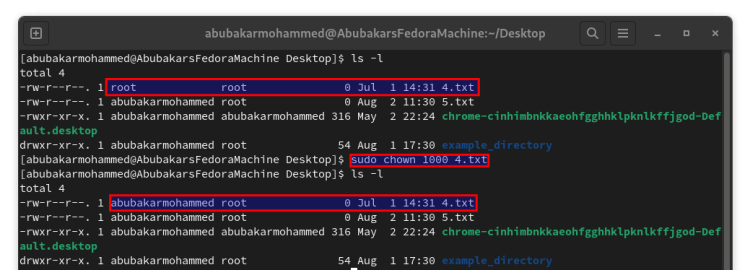
sudo chown user_id file1As per the above syntax, the command to transfer ownership of a file in Linux using user ID would be:
sudo chown 1000 4.txt
And that’s how you can change the ownership of files and directories on Linux. Now, while doing so, if you found directories that you no longer need, you can delete the directories effortlessly. Besides, you can copy the contents of directories from one place to another as well. Linux hosts a slew of amazing commands that you can use to effortlessly navigate the file system. We’ve mentioned more than 50 essential Linux commands for you to get started.


