Perhaps your existing Apple ID mobile number is no longer in use. Or maybe you want to switch to a different phone number that you just installed the SIM card for inside your brand-new iPhone. Whatever be the reason behind your wish to change your Apple ID phone number, let me tell you that there are multiple ways to do so. You can switch your Apple ID to a different mobile number right from your iPhone or iPad. If you do not have access to your device, you can also use a computer to change the phone number associated with your Apple ID. Irrespective of which of the five methods you choose, none of your data is harmed. So, let’s get going!
Change Trusted Phone Number for Your Apple ID on iPhone
When you first turn on two-factor authentication for your iCloud account, Apple automatically registers the phone number you use with your iPhone as a trusted phone number. This phone number is used to verify your identity, adding an extra layer of safeguard to your Apple ID. Whenever you (or, for that matter, anyone) sign in to your account on a new device, a 2FA prompt shows up on the trusted device for additional sign-in security.
Now, if you want to change the trusted phone number for your Apple ID at any given time, you can do so with ease. Just follow the steps below:
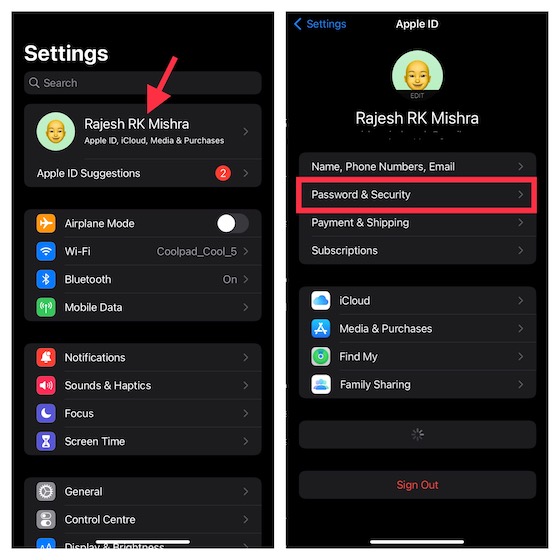
1. On your iPhone, open Settings, tap the Apple ID banner at the top, followed by Password & Security.

2. Now, tap on Edit located right next to the trusted phone number option.

3. Next, tap on the red minus button to the left of the number and hit the Delete button.

4. Next up, tap on Add a trusted phone number.

5. After that, you will need to enter your device passcode to proceed. Then, select your country code and type in the new trusted phone number.

6. Finally, verify your phone number using either a text message or a phone call, depending on your convenience. Your trusted phone number will then be updated in your Apple ID.
Change Trusted Phone Number from Apple ID Account Page
Apple also allows you to change your trusted phone number from the Apple ID account page in a web browser. Follow the steps below to learn how it works:
1. Open a web browser of your choice and navigate to the Apple ID account page. Then, sign in to your Apple account. If you’ve forgotten the password, you’ll first need to reset your Apple ID password.
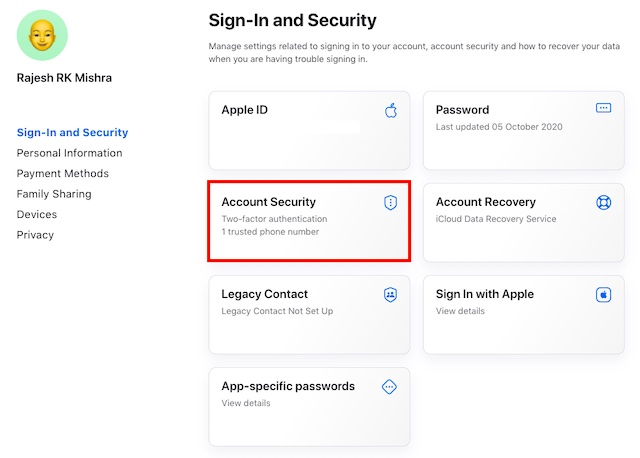
2. Choose Sign-In and Security from the left sidebar and click the Account Security option.

3. Next, click the “+” button next to the trusted phone number option in the pop-up window.

4. After that, select the country code -> enter your phone number and verify it via a text message or phone call.

And that’s it. You have successfully added a new trusted phone number to your Apple ID. You can now choose to remove the existing phone number by pressing the ‘minus’ icon next to that number.
Change Apple ID Phone Number for FaceTime and iMessage
1. First and foremost, make sure to sign out of every Apple service and device linked with your Apple ID, except the one you are using to change the phone number.
2. Now, open Settings and tap the Apple ID banner at the top.
3. Next, select the “Name, Phone Numbers, and Email” option.

4. Next up, tap Edit next to the “Contactable At/Reachable At” section heading.

5. After that, tap the red minus button and hit Delete to delete the existing phone number in use with FaceTime and iMessage on your iPhone or iPad.

6. Now, tap Continue and enter the new phone number. You will then receive a verification code on this number. Enter the verification code into the pop-up prompt. Here, it’s worth pointing out that if your new phone number is already in use as an iMessage phone number, shared, or trusted phone number, you won’t need to verify it.

Once the verification is complete, you can sign back into all services with your new Apple ID.
Change Apple ID from Email to Phone Number on Account Page
As stated above, you can also change the mobile phone number of your Apple ID from the iCloud website.
1. To get going, be sure to sign out of every Apple device and service connected to your Apple ID. Then, head over to appleid.apple.com in a browser of your choice. After that, sign in to your Apple account.

2. Next, click Sign-in and Security from the left sidebar and choose the Apple ID option in the right pane.

3. Under the “Change your Apple ID” section, enter the mobile number you wish to use as your Apple ID. After that, verify the phone number using the verification code you can receive over text or call.

5. After the verification is complete, sign back into all your Apple devices and services with your new Apple ID phone number instead of the email address.
Change Apple ID Phone Number without Verification Code
Now, many of you must be wondering – what happens if I don’t get the verification code, or my trusted device is not with me right now? Fret not, as you can still change your Apple ID phone number without the verification code. Just follow the steps below:
1. Open a browser on your computer and go to appleid.apple.com.
2. Now, sign in using your Apple ID and password as usual.

3. Next, click the “Did not get a verification code?” option and select More options from the pop-up prompt.

4. You will now be redirected to iforgot.apple.com. Next up, follow the instructions on the page to change the phone number associated with your Apple ID.

Note: Keep in mind that if your iPhone is running iOS 11.3 or later, you might not require to enter a verification code. In some cases, Apple will automatically verify your trusted phone number in the background while still keeping the two-factor authentication enabled.


