
For differently-abled people, the “Accessibility” suite in iOS devices has been no less than a boon. The ability to use the iPhone through voice-over, have the device read articles, recognize sounds, or perform certain actions with just a touch is something that truly empowers the differently-abled. Another equally important but lesser-known Accessibility feature on iPhones is called Switch Control. If you are wondering what is ‘Switch Control’ and how to use it on your iPhone and iPad, here is an in-depth guide so you can get the most out of this nifty feature.
How to Use Switch Control on iPhone and iPad
Switch Control comes with a wide range of features and offers full-on customization so that you can fine-tune all the pivotal aspects. Before getting into the customization aspect, let’s first get the basics out of the way!
What is Switch Control in iPhone and iPad?
Switch Control is designed to let you control your iPhone and iPad using a single or multiple switches. To be more precise, it changes the gestures used to control your iOS / iPadOS device.
People with limited mobility can take advantage of Switch Control to use their iPhone or iPad with the help of ability switches and other adaptive devices. It sequentially highlights items on the screen so that you can perform actions by tapping, moving your head, using adaptive accessories, or even smiling.


Notably, Switch Control also supports point scanning and custom gestures. It lets you fine-tune the timing, hold duration, and customize the menu for a more personalized experience.
Using custom switches, you can perform several actions like selecting and dragging items, activating Siri, invoking the control center, and more. Long story short, Switch Control ensures limited mobility doesn’t prevent you from getting the most out of your iPhone and iPad.
How to Enable Switch Control on iPhone and iPad
- Launch the Settings app on your iPhone or iPad.


2. Scroll down and tap on Accessibility.

3. Next, select Switch Control.


4. Next up, turn on the switch next to Switch Control. You may get a pop-up asking you to confirm the action. Tap ‘OK’ to confirm and enable the feature.

Note: If you ever want to disable Switch Control, follow the steps above and then turn off the toggle this time around. Besides, you can triple-click the Home button or the Power button to disable Switch Control on your iPhone or iPad.
How to Add a New Switch
Switch Control lets you add multiple types of switches that you can use to control your device. Make sure to assign one switch to the Select item action so that Switch Control can function correctly.
- Open the Settings app on your iOS or iPadOS device and go to ‘Accessibility -> Switch Control.’
2. Now, tap on Switches.

3. Next, tap on Add New Switch.

4. Next up, select a switch source:

- External: It lets you activate your external switch. The external switches “can be Bluetooth, MIDI, or Made for iPhone/ iPad Assistive Switch Control devices.”

- Screen: It allows you to choose Full Screen, enabling you to use Switch Control by tapping anywhere on your iPhone screen. Select Full Screen and then choose a preferred switch action.


- Camera: Select it to use Switch Control by moving your head to the left or right. After selecting Left / Right Head Movement, you get the option to choose the desired switch action, which could be either be scanner or system-related.

- Back Tap: With iOS 14 or later, you can perform certain actions like activating Siri, enabling Dictation, or adjusting volume by tapping twice or thrice on your iPhone’s back. What’s more, you can also use this super handy gesture to enhance Switch Control functionality. For instance, you can use this gesture to start / stop scanning and access the scanner menu.

5. Select the preferred switch action. Then, you have the option to choose Long Press to set up a long-press action.

How to Remove a Switch from Switch Control
If you no longer want to use a certain switch, you can easily delete it from Switch Control.
- Open the Settings app on your iOS or iPadOS device and go to “Accessibility -> Switch Control.”
2. Now, tap on Switches.
3. Next, swipe left on the switch you wish to remove. And then, tap on Delete.

How to Create a New Recipe
Interestingly, you can also create a new recipe, a set of complex actions, that you can temporarily assign to switches. Recipes come in handy in performing various tasks like triggering controls in games and even turning pages in the Books app. Moreover, you can also record several gestures as part of a recipe.
- Launch the Settings app on your iPhone or iPad and go to Accessibility -> Switch Control.
2. Now, tap on Recipes.

3. Next, tap on Create New Recipe. Then, give it a suitable name, assign a switch, and adjust the timeout.

How to Change Scanning Style
Based on your convenience, you can fine-tune the scanning style which lets you tweak how you move through items on your screen. Though Auto Scanning is the default, you can go for manual scanning if you wish to have better control.
- On your iPhone or iPad, open Settings app -> Accessibility -> Switch Control.
2. Tap on Scanning Style and select the one you prefer. We have explained what each scanning style does down below:

- Auto Scanning: It lets you move focus automatically after a specified duration.
- Manual Scanning: It requires a switch to move focus and a second switch to activate items.
- Single Switch Step Scanning: It also requires a switch to be engaged to move focus. Do note that if you take no action within a specified duration, the item with focus is triggered automatically.
How to Customize Switch Control Timing
- On your iPhone or iPad, open Settings app -> Accessibility -> Switch Control.
2. Now, scroll down to the Timing section. Next, you have five options to choose from:

- Auto Scanning Time: It allows you to adjust the auto-scanning time for Switch Control. In other words, it lets you change how long it takes for Switch Control to automatically scan items. Select it and then use the +/- button to adjust the timing.

- Pause on First Item: It lets you adjust the duration for which time auto-scanning will wait after input is pressed. Depending on your needs, you can increase/ decrease the timing using the +/- button.

- Loops: It allows you to hide the cursor after each item on the screen has been visited a certain number of times.

- Move Repeat: It enables you to control the delay before the move to the next or previous item is repeated while a switch remains pressed. It also features +/- buttons to let you fine-tune the timing.

- Long Press: Using the long press, you can add another action to a switch that is activated when you hold the switch for longer than the duration you have specified. You can not only choose the timing of the long-press but also pause Switch Control scanning by holding down on a long press enabled switch.

How to Customize Switch Control Tap Behavior
For a more personalized experience, you can also fine-tune the tap behavior
- On your iPhone or iPad, open Settings app -> Accessibility -> Switch Control.
2. Now, select the Tap Behavior option.

3. Next, you have three options to choose from:

- Default: Choose it to show the scanner menu of Switch Control.
- Auto Tap: It causes the Select action to automatically tap the screen unless it is pressed twice to show the Scanner Menu.
- Always Tap: It lets you make the ‘Select action’ immediately choose the focused item instead of displaying the Scanner Menu.
Keep in mind that the ‘Always Tap’ feature applies to the Item Mode only. Notably, the Always Tap behavior will revert to default in Guiding Cursor and Head Tracking modes.
How to Customize Focused Item After Tap
- On your iPhone or iPad, open Settings app -> Accessibility -> Switch Control.
2. Now, tap on Focused Item After Tap.
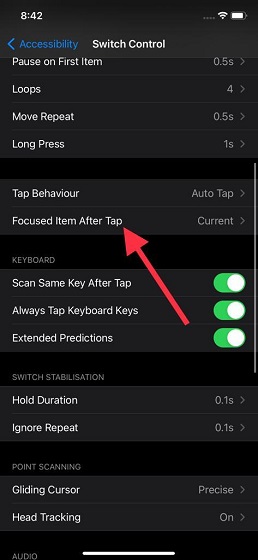
3. Next, you have two options to choose from:

- First Item: Select it to have Switch Control scan the first item.
- Current Item: Choose it to have Switch Control scan the current item.
How to Customize Keyboard for Switch Control
- On your iPhone or iPad, open Settings app -> Accessibility -> Switch Control.
2. Now, scroll down to the ‘Keyboard’ section. Then, turn on/off the toggles for ‘Scan Same Key After Tap’ and ‘Extended Predictions’ based on your preference.

How to Adjust Switch Stabilisation for Switch Control
Switch stabilization allows you to adjust both the hold duration and ignore repeat for improved accessibility control.
- On your iPhone or iPad, open Settings app -> Accessibility -> Switch Control.
2. Now, scroll down to Switch Stabilisation. Next, you can choose to customize the hold duration and ignore repeat.

- Hold Duration: It refers to the duration your input device must be held before a press is recognized. Bear in mind that the hold duration must be less than the Auto Tap time so that you can use the double input press. You can fine-tune the duration via the +/- buttons.

- Ignore Repeat: It’s the duration in which multiple presses of input are treated as a single input. Bear in mind that the ignore repeat duration must be less than the Auto Tap time so that a double input press can be used. You can fine-tune the duration via the +/- buttons.

How to Customize Gliding Cursor for Switch Control
- On your iPhone or iPad, open Settings app -> Accessibility -> Switch Control.
2. Now, scroll down to the ‘Point Scanning’ section and choose Gliding Cursor.

3. Next up, there are three options to choose from, and we have explained each one does below. You can use the +/- button to adjust the gliding cursor speed.

- Single: The Single mode lets you make one vertical and one horizontal selection. It is generally faster for larger selection targets.
- Refined: Refined mode enables you to refine your targeting in each direction, with a second scan in the range of your initial selection.
- Precise: It adds a final low-speed scan for more precise targeting.
How to Use Head Tracking
Using the camera of your iPhone and iPad, the ‘Head Tracking’ feature follows your head’s movement to control a pointer on the screen. Besides, it also tracks your facial expressions to perform actions.
Bear in mind that you can use Head Tracking only on the iPhone/iPad with a front-facing TrueDepth camera. The TrueDepth camera is available on iPhone X and later, and 12-inch iPad Pro (3rd and 4th-gen) and 11-inch iPad Pro (1st and 2nd-gen).
- On your iPhone or iPad, open Settings app -> Accessibility -> Switch Control.
2. Now, scroll down to the ‘Point Scanning‘ section and choose Head Tracking.
![]()
3. Next, toggle on Head Tracking, and then you can fine-tune the head-tracking actions, choose the tracking mode, and adjust the pointer speed.
![]()
Fine-Tune Head Tracking Actions
- Smile: It lets you choose an action to perform when you smile showing your teeth.
- Open Mouth: It allows you to choose an action to perform when you open your mouth.
- Stick Out Tongue: It enables you to select an action to perform when you stick out your tongue while lips are closed.
- Raise Eyebrow: It allows you to choose an action to perform when you raise your eyebrows.
Fine-Tune Head Tracking Mode
Using tracking mode, you can customize how the pointer moves.
![]()
- With Face: Once selected, you can point your face directly at a position on the screen to move the pointer to that location.
- When Facing Screen Edges: Select it to point your face towards an edge of the screen to move the pointer in that direction. Facing directly at the screen will let you keep the pointer still.
- Relative Head: Choose it to move the pointer with your head no matter where you are facing. It’s worth mentioning that moving faster makes the pointer move faster.
How to Enable/ Disable Sound Effects
Switch Control also offers neat sound effects that you can enable or disable as per your needs.
- On your iPhone or iPad, open Settings app -> Accessibility -> Switch Control.
2. Now, turn on/off the switch right next to Sound Effects.

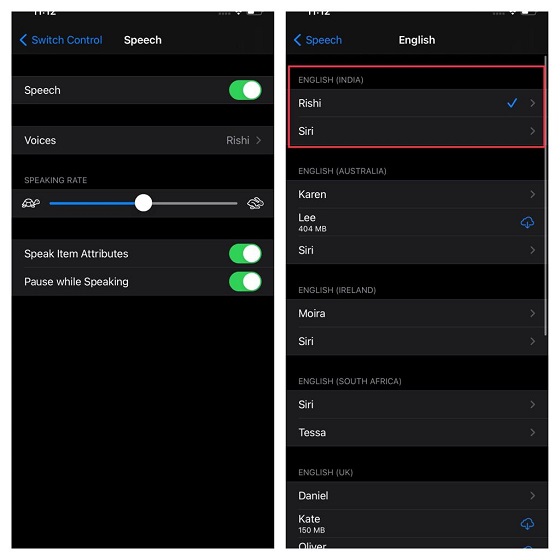
How to Adjust Switch Control Speech
Switch Control provides the desired flexibility to adjust speech as well. For instance, you can choose a preferred voice and even fine-tune the speaking rate.
- On your iPhone or iPad, open Settings app -> Accessibility -> Switch Control.
2. Now, scroll down to the ‘Audio’ section and select the ‘Speech’ option.

3. Next, turn on the switch for Speech. After that, you can choose the preferred voice, adjust the speaking rate, and enable/ disable ‘Speak Item Attributes’ and ‘Pause while Speaking’ options.
How to Customize Switch Control Menu Items
Another feature worth taking note of is the ability to customize the menu items. It lets you tweak not only gestures, settings but also media controls so that you can stay in complete control while performing various actions.
- On your iPhone or iPad, launch Settings app -> Accessibility -> Switch Control.
2. Now, scroll down and choose Menu Items.

3. Next, there are five menu items to choose from: Top Level, Gestures, Device, Settings, and Media Controls. Select the preferred menu item and then adjust the order in which you want them to appear.

How to Enable/ Disable Group Items
Switch Control also lets you group items for faster navigation. However, you can choose to enable/disable it on your own terms.
- On your iPhone or iPad, open Settings app -> Accessibility -> Switch Control.
2. Now, turn off/on the toggle for Group Items based on your preference.

How to Enable/ Disable Large Cursor
Though the large cursor looks better and makes navigation a bit more convenient, you can disable it if you don’t find it helpful.
- On your iPhone or iPad, open Settings app -> Accessibility -> Switch Control.
2. Now, scroll down to the ‘Visual’ section and turn off the ‘Large Cursor’ toggle.

How to Customize Switch Control Cursor Color
Probably the coolest thing about Switch Control is the ability to customize the cursor color. So, if you want the cursor to look pleasing to the eyes (or if you are colorblind), choose the desired color for it.
- On your iPhone or iPad, open Settings app -> Accessibility -> Switch Control.
2. Now, scroll down to the ‘Visual’ section and select Cursor Color.

3. Next, choose a preferred color for the cursor.

How to Create New Switch Control Gestures
Gestures make it simpler to perform specific tasks. So, never fail to create handy gestures that can let you get work done faster.
- On your iPhone or iPad, open Settings app -> Accessibility -> Switch Control.
2. Now, scroll down and choose Saved Gestures.

3. Next, click on Create New Gesture.

4. Next up, tap or swipe to create a neat custom gesture. Do note that a sequence of gestures will be counted as a single multiple-touch gesture. Say you draw ‘O’ followed by two ‘I’, then you will have to draw ‘OII’ each time you want to activate the action linked to that gesture. Once you create the desired gesture, make sure to tap on Save.

Now, you can activate your custom gestures from the Actions -> Gestures -> Saved.
Enable/ Disable Side Button Confirmation
You can use Switch Control to confirm payments with Face ID, or any time double-clicking the side button is required to verify the purchase.
- On your iPhone or iPad, open Settings app -> Accessibility -> Switch Control.
2. Now, scroll down to the bottom and then turn on the switch right next to Confirm with Switch Control.

3. Next, tap on Continue and then double-click the side button to confirm.

Enable and Customize Switch Control on iOS and iPadOS
That’s pretty much it! As I said above, Switch Control is a pretty handy Accessibility feature designed for folks with limited mobility. The best part about this feature is the wide range of customization options. Thus, you can tweak all the essential aspects in line with your needs. Besides, it also lets you customize the appearance of menu items and the cursor, which might come in handy for some.
Recently, we have covered quite a few Accessibility-related articles, such as how to enable and use Magnifier, Screen Curtain, Sound Recognition, and Accessibility Shortcut. Be sure to check them out if you are yet to get the most out of these equally useful features.


