More times than not, you probably find yourself clearing your iPhone storage to make room for extra photos. However, that may also force you to delete photos that you wouldn’t have otherwise. That’s exactly where the need for a reliable tool to transfer photos from your iPhone to a PC comes in, letting you create a safe backup for your photos without having to delete them. This guide will describe to you the best ways to transfer iPhone photos to your PC. So, let’s begin!
Things You Should Know about Transferring iPhone Photos to PC
Transferring photos from your iPhone to a PC can be a cumbersome task, especially if you have a lot of them. However, there are quite a few ways to do so. From using apps to wireless transfer photos and using a Cloud storage platform to using dedicated third-party software, there are multiple ways to go about it.
While you can go wireless if you don’t have too many photos to transfer, for bulk transfers, you will need a more effective solution. Besides, not all the tools are reliable out there, and you don’t want to risk compromising the security of something as private as your photos.
Over the years, I have explored way too many tools and methods of transferring photos and videos seamlessly. So, going by my personal experience, I have detailed the top methods of doing so, minimalizing the hassle as much as possible.
1. Use a Photo Transfer App to Move iPhone Photos to Your PC
While there are several photo transfer apps out there, for us, TenorShare’s iCareFone seemed to work the best. This is mostly because the app doesn’t necessarily complicate things and instead, gives you a one-click photo export option. Here’s how to use it:
Transferring All Photos on iPhone to PC
- Firstly, head over to iCareFone’s official website (visit) to download the tool.
- Once installed, connect your iPhone to your PC using a USB-C or Lightning cable (For iPhone 14 series and lower).
- Then, as soon as you connect your iPhone, you will see the “Trust This Computer?” confirmation window on it, where you’ll need to tap Trust on your iPhone and enter your device passcode to get through.

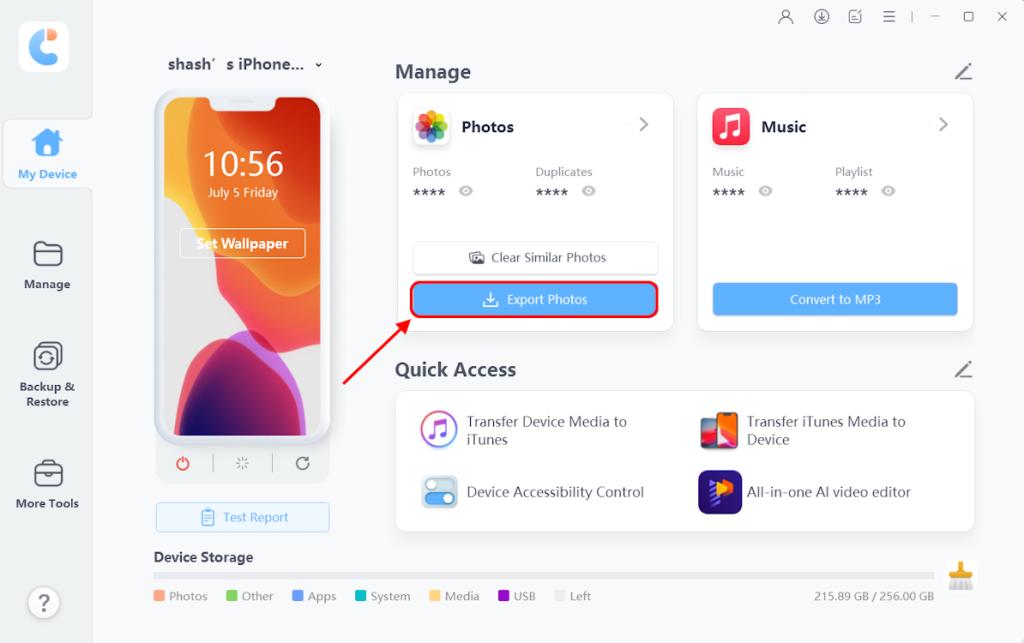
- That will instantly take you straight to iCareFone Windows App’s My Device section.
- Here, you will see your device being listed along with a dedicated Export Photos button in the Photos panel. Click on it.
- That will instantly open your PC’s File Explorer, where you will need to select the export destination. Once selected, click on Select Folder.

- And, with that, the tool will automatically start exporting all your device’s photos to your PC.

Transferring Specific Photos on iPhone to PC
Now, while the one-click export is a great functionality, iCareFone also allows you to transfer specific photos on your iPhone. To do so, follow these steps:
- When your iPhone is connected to your Windows PC, from the Home Page, select Manage from the left panel.

- Here, under Photos, you will find all your iPhone’s images. Select the images that you want to transfer.
- Once selected, click on the Export button at the bottom right.

- Next, in the Export Confirmation window, you can select the format you want to export the photos in. You can also modify the export destination from here. Once you’ve modified these settings, click on Next.

- That should instantly start exporting your iPhone photos to the desired location on your PC.
Now, the free version lets you transfer only up to 10 files. However, to make the most of iCareFone, the premium is the way to go, primarily because there’s a lifetime license that costs $69.95. That’s the smarter way to go about it since the monthly tier costs $29.95. Or, you can get a year’s license for $49.95.
For the price that you pay, you don’t just get to enjoy the one-click photo transfer feature, but also a very reliable backup/restore functionality which I’ve been using for quite some time now. Most importantly, you can transfer data apart from photos and videos from your iPhone to a Windows PC, which has always been a problem.
It also offers essential iPhone controls right inside, so in case your display stops working somehow, you can still carry out certain important actions on your iPhone.
2. How to Transfer Photos from iPhone to PC Wirelessly
If you’re in the Apple ecosystem, you can easily transfer files between your iPhone and Mac wirelessly, thanks to AirDrop.
However, if you don’t send in the photos in batches of 100, AirDrop glitches out a lot of times. That is understandably a hassle. Besides, if you are trying to transfer files from your iPhone to a Windows PC, AirDrop will not work.

That’s where apps like LocalSend come in. All you have to do is connect to the same Wi-Fi network on both devices to do so. The UI is simple and easy to understand, and the process is completely free. So, if you’re just looking to transfer a couple of photos, these wireless tools work great.
3. Use iCloud to Transfer Photos from iPhone to PC
Transferring photos from your iPhone to your Mac is super duper easy. For the most part, you don’t have to do so manually. You can simply sync your photos and they will appear on both your iPhone and Mac’s Photos app. However, if you’re not using the Photos app, here’s a manual way to go about it and use your iCloud Drive to your advantage:
- On your iPhone, head over to the Photos app and select photo(s) that you want to transfer to your Mac.
- Then, tap on the Share icon here at the bottom left.
- In the share sheet, scroll down to find Save to Files and tap on it.
- That will take you straight to your iCloud Drive folder, where you will need to hit the blue Save button at the top right. This will instantly initiate the upload of these files to iCloud.

- Once done, head over to your Mac, and from the Finder, click on iCloud Drive in the left panel. Here, you will find the photos you have uploaded to iCloud through your iPhone, provided you have turned on the iCloud sync between your devices.

And, that’s how you can easily transfer photos from your iPhone to Mac this way. However, do note that for this method to work as intended, you will need to sign in to the same Apple ID on both devices. Also, you can transfer files from your Mac to your iPhone the same way. Being in the ecosystem pays.
4. Use Google Drive to Transfer Photos from iPhone to PC
First things first, you will need to install the dedicated Google Drive app (Download) on your iPhone. Once that’s done, open the app and sign in. Then, follow these steps to transfer photos from your iPhone to your PC:
- When in the Google Drive iOS app, tap on the multicolored plus icon at the bottom right.
- Then, tap on Upload file from here and select Photos and Videos.

- Next, Allow Full Access in the permission window that pops up.
- Then, you will see all your photo albums listed from where you will need to head in and select the images that you want to transfer.
- Once selected, tap on the blue UPLOAD button at the top right. Then, you will see the Processing uploads message displayed at the bottom.

- Next, head over to Google Drive on your Mac or Windows PC. You can simply visit it on the web or, you can download the dedicated app (Download).
- Sign in to the same Google account as on your iPhone and that’s it. You will find all the files that you’ve uploaded right here. Then, you can easily download the uploaded files to your PC.

5. Transfer Files from Your iPhone to Your PC Over USB
- Connect your iPhone to a Windows PC using the connecting wire.
- Add your iPhone as a trusted device in the permission window if you haven’t already.
- Next, head over to your File Explorer, and here, your connected iPhone will show up. Double-click on it.

- Head into your iPhone’s internal storage to see some strangely named folders. These folders house your photos and videos.

- Open them one by one to find all your photos and videos and select them manually. Otherwise, you can simply use the Ctrl + A shortcut to select all the folders and Ctrl + C to copy them. You can also hold down Ctrl again and click on specific photos to select them.

- Then, head over to the desired location on your PC where you’d like to paste them and use the Ctrl + V shortcut to do so.
With that, all your iPhone’s files will start copying to your PC, and once done, you can disconnect your iPhone.
And, that brings us to the end of this guide. The methods are very straightforward if you follow them to the T. But, if you do have any other queries or run into any issues when trying them out, drop them in the comments down below.


![How to Transfer Contacts From iPhone to iPhone [2025 Guide]](https://static.beebom.com/wp-content/uploads/2024/02/How-to-transfer-contacts-from-iPhone-to-iPhone.jpg?w=300&quality=75)


