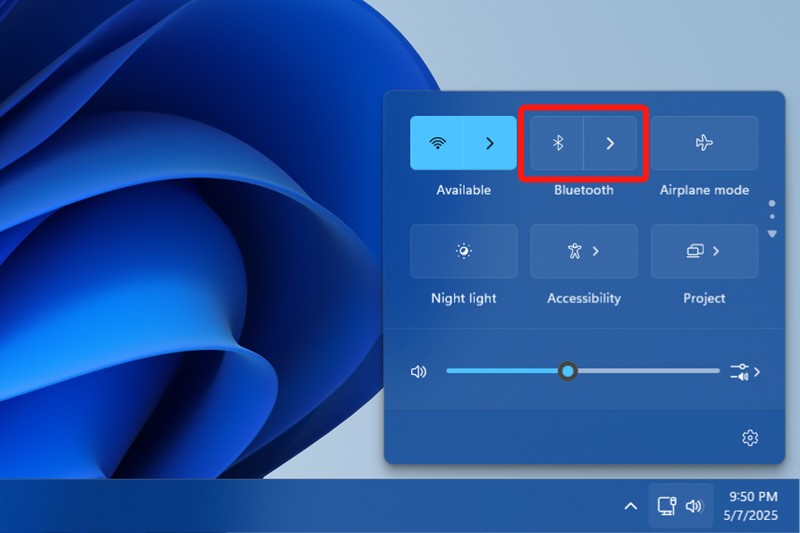
- The easiest way to turn on Bluetooth on Windows 11 is by using the Action Center.
- You can also turn it on from the Settings app by going to Bluetooth & devices.
- Lastly, you can use the Control Panel or Device Manager to enable or disable Bluetooth and Drivers.
Windows 11 brought many changes to the user interface, but one of the major UI changes was related to the Action Center. Besides a new splash of colors, the iconography was a tad different, which made it challenging for users to get used to the same. If you want to turn on Bluetooth but couldn’t quite find it, here’s how to turn on Bluetooth on Windows 11.
How to Turn On Bluetooth on Windows 11
There are multiple ways to turn on Bluetooth on Windows 11. Besides, if you cannot find the option for some reason, we’ve also highlighted troubleshooting steps at the end of this guide. Let’s go through all the ways.
Method 1: Turn on Bluetooth on Windows 11 Using Action Center
The easiest way to enable Bluetooth on your Windows 11 PC is via the Action Center. It’s similar to Control Center on iOS and Quick Settings on Android. Here’s how it works:
- Click on the Wi-Fi and Sound icons on the bottom right, or use the Windows + A keyboard shortcut to launch the Action Center.
- Now, hit the Bluetooth icon, and it should turn on right away.

- You can also click the right arrow beside the Bluetooth tile and flip the toggle to turn it on.
- The way to spot that Bluetooth is turned on is by looking at if the option is highlighted, just like the Wi-Fi tile in the picture below.
Now all you need to do is pair a new Bluetooth device. You can use the arrow key to see all the saved devices and click on one of them to connect. If you were pairing a new device, put it in pairing mode, and it should show up under New devices. If it doesn’t, click Show all devices.
Method 2: How to Turn on Bluetooth From Windows 11 Settings
If that didn’t work, you can always directly head over to Windows’ Settings app to enable Bluetooth. Here’s how to do it.
- Open Windows Settings and click on the Bluetooth & devices tab from the left sidebar.
- Now turn on the Bluetooth toggle until it reads “On”.
- If you had paired a device before, it should automatically connect. If you’re pairing a new one, click on the + Add device button.
- Now select Bluetooth from the “Add a device” screen and select the device from the list and wait for it to connect.
- Then click on OK to close the overlay.
Method 3: Turn On Bluetooth From Control Panel Windows 11
Control Panel was the OG Settings app before Windows 10, and although Microsoft has mostly migrated all the settings, Control Panel can still help you switch on or off features including Bluetooth.
- Use the Windows + R keyboard shortcut to open the Run window.
- Here, type
ncpa.cpland hit the Enter key.
- Now right-click on Bluetooth Network Connections and select Enable.
This should turn on Bluetooth and will connect to your previously saved devices.
Method 4: Turn on Bluetooth from Device Manager on Windows 11
The last and the most uncommon way to turn on Bluetooth is by using the Device Manager on Windows. Here’s how:
- Press the Windows + X keyboard shortcut and select Device Manager to launch it.
- Expand the Bluetooth section and look for your adapter. It could me Realtek, Broadcom, Intel, or MediaTek make.
- Right-click on your Bluetooth adapter and select Enable device.
- Restart your Windows PC, and Bluetooth will be enabled on your Windows 11 computer.
Like other operating system, Windows isn’t without its issues. Some of the most common ones are related to networking or Bluetooth, but there are plenty of ways to fix Bluetooth issues on Windows 11. Some of them include reinstalling the drivers, restarting the Bluetooth service, and restarting your computer.
So these are the four ways you can turn on Bluetooth on Windows 11. Let us know if that helped you in the comments below.