
Microsoft’s latest desktop OS, Windows 11, brings a long list of hidden features, but the option to set Taskbar icons to ‘Never Combine’ is still missing. Users who have upgraded from Windows 10 to Windows 11 are finding it tough to navigate their way around the new centered Taskbar. But you don’t have to worry, as we have found a nifty way to enable this feature. In this guide, we bring you two simple methods to set Windows 11 Taskbar icons to never combine. It works exactly like in Windows 10 and 7, plus you also get access to some legacy changes on Windows 11. So without any delay, check out how to ungroup Windows 11 Taskbar icons.
Set Windows 11 Taskbar Icons to Never Combine (2022)
We have mentioned two different ways to set Windows 11 Taskbar icons to never combine. The third-party apps listed below enable you to further customize the Taskbar in Windows 11, so if you are an old-school user, you are absolutely going to love them. Now, expand the table below and check out both the apps.
Ungroup Windows 11 Taskbar Icons with StartAllBack
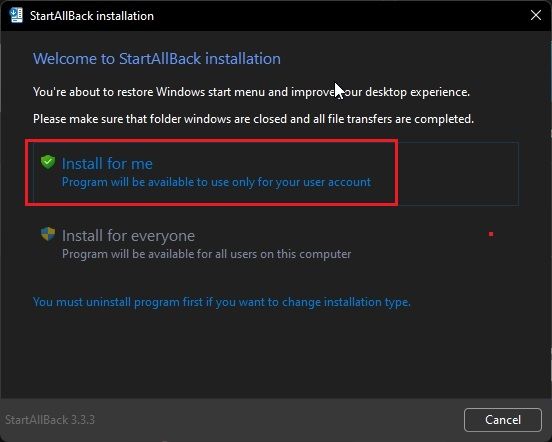
StartAllBack is a powerful program that lets you set Windows 11 Taskbar icons to ‘Never combine’. Apart from that, it brings the Windows 10-style Start menu and other cosmetic changes that old-school users will appreciate. It offers a free trial period of 100 days. After that, you will have to buy a license key that costs $4.99 for a single PC. If you like using this software, you should definitely buy it. That said, let’s see how it works:
1. First, go ahead and download StartAllBack from the link provided here. Then, install the program using the downloaded EXE file.

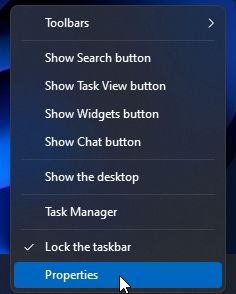
2. After installing the program, it will move the Taskbar to the left side. Also, StartAllBack will open automatically, giving you a variety of options to customize the taskbar. If that does not happen, right-click on the Taskbar and select “Properties” to open the program.

3. Now, go to the “Taskbar” section from the left sidebar, and click on the drop-down menu next to “Combine taskbar buttons” on your Windows 11 PC. Then, choose “Never” from the drop-down menu. And that’s it.

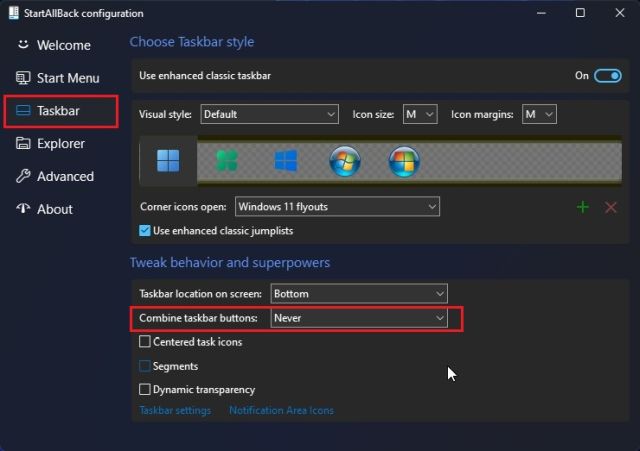
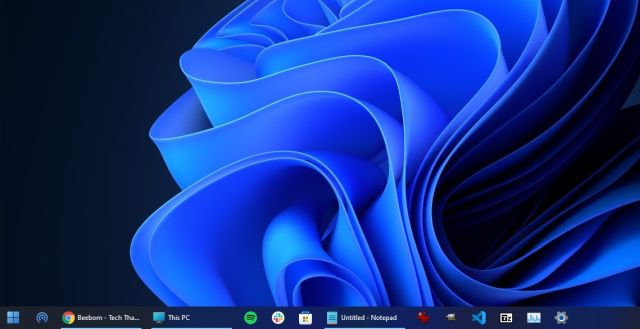
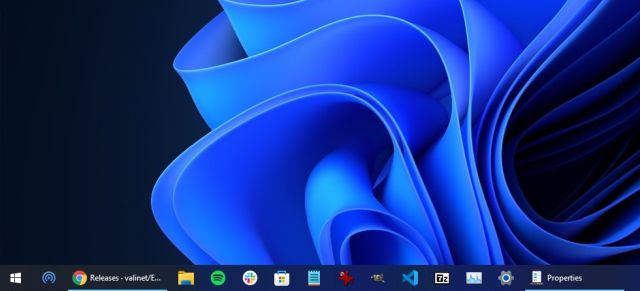
4. Now, the Taskbar icons on your Windows 11 computer will be set to never combine. See the screenshot below to understand how it will look like:

Ungroup Windows 11 Taskbar Icons with ExplorerPatcher
In case you are not happy with the 100 day trial period of StartAllBack and want a completely free program, ExplorerPatcher is a great option. It lets you ungroup Windows 11 Taskbar icons in one click. Follow the below guide for detailed instructions.
1. Use this link and download ExplorerPatcher.
2. Now, install the app, and it will automatically set the Taskbar icon alignment to the left. The best part about this app is that the Taskbar icons are set to never combine by default, so you don’t need to do anything.

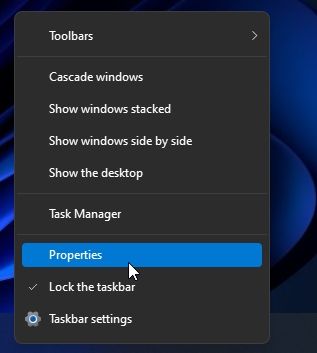
3. Anyway, to configure the settings, right-click on the Taskbar and select “Properties“.

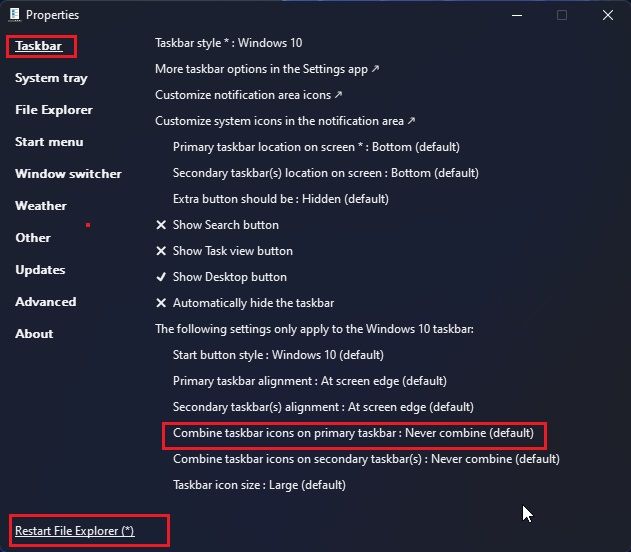
4. Under the “Taskbar” section, you can further customize Taskbar in Windows 11 to your liking. After making the changes, make sure to click on “Restart File Explorer” at the bottom left.

Ungroup Taskbar Buttons on Windows 11
So these are the two easiest ways to ungroup Taskbar icons and set them to never combine in Windows 11. I also tried a few hacks with the Registry Editor, but the latest Windows 11 build does not support ungrouping of Taskbar icons. I would strongly recommend StartAllBack because the alternate Start menu is also fast and brings fluidity of Windows 7 to Windows 11. Anyway, that’s all for this guide. If you want to learn about upcoming Windows 11 features, go through our exhaustive list. And if you wish to learn how to drag and drop files on the Windows 11 Taskbar, we have a handy guide for that as well. Finally, if you have any questions, let us know in the comments below.

