The new centered Start Menu in Windows 11 is divided into two sections. The top half displays the shortcuts for pinned apps, whereas the bottom half includes the “Recommended” section. The latter shows recent files and offers recommendations for various apps installed on your PC. However, if you find the Recommended section annoying and unnecessary, you now have the option to completely remove it. In this tutorial, we will explain how to remove the Recommended section in the Windows 11 Start Menu.
Remove Recommended Section from Windows 11 Start Menu (Updated April 2022)
We have mentioned an easy method to remove the Recommended section from the Windows 11 Start menu in this tutorial. Along with that, we have also included steps to reduce the space assigned to Recommended items, and how to prevent recently added apps from showing up in the Recommended section. You can expand the table below and move to a tutorial of your preference.
Method 1: Remove Recommended Section on Windows 11 with Explorer Patcher
With the latest release of Explorer Patcher, you can now entirely remove the Recommended section from the Windows 11 Start menu. And the best part is that it’s completely free to use. Earlier, we had used Explorer Patcher to set Windows 11 Taskbar icons to ‘Never Combine’ and this time too, the tiny open-source utility has come to the rescue. Here is how to do it.
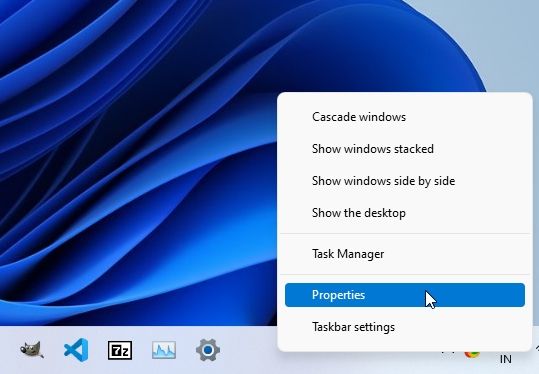
1. Go ahead and download the latest stable build of Explorer Patcher using the GitHub link right here. Then, run the program to see the Windows 11 Taskbar instantly change to a Windows 10-style Taskbar. Now, right-click on the Taskbar and open “Properties“. It will open Explorer Patcher’s properties.
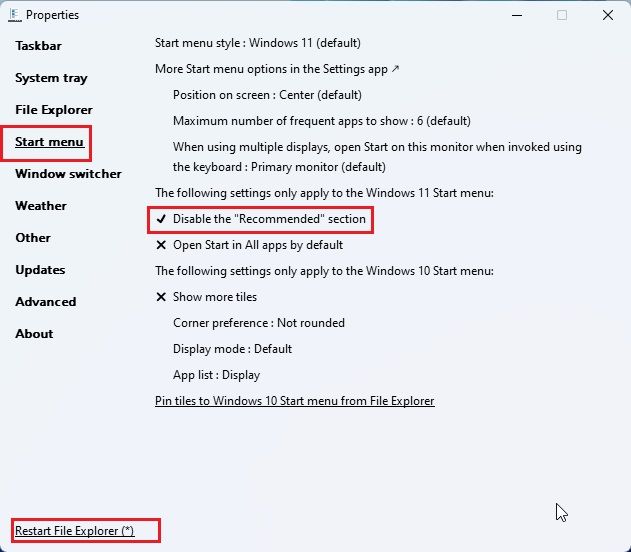
3. Then, move to the “Start menu” section from the left sidebar and turn on the “Disable the Recommended section” toggle. Finally, click on “Restart File Explorer” at the bottom-left corner.
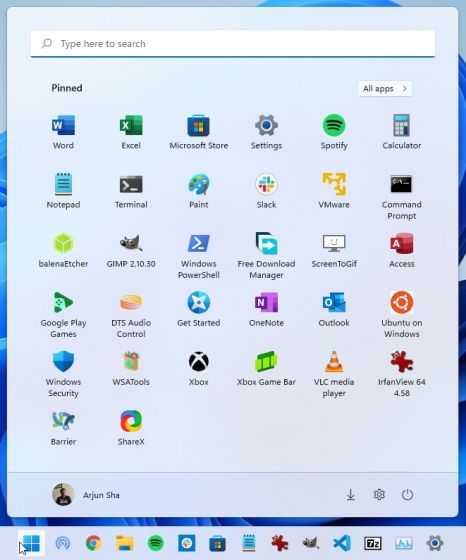
4. Now, open the Start menu on Windows 11, and you will find that the Recommended section has been removed. You can add more apps to the Start menu and fill the entire section with your favorite pinned apps. That’s awesome, right?
Method 2: Reduce Recommended Section Area and Add More Pins
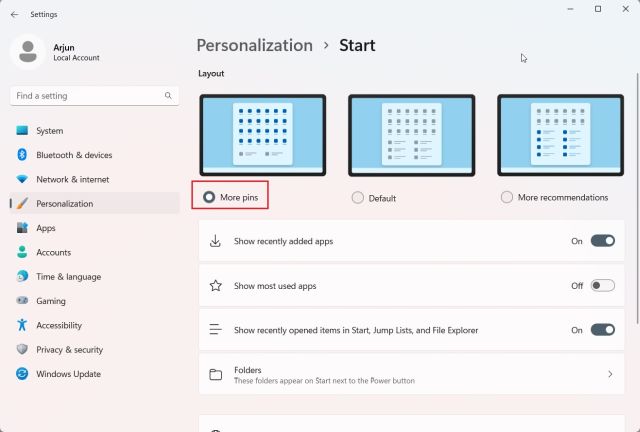
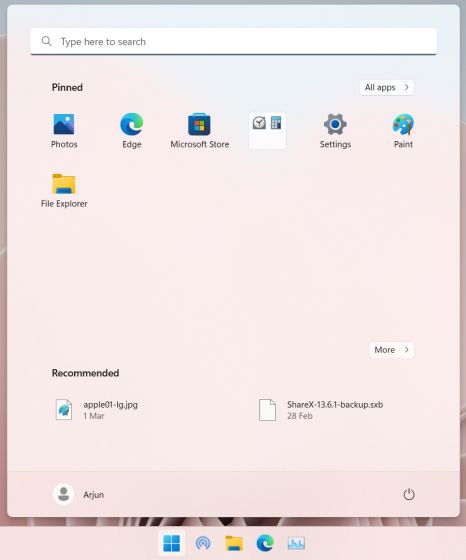
If you are on the Windows 11 Dev build (22509 or later; Dec 1, 2021), you can choose a Start menu layout where the Recommended section is shrunk to just one row, and more space is available for pinned apps. It is one of the best Windows 11 hidden features, and I always switch the layout when setting up Windows 11.
This way, you will not have to use a third-party app to get more space on the Start menu. The feature is currently available to Insiders in the Dev channel, but it will soon be available on the Stable channel. Then, everyone can follow these steps below and reduce the Recommended section area on their Windows 11 PC.
1. First, press the “Windows + I” shortcut to open the Settings. Now, move to “Personalization” from the left sidebar and click on “Start” in the right pane.
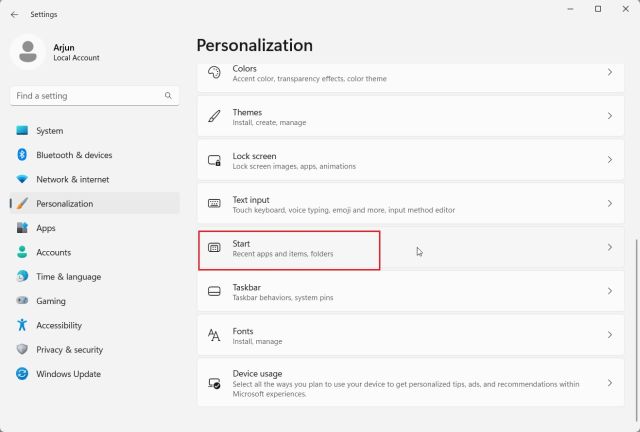
2. Here, choose the “More pins” layout.
3. Now, open the Windows 11 Start menu, and you will find that more rows are available for pinned apps. The Recommended section area is reduced to just one row.
Method 3: Remove Recommended ‘Items’ Through Windows Settings
You can remove the Recommended section from the Start Menu using the Settings menu. Here’s how you can do that in two clicks:
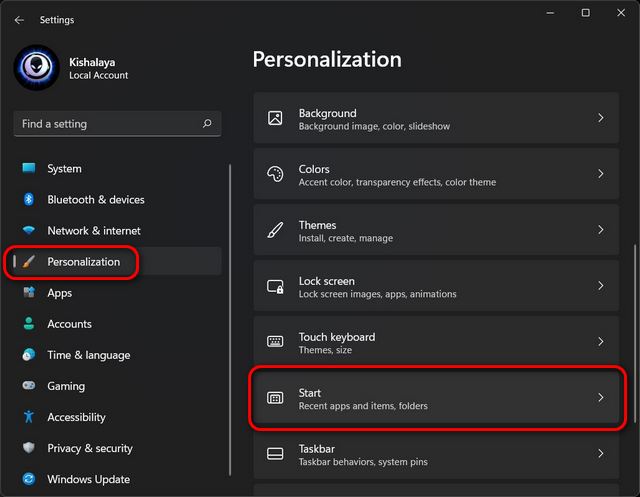
- Open “Settings” using the Windows 11 keyboard shortcut Win + I. Then, click on “Personalization” on the left sidebar, and select “Start” on the right pane.
- Now, turn off the toggle next to “Show recently opened items in Start, Jump Lists, and File Explorer“. You can also disable the “Show recently added apps” option to get an even cleaner Start Menu experience in Windows 11.
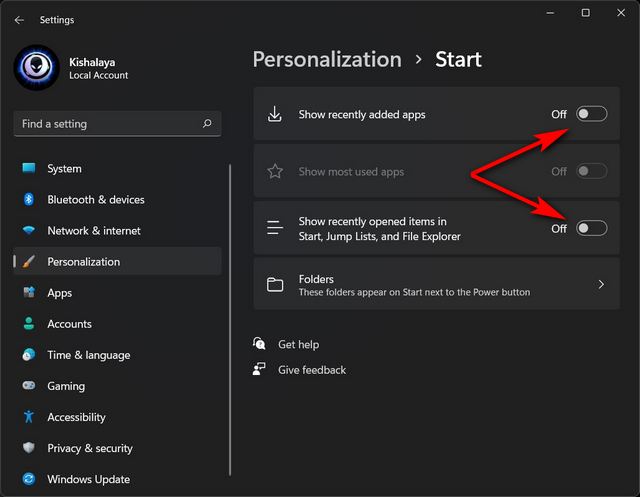
Note: Disabling “recently opened items” will also get rid of your favorite websites on the Taskbar jump-lists for your browser, which could be inconvenient for some users.
Method 4: Remove Recommended ‘Items’ From Start Menu
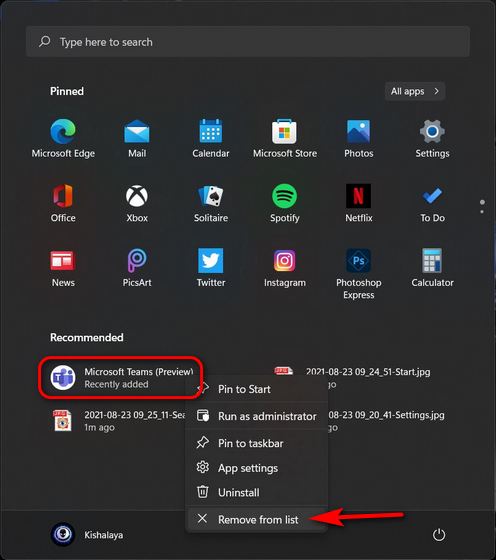
Another way to remove the Recommended items is by individually removing each one from the Start Menu. Here’s how you do that:
- Open the Start Menu either by clicking on the Start Button or hitting the Windows key on your keyboard.

- Now, right-click on the unwanted item and select “Remove from list“. If it is an app that you are trying to remove, you can also click the “Uninstall” button. But this will remove the app from your device for good, and you can no longer access it.
Easily Remove the Recommended Section From the Start Menu!
So yeah, you can see that removing the ‘Recommended’ section from the Start Menu in Windows 11 is easy. Apart from this, you can choose to further customize the Start Menu experience in Windows 11 using our linked guide. Now that you know how it works, check out some of our other guides to learn how to remove other annoyances after upgrading from Windows 10 to Windows 11. You can remove ads from your Windows PC and should disable mouse acceleration on your PC if you are a gamer. Meanwhile, if you dislike the new centered Windows 11 Start Menu, learn how to get the old Windows 10-style Start Menu in Windows 11. If you have any other complaints about Microsoft’s new desktop OS, let us know in the comments section, and we will help you out.


