If you are having problems accessing some websites or apps, one way to solve it is by flushing the DNS cache on your computer. How you do that depends on the device you are using because it will vary from Windows to Mac and from Chrome OS to Linux. In this article, we will show you how to flush DNS cache in Windows 11. We will also tell you all about DNS cache and how flushing it can help fix random connectivity issues.
Flush DNS Cache in Windows 11 (2021)
If you are experiencing connectivity issues even after deleting the temporary files and clearing the app cache on your Windows 11 computer, the underlying problem might be with the way the network is configured. To correct it, you will need to flush the DNS resolver settings in your computer. Best practice dictates that you also restart your modem and router to clear out all cached DNS settings. With that said, let’s get started:
Note: This tutorial focuses on flushing DNS cache in Windows 11. For other platforms, check out how to flush DNS cache in Android and clear DNS cache on macOS devices.
What is DNS Cache and Why Should You Care?
DNS cache is a file that includes the hostnames and IP addresses of the websites you have visited on your computer. As the name suggests, it caches the webpage, which results in the site loading faster the next time you open it. The caches are located in the client computer, as well as in the servers of the ISP (Internet Service Provider).
While most systems connected to the internet automatically update the cache and hostname, problems arise when the IP address of a webpage changes before the update. That’s when you can have connectivity issues, with the page failing to load in your browser. Flushing the DNS cache removes all the stored (cached) information, which forces the computer to retrieve relevant new data rather than serving up old and obsolete data.
Steps to Flush DNS Cache in Windows 11
Note: This guide only deals with clearing your DNS cache. To change your DNS service provider, check out our detailed tutorials on how to change DNS settings on Windows.
Method 1: Using Command Prompt
- First, open a Command Prompt window in Admin mode. To do that, search for “cmd” (without quotes) in the Windows search bar and select Run as Administrator.

- Now, copy + paste the following command:
ipconfig /flushdnsand press Enter to flush the DNS cache on your Windows 11 computer. You will get a message saying the operation is successful.

Method 2: Using Windows PowerShell
Another way to flush the DNS cache on Windows 11 PCs is by using PowerShell. Here’s how you do that:
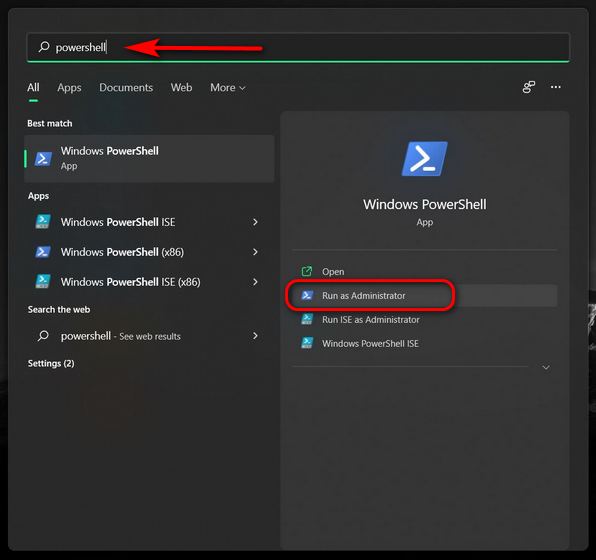
- Open Windows PowerShell in Admin mode on your Windows PC. To do that, search for “powershell” in the Windows search bar and click Run as administrator.
- In the PowerShell window, copy + paste the following command and press Enter:
Clear-DnsClientCache. This will clear the DNS cache of your Windows 11 computer instantly.

Method 3: Using a Run Command
You can also clear the DNS cache straight from the Run dialog box without opening either the Command Prompt or PowerShell. This is probably the easiest way to clear DNS cache on Windows computer, and here’s how it works:
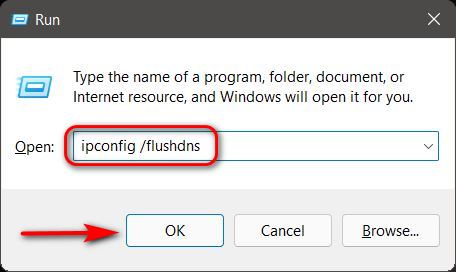
- Open the Run box by using the Windows 11 keyboard shortcut Windows key + R. Now, type the following command:
ipconfig /flushdnsand hit Enter. This will flush the DNS cache on your Windows 11 computer.
Method 4: Using a Batch File
Finally, if you would rather automate the process of flushing the DNS cache on your Windows PC, you can create and use a batch file for the purpose. So, download this batch file and run it to clear the DNS cache in Windows 11.
A batch file, in case you are unaware, includes a set of commands and you can just run the file at scheduled intervals or on-demand to execute those commands. To know more, check out our detailed article on batch files and how to use them to automate tasks on Windows.
Clear DNS Cache in Chrome
Some Windows apps, including Google Chrome, have DNS caches of their own. It is separate from the DNS cache stored by your operating system. In these cases, you will have to clear the DNS Cache of these applications as well. For Google Chrome, this is how you do it:
- First, open Google Chrome on your computer. Now copy + paste the following URL in the browser’s address bar:
chrome://net-internals/#dnsand hit Enter. It will load the DNS tab of Chrome’s “net internals” page. Here, click on the “Clear host cache” button to clear up Chrome’s DNS resolver cache.

Flush DNS Cache to Solve Connectivity Issues in Windows 11
Flushing DNS cache may sound like a ton of tech jargon, but it’s an easy undertaking, as you now know. There are multiple ways to flush the DNS cache in Windows 11 PCs, including using the Command Prompt, the PowerShell, and the Run command. So go ahead, flush the cached DNS data on your Windows 11 computer to fix any underlying connectivity issues and improve your privacy. Once you do that, check out some of our other DNS-related articles, including the best DNS servers you can use and the difference between VPN and DNS.


 Anshuman Jain

