Windows 10 users who recently upgraded to Windows 11 are facing a ton of issues. Recently, we published a handy guide on how to fix the no sound issue on Windows 11, and now we are seeing reports that many users are facing frequent WiFi disconnection on Windows 11 PCs. Even when the network is in range, WiFi keeps disconnecting and does not reconnect. If you are also facing the same issue and WiFi keeps disconnecting on your Windows 11 computer, follow our guide to resolve it right away. We have mentioned basic and advanced methods to troubleshoot the WiFi problem. So on that note, let’s jump into the tutorial.
Fix WiFi Keeps Disconnecting on Windows 11 (2022)
In this tutorial, we have included 10 different ways to fix the frequent WiFi disconnection issue on Windows 11. From common solutions like ensuring airplane mode is off to advanced fixes like updating drivers, we have added everything in this guide. Expand the table below and move to any solution you want as per your convenience.
1. Turn On/ Off Airplane Mode
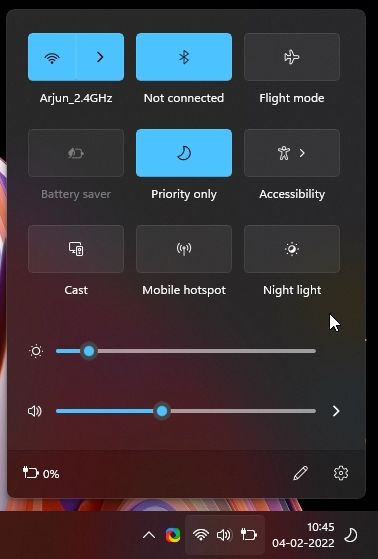
If WiFi keeps disconnecting on your Windows 11 PC, an easy fix would be to turn on the Airplane mode and turn it off again. It will disable and then enable all the radio devices on your device, including WiFi, Bluetooth, etc. Here is how to do it.
1. Press the Windows 11 keyboard shortcut “Windows + A” to open the Action Center. Here, click the “Airplane mode” or “Flight mode” toggle. It will disable the WiFi service.
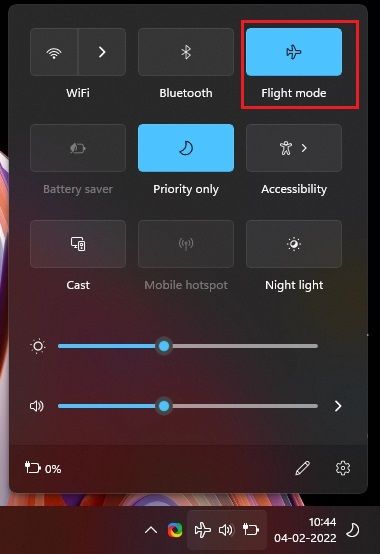
2. After a few seconds, turn it off and check if WiFi keeps disconnecting on your Windows 11 computer.
2. Forget and Reconnect to WiFi Network
Another way to fix WiFi keeps disconnecting issue on Windows 11 is to forget the WiFi network and reconnect to it again. To do so, follow the steps below:
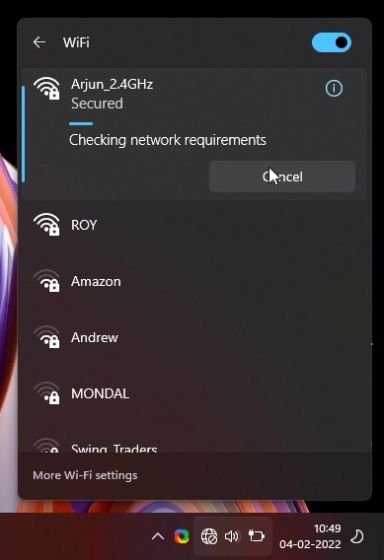
1. Open the Action Center by pressing “Windows + A” and click on the arrow icon next to WiFi.
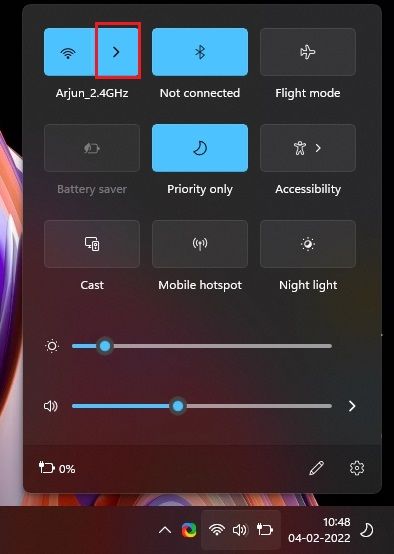
2. Here, right-click on the WiFi network you usually connect to and choose “Forget“. This step will disconnect your Windows 11 PC from the WiFi network, and it will also unsave the WiFi password.
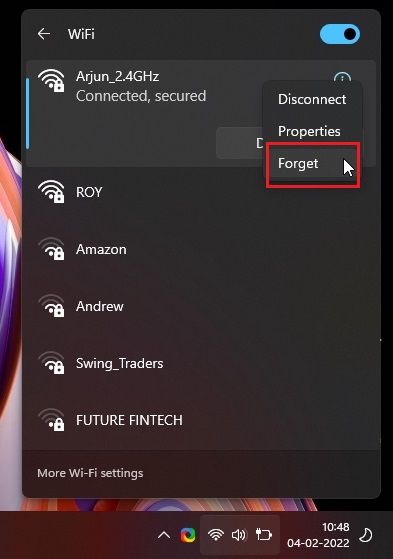
3. After a minute or two, reconnect to the same WiFi network and enter the password. Now, check if the WiFi keeps on disconnecting or not.
3. Connect Automatically to WiFi Network
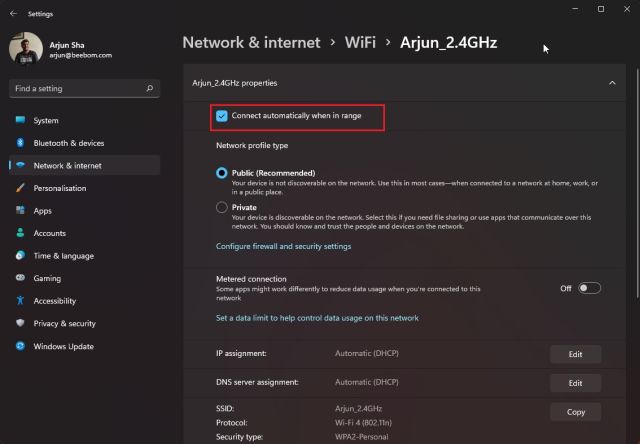
Sometimes, even when the WiFi network is in range, the PC does not connect to the WiFi because the automatic connection setting is turned off. To allow your PC to connect to a WiFi network automatically, follow the below steps.
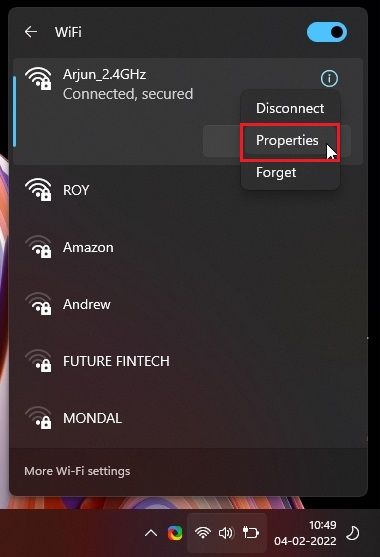
1. Open the Action Center by pressing the “Windows + A” shortcut. Here, click on the “arrow” icon next to WiFi.

2. Now, right-click on the network and open “Properties“. It will open the WiFi properties in the Windows Settings app.
3. From the WiFi settings page, enable the “Connect automatically when in range” checkbox. That’s it. Now, your Windows 11 PC will connect to your WiFi network automatically.
4. Set WiFi Network to Private
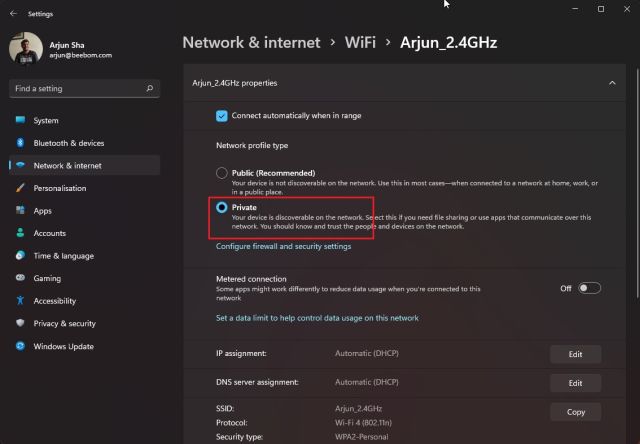
If you have set your home WiFi network to “Public”, a different set of firewall and network settings are applied, which might be causing the issue on your Windows 11 PC. So, here is how to make sure your WiFi connection is set to private and fix the frequent WiFi disconnection issue on Windows 11.
1. Use the “Windows + A” keyboard shortcut to open the Action Center. Now, click on the arrow icon next to the WiFi.

2. After that, right-click on the WiFi network and select “Properties“.

3. Under WiFi properties on the Windows Settings page, choose “Private” as your network profile type. And that’s it. You are done. Now, check if you are still facing the WiFi disconnection issue.
5. Enable WLAN AutoConfig Service
WLAN AutoConfig is a service that handles everything related to WiFi (wireless networks) on Windows 11. If the service is set to Disabled or Automatic (Delayed), you might face the WiFi keep disconnecting issue on your Windows 11 PC. So here is how to ensure the service is configured properly.
1. Open the Run window using the “Windows + R” keyboard shortcut. Type services.msc and hit Enter. It will open the Services window.

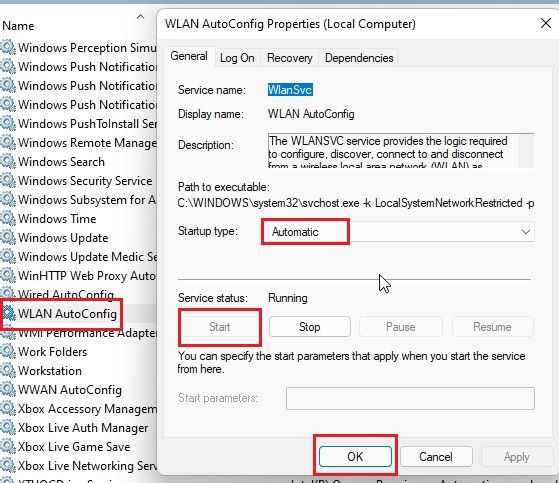
2. Next, scroll down and look for the “WLAN AutoConfig” service. Double-click to open it. Then, change the Startup type to “Automatic” and click on “Start” to enable the service right away. Finally, click on OK, and you are done. You can now restart the computer and check whether that fixes the WiFi disconnection issue on your Windows 11 computer.
6. Update the WiFi Driver
If none of the methods above fixed the issue, you need to update the WiFi driver next. There are high chances that you are facing the WiFi disconnection issue on Windows 11 due to driver incompatibility. Here is to go about it.
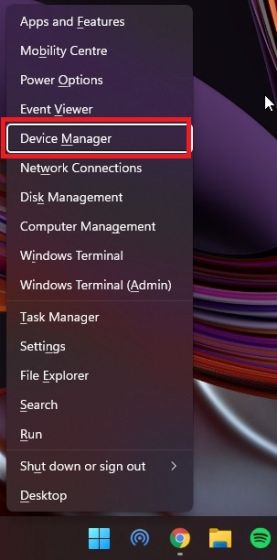
1. Press “Windows + X” to open the Quick Menu. Here, open “Device Manager“.
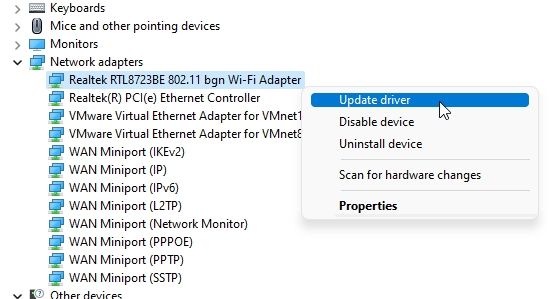
2. Next, expand the “Network adapters” section, and you will find your WiFi adapter. Right-click on it and select “Update driver“.
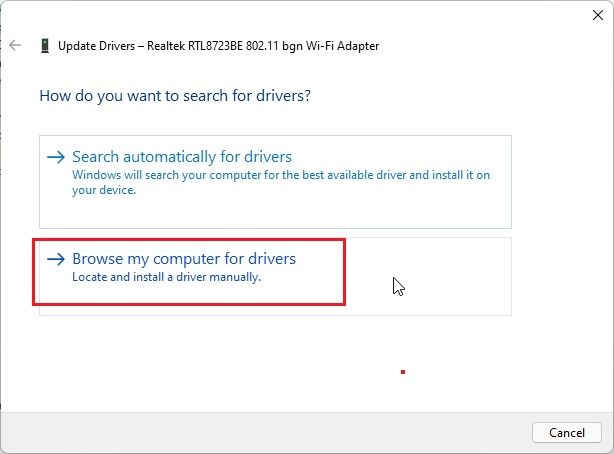
3. From the pop-up prompt that appears, you need to click on “Browse my computer for drivers“.
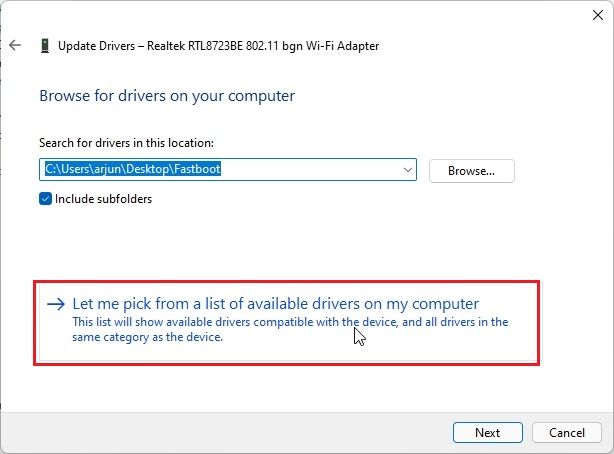
4. After that, click on “Let me pick from a list of available drivers on my computer”.
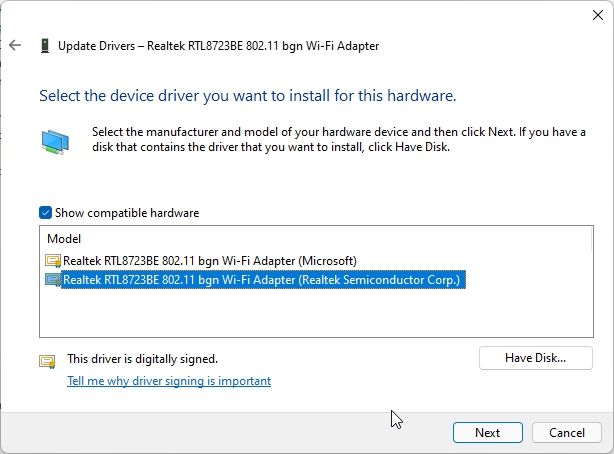
5. Finally, select the driver suitable for your WiFi adapter. For example, my WiFi adapter is from Realtek, so I have chosen the Realtek one. If this trick doesn’t work for you, try other drivers available on the list as well. Finally, click on “Next” to apply the change.
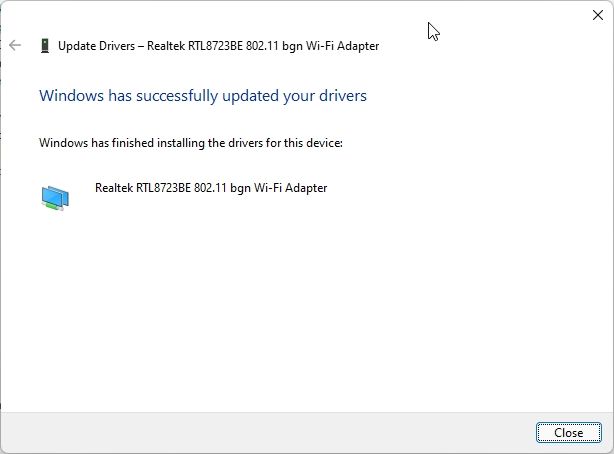
6. Windows 11 will install the WiFi driver once again, and that should most likely resolve the WiFi keeps disconnecting issue on Windows 11. After the driver update, make sure to restart the PC.
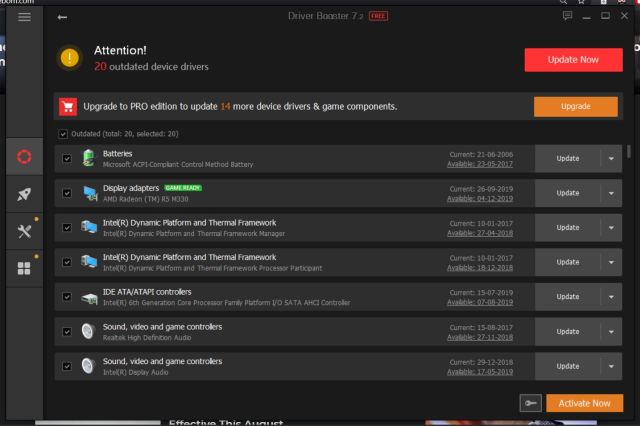
7. If you are still facing the same issue even after the re-installation of the driver, go ahead and update the WiFi driver through a third-party driver tool on Windows 11. I suggest using IObit Driver Booster, which installs the latest driver directly from the manufacturer’s website.
7. Adjust the WiFi Power Management Settings
Windows 11 sometimes puts some system services to sleep, including WiFi and Bluetooth, to save battery. If WiFi keeps disconnecting on your Windows 11 computer, it might have to do with the power management settings. Here is how you can modify it.
1. Press “Windows + X” to open the Quick Links menu on your Windows 11 PC. Now, open “Device Manager“.

2. Here, expand the “Network adapters” section, right-click on the WiFi adapter, and select “Properties” from the context menu.
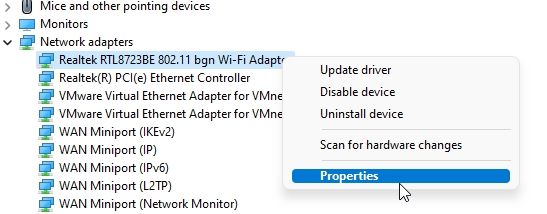
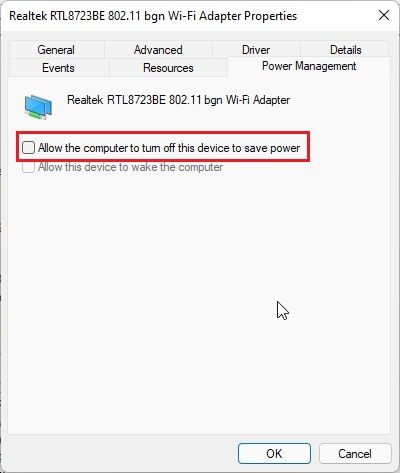
3. After that, move to the “Power Management” tab and untick the “Allow the computer to turn off this device to save power” checkbox. Doing this will prevent Windows 11 from turning off the WiFi adapter to save battery. Click on “OK” and restart your PC. Now, check if the Windows 11 WiFi disconnection issue has been fixed or not.
8. Change Power Plan Settings
You can also change the power plan settings if you continue to face the WiFi disconnection issue on Windows 11. It will allow your PC to provide maximum performance to the WiFi adapter. Here are the steps to follow.
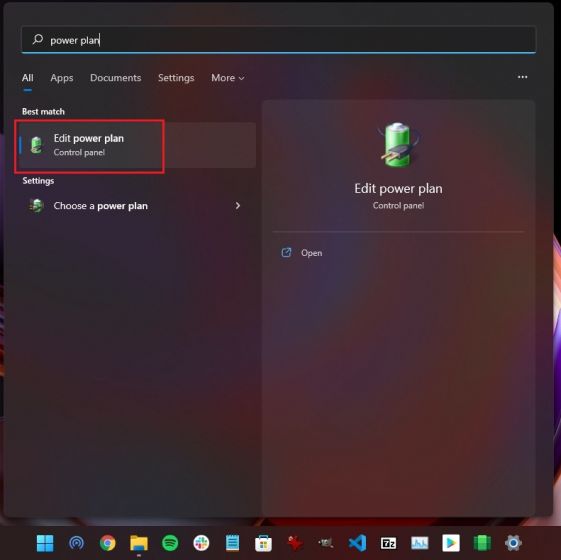
1. First, press the Windows key once and type “Power plan”. Now, click on “Edit Power plan” from the search results, and it will take you directly to the Control Panel.
2. Next, click on “Change advanced power settings“.
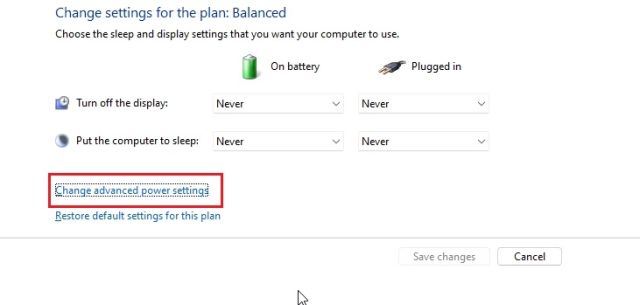
3. From the pop-up window that now opens on your screen, expand “Wireless Adapter Settings” and change the setting to “Maximum Performance” for both scenarios – on battery and while plugged to a charger. Click on Apply -> OK to confirm the changes.
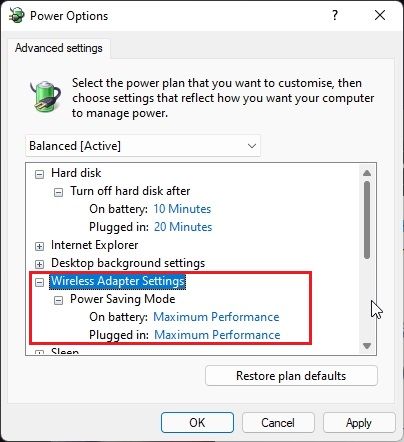
4. Now, restart your Windows 11 PC, and it should not drop the WiFi connection frequently.
9. Reset Network Settings
If nothing seems to have worked so far, you need to reset the network settings on your Windows 11 PC. This method will flush and renew all the old configurations, policies, and cache. It may be the easiest solution to fix the WiFi disconnection issue on Windows 11.
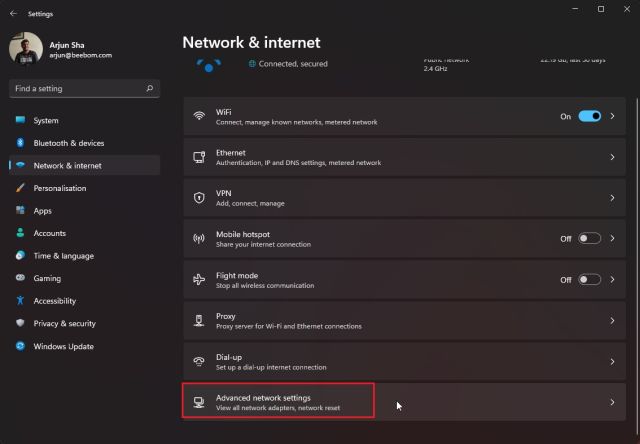
1. Use the “Windows + I” shortcut to open Windows Settings. After that, move to the “Network & internet” section from the left sidebar and scroll down to the bottom. Here, click on “Advanced network settings“.
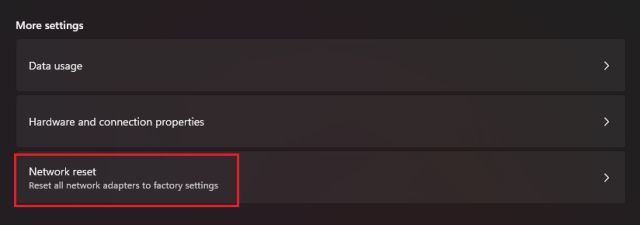
2. Next, click on “Network reset“.
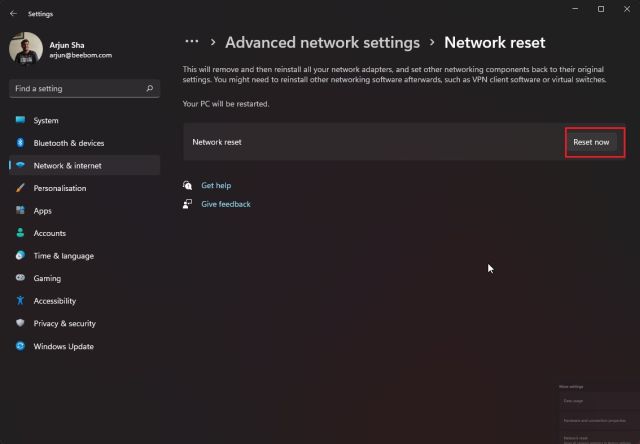
3. Finally, click on “Reset now” on the next page. Doing so will reinstall your network drivers and reconfigure internet settings to the factory version. After that, restart the PC, and check if you are still facing the frequent WiFi disconnection issue on your Windows 11 PC.
4. If the issue has not been resolved, press the Windows key once and type “cmd“. Now, click on “Run as administrator” on the right pane to open the Command Prompt with elevated privileges.
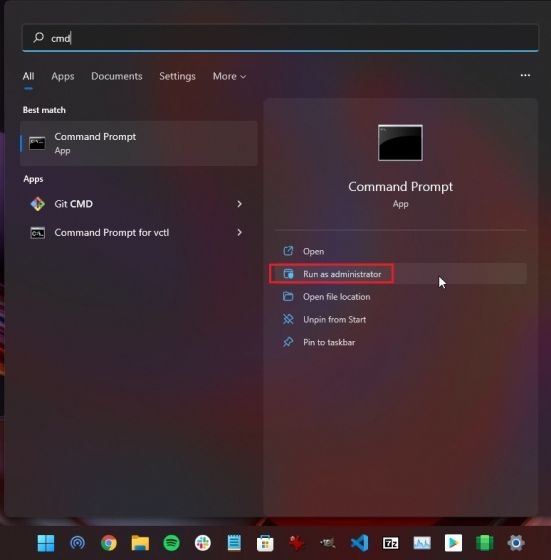
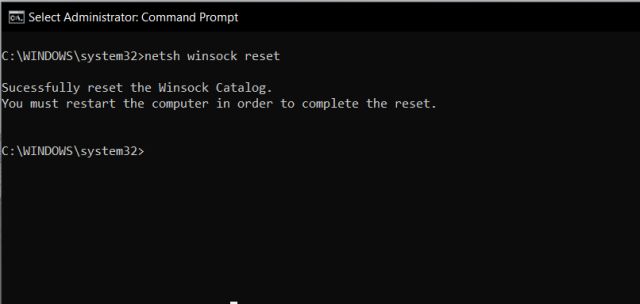
5. In the Command Prompt window, execute the below commands one by one. After that, reboot your Windows 11 PC, and your WiFi should stay connected to your PC this time around.
netsh winsock reset
ipconfig /release
ipconfig /renew
ipconfig /flushdns
10. Run Network Troubleshooter
Finally, if nothing else seems to have worked, run the Internet troubleshooter and let Windows 11 try to find and fix the WiFi disconnection issue on your PC. It works pretty well and automates most of the fixes that we have provided above. As a last resort, you should try this fix.
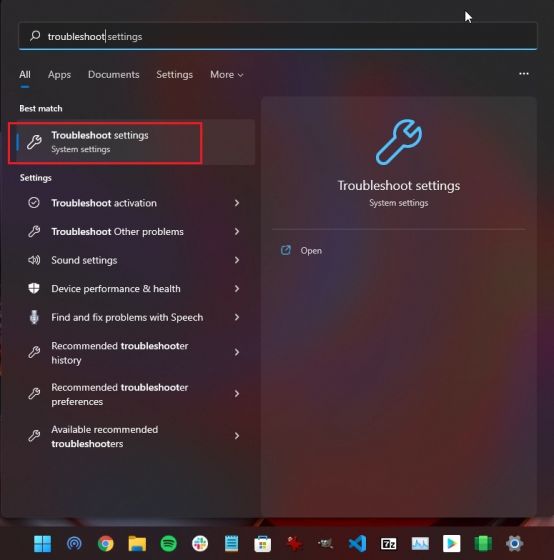
1. First, press the Windows key once and type “troubleshoot“. After that, open “Troubleshoot settings”.
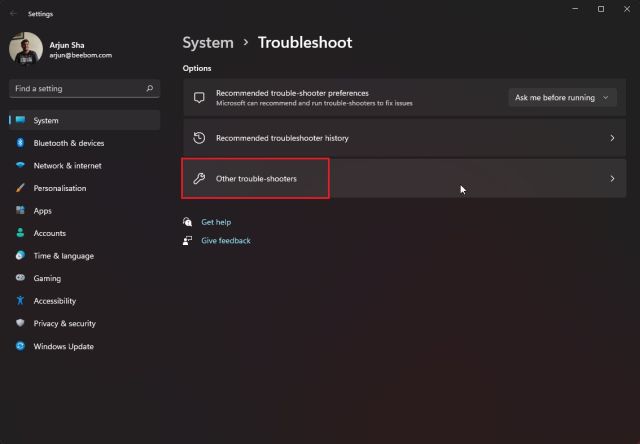
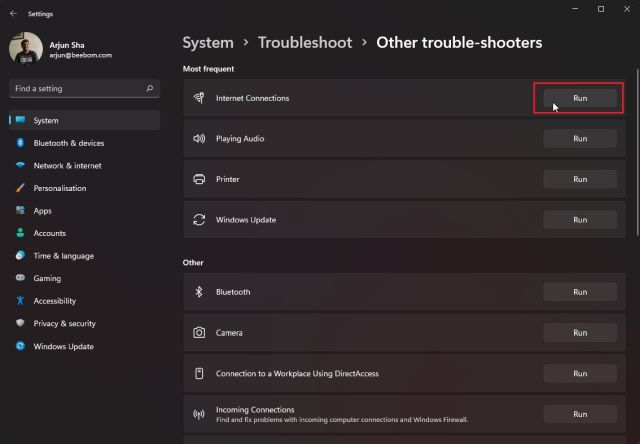
2. Next, click on “Other trouble-shooters” in the settings window.
3. Then, click on “Run” next to “Internet Connections” to run the network troubleshooter on Windows 11.
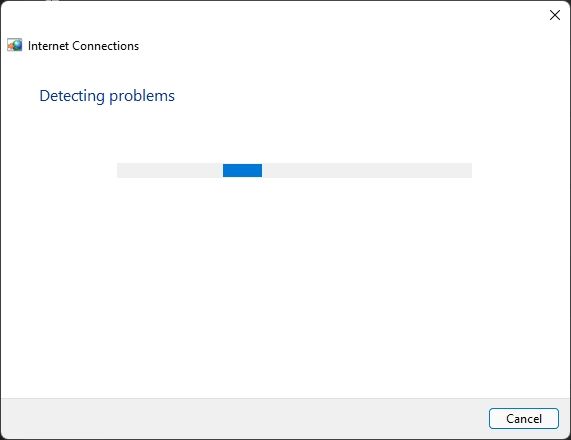
4. Follow the on-screen instructions and answer a few queries, and Windows 11 will try to fix the WiFi disconnection issue on your PC.
[FIXED] WiFi Keeps Disconnecting and Won’t Reconnect on Windows 11
So these are the 10 best ways you can use to fix the WiFi issue if you are experiencing signal drop and frequent disconnection. If none of these methods worked for you, I suggest getting a cheap USB WiFi adapter. It costs around $4 and should solve all your WiFi connectivity woes. Anyway, that is all from us. If WiFi is not showing up at all on your Windows 11 PC, go through our tutorial for further detailed fixes. And if you have any questions, let us know in the comments section below, and we will try to help you resolve all network-related issues.


