Keyboard shortcuts and productivity go hand in hand. By removing the extra steps, shortcuts let you perform certain tasks faster that may otherwise take more time and prove tiresome. Of course, you do have to get used to the shortcuts initially if you are just getting used to them. But once you have gone past that preliminary phase, performing all sorts of tasks becomes a breeze, thanks to a plethora of most useful Mac keyboard shortcuts. So, if you are all geared up to bolster your multitasking, check out the list of these keyboard shortcuts for macOS.
Best Mac Keyboard Shortcuts for Boosting Productivity
Just like the Windows 11 keyboard shortcuts, there are a number of super handy shortcuts for Macs. Keep in mind that on keyboards for Macs, you will need to use “Option” instead of the Alt key and “Command” instead of the Windows logo key. If you are new to macOS, you will have to get acquainted with the modifier keys as they play a key role in most macOS shortcuts. Here are the modifier keys to look at:
- Command or Cmd (⌘)
- Shift (⇧)
- Option (⌥)
- Control (⌃)
- Caps Lock (⇪)
- Fn
You should also know that there’s an option to customize the keyboard shortcuts too. We will detail this in the latter part of the article. Now that you know of the basic things to get started, let’s just dive into the list.
Useful Mac Keyboard Shortcuts to try
Before we detail all the possible Mac keyboard shortcuts available, here’s a look at the most useful and even the basic ones that definitely need your attention:
- Command+C: To copy text.
- Command+V: To paste text.
- Command+X: To cut text.
- Command+Z: To undo a command.
- Command+A: To select all items.
- Command+S: To save an item(s).
- Command+F: To search a web page in Safari (or another web browser).
- Command+Spacebar: To view the Spotlight search.
- Command+Delete: To move the selected item to the Trash.
- Command+N: To open a new Finder window.
- Command+W: To close a window in browser.
- Command+`: To switch to another Safari or app window.
- Command-P: To print a web page.
- Control+Command+Power button: To restart the Mac.
- Control+F2+Left Arrow or Right Arrow: For menu hopping.
- Control+Command+Q: To lock the screen.
- Shift+Command+Delete: To empty the trash.
- Shift+Command+R: To open the AirDrop window.
- Shift+Command+5: To capture a screenshot or make a screen recording (macOS Mojave or later).
- Shift+Command+Q: To log out of your macOS user account after your confirmation.
- Shift+Command+I: To launch iCloud Drive.
- Option+Command+F5: To display the Accessibility options.
- Option+Command+plus sign: To zoom in.
- Option+Command+minus sign: To zoom out.
- Option+Command+L: To get to the Downloads folder.
- Option+Command+D: To show/hide the Dock.
- Option+Command+Power button or Option+Command+Media Eject: To quickly put your Mac to sleep.
- Option+Shift+F11/F12: To change volume levels in small increments.
- Option+Shift+F1/F2: To change brightness levels in small increments.
- Press the arrow keys: To scroll left, right, up, and down.
Note:
- To access all the cool Apple Music shortcuts: Open the Music app and choose the Help menu. Next, click on Keyboard shortcuts.
- To unravel other hidden macOS shortcuts: Head over to the Apple menu -> System Preferences -> Keyboard -> Shortcuts.
Best Finder and System Keyboard Shortcuts for Mac
For the best Mac experience, you should master Finder and keyboard shortcuts can help in achieving that. Mentioned below are a number of shortcuts you can memorize:
- Command+E: To eject the selected disk or volume.
- Command+I: To display the “Get Info” window for a selected file.
- Command+R: To display the original file for a selected alias in Finder. It’s worth mentioning that in some apps like Calendar or Safari, this shortcut can let you refresh or reload the page. In Software Update preferences, this shortcut allows you to check for software updates again.
- Command+D: To duplicate the selected files.
- Command+Slash (/): To hide/show the status bar in Finder windows.
- Command+J: To display View options.
- Command+K: To open the “Connect to Server” window.
- Command+Y: To use Quick Look to preview the selected files.
- Command+T: To show/hide the tab bar when a single tab is open in a Finder window.
- Command+1: To view the items in the Finder window as icons.
- Command+2: To view the items in a Finder window as a list.
- Command+3: It lets you view the items in a Finder window in columns.
- Command+4: To view the items in a Finder window in a gallery.
- Command+Left Bracket ([): To go to the previous folder.
- Command+Right Bracket (]): To go to the next folder.
- Command+Up Arrow: To open the folder that contains the current folder.
- Command+Down Arrow: To open the selected item.
- Command+Control+Up Arrow: To open the folder that contains the current folder in a new window.
- Command+Brightness Down: To enable/disable video mirroring whenn an external display is connected.
- Command+Click a window title: View the folders that contain the current folder. You can click the Go menu in the Finder menu bar to access several useful macOS shortcuts for opening commonly used folders including Applications, Documents, Downloads, Utilities, and iCloud Drive.
- Command+Mission Control: To show the desktop.
- Command key while double-clicking: To open a folder in a separate tab or window.
- Command key while dragging to another volume: To move the dragged item to the other volume instead of copying it.
- Shift+Command+H: To open the Home folder of the current user account.
- Shift+Command+K: To open the Network window.
- Shift+Command+N: To create a new folder.
- Shift+Command+O: To open the Documents folder.
- Shift+Command+P: To show/hide the Preview pane in Finder windows.
- Shift+Command+C: To open the Computer window.
- Shift+Command+D: To open the desktop folder.
- Shift+Command+F: To open the Recents window.
- Shift+Command+G: To open a Go to Folder window.
- Shift+Command+T: To show/hide the tab bar in Finder windows.
- Shift+Command+U: To open the Utilities folder.
- Control+Down Arrow: To show all windows of the front app.
- Control+Command+T: It lets you add the selected item to the sidebar (supports OS X Mavericks or later).
- Control+Command+A: To make an alias of the selected item.
- Control+Brightness Up or Control+Brightness Down: It allows you to change the brightness of your supported external display.
- Control+Shift+Command+T: To add selected Finder item to the Dock (supports OS X Mavericks or later)
- Option+Brightness Up: To open displays preferences. It’s worth noting that it works with either Brightness key.
- Option+Command+P: To hide/show the path bar in Finder windows.
- Option+Command+S: To hide/show the Sidebar in Finder windows.
- Option+Command+N: To create a new Smart Folder.
- Option+Command+Delete: To delete a file or folder.
- Option+Command+T: To show/hide the toolbar when a single tab is open in the current Finder window.
- Option+Command+V: To move the files in the Clipboard from their original location to the current location.
- Option+Command+Y: To view a Quick Look slideshow of the selected files.
- Option+Shift+Command+Delete: To empty the Trash without confirmation dialog.
- Option+Shift+Brightness Up or Option+Shift+Brightness Down: To adjust display brightness in smaller steps. Notably, you can add the Control key to this shortcut to make the adjustment on your supported external display as well.
- Option key while dragging: To copy the dragged item.
- Option+Command while dragging: To make an alias of the dragged item.
- Option+Click a disclosure triangle: To open all folders within the selected folder. Bear in mind that it works only in the list view.
- Option+Mission Control: To bring up Mission Control preferences.
- Option+Volume Up: To bring up the Sound preferences. Notably, this shortcut works with any of the volume keys.
- Option+Keyboard Brightness Up: Access Keyboard preferences. You can use this shortcut with either Keyboard Brightness key.
- Option+Shift+Keyboard Brightness Up or Option+Shift+Keyboard Brightness Down: It lets you adjust the keyboard brightness in smaller steps.
- Option+Shift+Volume Up or Option+Shift+Volume Down: To adjust the sound volume in smaller steps.
- Option key while double-clicking: To open the item in a separate window and close the original window.
- Right Arrow: Open the selected folder. Do note that it works only in the list view.
- Left Arrow: Close the selected folder. Keep in mind this shortcut works only in the list view.
Best Accessibility Keyboard Shortcuts for Mac
Accessibility allows you to use macOS (or even iPhone) in a much better way. If you are a fan, you shouldn’t miss out on these shortcuts.
- Command+F5 or Fn+Command-F5. To turn VoiceOver on or off. You can also hold Command and triple-press Touch ID on supported models to enable/disable VoiceOver.
- Control+Option+F8 or Fn+Control+Option+F8: Tp open VoiceOver Utility when VoiceOver is enabled.
- Control+Option+Command+Comma (,): To reduce contrast.
- Control+Option+Command+Full stop (.): To increase contrast.
- Control+Option+Command+8: To invert colors.
- Option+Command+8: To turn zoom on or off.
Pro Tip:
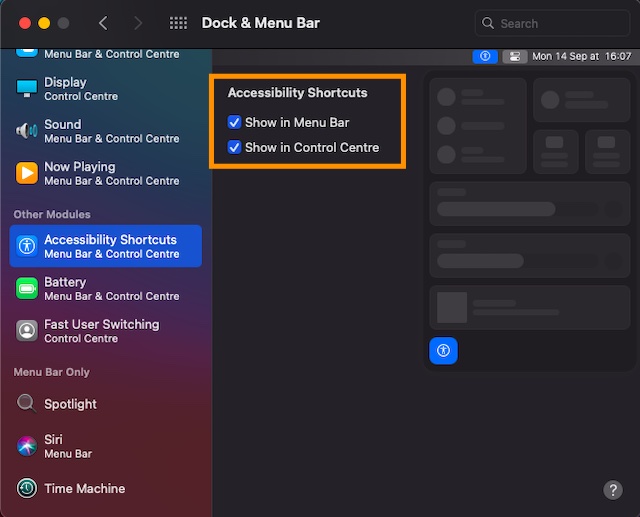
- macOS also lets you add the Accessibility Shortcuts icon to the menu bar and Control Center on your Mac. If you want to take control of features like VoiceOver, Zoom, Invert Colors, and more with ease, make sure to take advantage of this nifty feature.
- Go to System Preferences -> Dock & Menu Bar -> Accessibility Shortcuts. Now, check the box on the left of Show in Menu Bar/Control Center.
Best Spotlight Keyboard Shortcuts for Mac
Spotlight has got way more cool hacks up its sleeve than what meets the eyes. These Spotlight shortcuts can help big time in making things smoother for you.
- Command: To display the path of a result (such as a file) on your Mac.
- Command+Down Arrow: To move to the first result in the next category.
- Command+Up Arrow: To move to the first result in the previous category.
- Command+R or Command+Double-click: To view a file in an app or the Finder.
- Option+Command+Space bar: To open a Finder window with the search field selected:
- Return key: To open a result.
- Tab key: To show the preview area.
- Down Arrow: To move to the next result.
- Up Arrow: To move to the previous result.
Note: We have created a separate guide about Spotlight tips and tricks. So, if you are willing to unravel more tips related to Spotlight, do check that out.
Best Safari Keyboard Shortcuts for Mac
If you want to speed up your browsing experience using Safari, do not fail to have a solid grip on the neat Safari keyboard shortcuts for Mac.
- Command+L: To select the Smart Search field.
- Command+Up Arrow: To go to the top-left corner of a page.
- Command+Down Arrow: To go to the bottom-left corner of a page.
- Control+Command+2: To show or Hide the Reading List sidebar.
- Control+Click the page summary in the sidebar and select Remove Item: To remove a page.
- Option+Click a link to the file: To download a linked file.
- Option+Click the New Folder button: To create a folder containing the selected bookmarks and folders in bookmarks view.
- Shift+Command+D: To add the current page.
- Shift+Command+R: To open Reader.
- Shift+Click a link to the page: To add a linked page.
- Shift+Command+T: To reopen the last closed window.
- Shift+Command+H: To go to the home screen.
- Shift+Spacebar: To scroll up.
- Tab: To highlight the next field or pop-up menu on a web page. Do note that you can use Tab to highlight buttons and other controls if “Use keyboard navigation to move focus between controls” is enabled in the Shortcuts pane ( System Preferences -> Keyboard pane)
- Esc: To close Reader (it can also let you restore the current web page address).
- Press Option while holding down an arrow key: To scroll in larger increments.
- Space Bar: To scroll down.
Best Startup Keyboard Shortcuts for Mac
Startup keyboard shortcuts for Mac can come in really handy too. Here’s a look at some handful ones.
- Command (⌘)+R: To start up from the built-in macOS Recovery system. Alternatively, you can press Besides, you can also the Option+Command+R or Shift+Option+Command+R to start up from macOS Recovery over the Internet.
- Command+S: To start up your Mac in single-user mode (will require a password if the Mac is using a firmware password). Do note that it is disabled in macOS Mojave or later.
- Command+V: To start up in verbose mode (disabled when there’s a firmware password).
- Option (⌥) or Alt: To bring up the Startup Manager that can let you choose other available startup disks or volumes.
- Option+Command+P+R: To reset NVRAM or PRAM, which comes in really handy when dealing with unexpected/common Mac issues. The M1 Macs (M1, M1 Pro, M1 Max) don’t support this shortcut.
- Shift (⇧): To start up your Mac in safe mode. It is disabled when using a firmware password.
- D: To start up your device with the Apple Diagnostics utility. You can also use Option+D to start up this utility over the Internet. It is also disabled when using a firmware password.
- N: To start up your macOS device from a NetBoot server. It works only if your Mac supports network startup volumes. You can press Option+N to use the default boot image on the server. Again, it is disabled when using a firmware password.
- T: To start up in target disk mode (turned off when using a firmware password).
- Eject (⏏) or F12 or Mouse button or Trackpad button: To eject removable media like an optical disc (won’t work when using a firmware password).
Best Document Keyboard Shortcuts for Mac
If your Mac is used more for writing and documentation, these keyboard shortcuts can prove really helpful to maintain the flow.
- Control+A: To move to the beginning of the line or paragraph.
- Control+E: To move to the end of a line or paragraph.
- Control+F: To move one character forward.
- Control+B: To move one character backward.
- Control+L: To center the cursor or selection in the visible area.
- Control+P: To move up a line.
- Control+N: To move down a line.
- Control+O: To insert a new line after the insertion point.
- Control+T: To swap the character behind the insertion point with the character in front of the insertion point.
- Control+K: To delete the text between the insertion point and the end of the line or paragraph.
- Control+H: To delete the character to the left of the insertion point (can also use Delete).
- Control+D: To delete the character to the right of the insertion point (can also use Fn+Delete).
- Control+Command+D: To show or hide the definition of the selected word.
- Shift+Up Arrow: To extend text selection to the nearest character at the same horizontal location on the line above.
- Shift+Down Arrow: To extend text selection to the nearest character at the same horizontal location on the line below.
- Shift+Left Arrow: To extend text selection one character to the left.
- Shift+Right Arrow: To extend text selection from one character to the right.
- Shift+Command+Colon (:): To show the Spelling and Grammar window.
- Shift+Command+Up Arrow: To select the text between the insertion point and the beginning of the document.
- Shift+Command+Down Arrow: To choose the text between the insertion point and the end of the document.
- Shift+Command+Left Arrow: To select the text between the insertion point and the beginning of the current line.
- Shift+Command+Right Arrow: To choose the text between the insertion point and the end of the current line.
- Shift+Command+Vertical bar (|): To center align.
- Shift+Command+P: To show a window for selecting document settings.
- Shift+Command+S: To show the Save As dialog, or duplicate the current document.
- Shift+Command+Minus sign (-): To decrease the size of the selected item.
- Shift+Command+Plus sign (+): To increase the size of the selected item. Do note that Command–Equal sign (=) also performs the same function.
- Shift+Command+Question mark (?): To open the Help menu.
- Command+Semicolon (;): To find misspelled words in the document.
- Command+Up Arrow: To move the insertion point to the beginning of the document.
- Command+Down Arrow: To move the insertion point to the end of the document.
- Command+Left Arrow: To move the insertion point to the beginning of the current line.
- Command+Right Arrow: To move the insertion point to the end of the current line.
- Command+Left Curly Bracket ({): To left align.
- Command+Right Curly Bracket (}): To right align.
- Command+B: To bold the selected text or disable it.
- Command+I: To italicize the selected text or disable it.
- Command+K: To add a web link.
- Command+U: To underline the selected text or disable it.
- Command+T: To show/hide the Fonts window.
- Command+D: To choose the Desktop folder from within an Open dialog or Save dialog.
- Option+Delete: To delete the word to the left of the insertion point.
- Option+Left Arrow: To quickly move the insertion point to the beginning of the previous word.
- Option+Right Arrow: To move the insertion point to the end of the next word.
- Option+Shift+Up Arrow: To extend text selection to the beginning of the current paragraph. Do note that it also allows you to extend text selection to the beginning of the following paragraph if pressed again.
- Option+Shift+Down Arrow: To extend text selection to the end of the current paragraph. It also allows you to extend text selection to the end of the following paragraph if pressed again.
- Option+Shift+Left Arrow: To extend text selection to the beginning of the current word. It also lets you extend text selection to the beginning of the following word if pressed again.
- Option+Shift+Right Arrow: To extend text selection to the end of the current word. It can also let you extend text selection to the end of the following word if pressed again.
- Option+Command+F: To quickly go to the search field.
- Option+Command+T: To show or hide a toolbar in the app.
- Option+Command+C: To copy the formatting settings of the selected item to the Clipboard.
- Option+Command+V: To paste the copied style to the selected item.
- Option+Command+I: To show or hide the inspector window.
- Option+Shift+Command+V: To apply the style of the surrounding content to the item pasted within that content.
- Fn-Delete: To forward delete on keyboards that do not feature a Forward Delete key (or use Control-D).
- Fn+Up Arrow: To page up (scroll up one page).
- Fn+Down Arrow: to page down (scroll down one page).
- Fn+Left Arrow: To scroll to the beginning of a document.
- Fn+Right Arrow: To scroll to the end of a document.
More Mac Keyboard Shortcuts
- Command+W: To close the front window. If you want to close all windows of the app, press the Option-Command-W.
- Command+Tab: To switch to the next most recently used app among the currently open apps.
- Command+Comma (,): To open preferences for the front app.
- Option+Command+Esc: To force quit an app.
- Option+Shift-Command+Q: To immediately log out of your macOS user account without asking for your confirmation.
- Control+Command+Space bar: To display the Character Viewer that can let you select emoji and other symbols.
- Control+Command+F: To use a supported app on the full screen.
- Control+Shift+Power button or Control+Shift+Media Eject : To put your displays to sleep.
- Control+Power button or Control+Media Eject : To show a dialog with multiple options like restart, sleep, or shut down.
- Control+Command+Media Eject : It allows you to quit all apps and then restart your Mac. Keep in that if you have any open documents with unsaved changes, macOS will ask you whether you want to save them.
- Control+Option+Command+Power button or Control+Option+Command+Media Eject : To quit all apps and then shut down your Mac. macOS will show a prompt asking you to save documents that have unsaved changes.
- Space bar: To use Quick Look to preview the selected item.
Create Custom Keyboard Shortcuts for Mac
As mentioned earlier, you can also get the ability to create custom keyboard shortcuts on Mac, which opens up new ways for you to use your Mac. If this interests you, here’s what you need to do:
- Open System Preferences via the Settings on your Mac. After that, click on Keyboard and then select the Shortcuts tab.
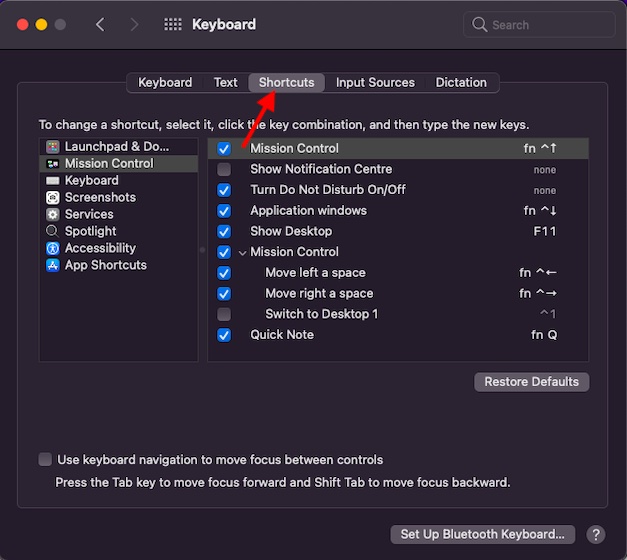
- Now, choose App Shortcuts on the left and then click on the Add button (+).
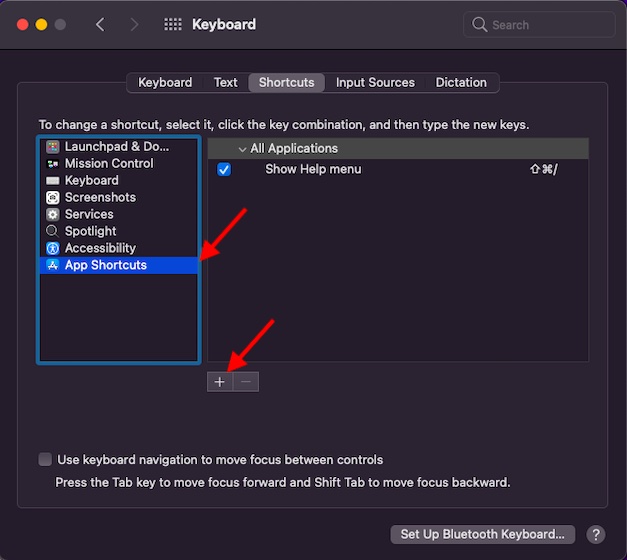
- Next, click on the Application pop-up menu and select a specific app or All Applications.
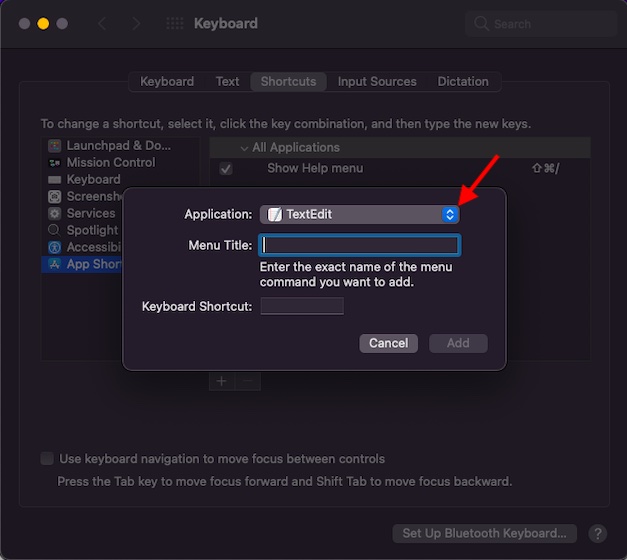
You should note that not all apps can let you set keyboard shortcuts. If you don’t find an app in the list, click on Other and then locate the app with the help of the Open dialogue. Additionally, if you wish to set a shortcut for a menu command that shows up in several apps, select All Applications.
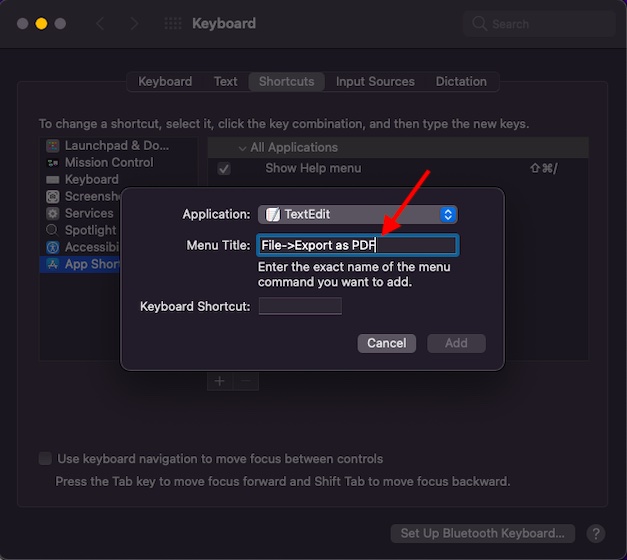
- Next up, type in the menu command in the Menu Title field. Make sure to type the menu command exactly as it appears in the app. For instance, if you want to create a shortcut for the Export as PDF command, type File->Export as PDF.
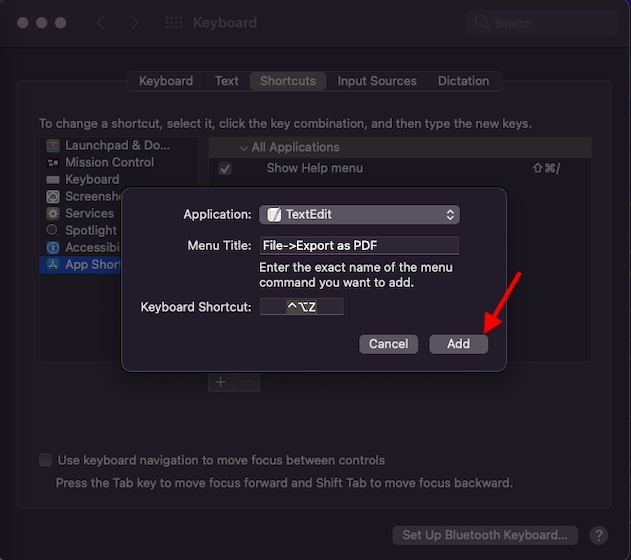
- Now, click on the Keyboard Shortcut field and then press the key combination (i.e press the Control, Option, and Z keys at once) that you wish to use as the shortcut. After that, click on Add. This creates the desired keyboard shortcut for you.
Note:
- macOS lets you create keyboard shortcuts only for existing menu commands.
- Keep in mind that you are not allowed to create keyboard shortcuts for general-purpose tasks on your Mac. For example, opening an app.
- If you make a custom keyboard shortcut that already exists for another command or another app on your Mac, the new shortcut won’t work.
- To change a shortcut, select it, you need to click on the key combination and then pick a new key combination.
If you want to remove a custom shortcut, select the shortcut and then click the Delete (minus) button.
Best macOS Keyboard Shortcuts to Boost Your Productivity
Now that you have got a ton of time-saving Mac shortcuts at your disposal, you can get the most out of them to get your work done faster. As mentioned before, these will take some time and practice to get into the groove of your workflow. Once they do, they will become an integral part of your routine.
For those who don’t know, these keyboard shortcuts work for Macs supporting the latest macOS 12 Monterey, macOS Big Sur, macOS Catalina, and versions going back to OS X Mavericks.
Do let us know which ones help you the most in the comments section below.


