
Video calling on a computer doesn’t have to be boring. Whether you are chatting with your friend or interacting with your colleague, the use of fun-loving filters can light up the whole video calling experience. Not to mention, the eye-catching lenses can even bring plenty of laughter to the show. If that’s what your video calling is missing, read on to learn how you can use Snap Camera filters on Zoom, Skype, and Google Meet video chat.
Use Snap Camera Filters on Zoom, Skype, & Google Meet Video Chat
Snap Camera works as a handy third-party app for the webcam. So, you can use it with many other video chat apps as well. The only condition is that the app must be running in the background. Ready to give it a shot? Ensure that your computer meets the requirements before getting started.
- What are the Requirements?
- Download Snap Camera on Your Computer
- Use Snap Camera Filters on Zoom
- Use Snap Camera Filters on Google Meet
- Use Snap Camera Filters on Skype
What are the Requirements?
- Snap Camera is compatible with Windows and macOS. If you are using PC (64 bit), ensure that it’s running Windows 10 or later. Your Mac must be running macOS 10.13 or newer.
- It needs a minimum of Intel Core i3 2.5Ghz or AMD FX 4300 2.6Ghz coupled with 4 GB RAM.
- Besides, also make sure your computer feature Intel HD Graphics 4000 / Nvidia GeForce 710 / AMD Radeon HD 6450 with a screen resolution of 1280×768 or higher.
- Unfortunately, Snap Camera doesn’t support Linux, iOS or Android.
Download Snap Camera on Your Computer.
1. To get started, head over to snapcamera.snapchat.com website. Now, click on the Download button.


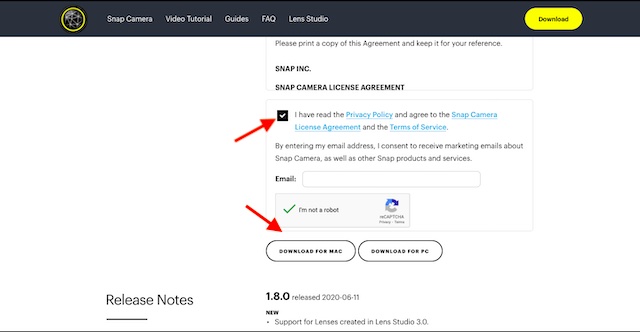
2. On the next screen, agree to the terms and conditions and enter your email. After that, click choose macOS or Windows version of the app.
3. After you have installed Snap Camera on your computer, launch it. Now, choose the desired lense/filter which you want to use.


Use Snap Camera Filters on Zoom
Once you have downloaded the Snap Camera, using it in Zoom is a breeze.
1. Ensure that Snap Camera is running in the background. If Zoom app is not installed on your computer, navigate to zoom.us and download it. If it’s already installed on your computer, launch it. After that, start a new meeting.


2. Next up, click on the tiny arrow to the right of the start/stop video calling option and select Snap Camera as the desired webcam.


There you go! The Snapchat filter will immediately apply to your Zoom video.

If you ever want to remove Snap Camera filter, simply click on the arrow again and change the camera back to the default source. If you like this tip, check our article on best Zoom tips to learn more tips and tricks.
Use Snap Camera Filters on Google Meet
Enabling Snap Camera filters on Google Meet is just as straightforward. Let me show you how it works.
1. Navigate to Google.meet.com and start a video call.


2. Now, click on the menu button (three horizontal dots).

3. Next, choose Settings in the menu.

4. Next up, click on the Video tab and choose Snap camera.


Note: If Snap Camera doesn’t appear, relaunch it.
Use Snap Camera Filters on Skype
If you use Skype to chat with your friends or colleagues, you can use Snap Camera to bring a lot of fun into the conversation.
- Download Skype on your computer, if you haven’t already and then launch it. After that, click on the three horizontal dots which is located right next to your profile and select Settings.


2. Now, click on the Audio and Video option.


3. Next, choose Snap Camera. Now, get started with the video calling as usual. Your favorite filter would instantly apply.


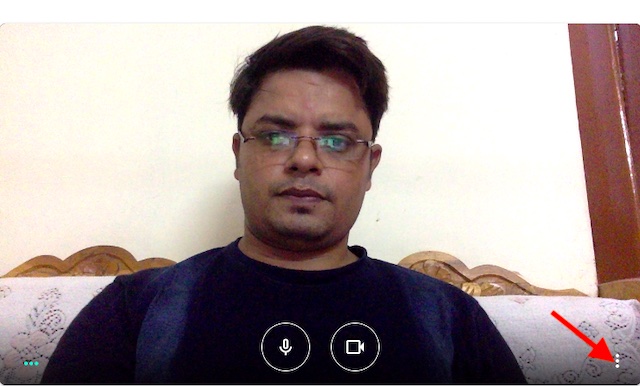
Note: Alternately, you can click on the three dots at the bottom right corner of the screen during video calling. Then, click on the Audio & Video option and choose Snap Camera.
Make the Most of Snap Camera Filters on Zoom, Skype, and Google Meet
So, that’s the way you can use the Snap Camera filters to enhance your video calling experience. As Snapchat’s offering comes with a ton of filters, choose them based on your mood and theme of the conversation so that your conversation remains fun-loving. Have any questions? Shoot your valuable thoughts in the comments section below.

