iOS 14 is a big update for iPhone users, bringing tons of prominent and hidden features. One of those features is the new Guides feature in Apple Maps that aims to help users discover new places to eat, shop, and explore whenever they visit a new city. To make this feature useful, Apple has partnered with third-party services including, Lonely Planet, the Washington Post, AllTrails, and more. It is to ensure that the data in the guides feature is comprehensive and current. In this article, I am going to show you how you can use the new Guides features in Apple Maps.
Note: The Guides feature is currently rolling out in stages, so it’s not available in all cities at launch (San Francisco, New York, London, and Los Angeles). Hopefully, Apple will be quick to add more cities, so, all users can enjoy the benefit of this feature.
Use the New Guides Feature in Apple Maps
Using the guides feature on Apple maps is easy. Here is how you can do it:
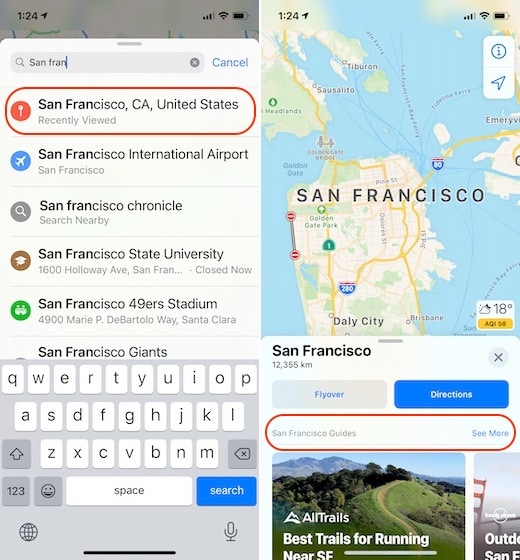
1. Launch Apple Maps and search for the city you are planning to visit. Let’s say we want to explore San Fransisco. Tap on the name to select it.

2. Swipe up on the page to reveal more information. If the city supports the guides feature, it will show up under a new “All Guides” section.
3. Here, you can swipe on the guide cards to see the most popular guides or tap on the “See More” button to reveal all the guides.
4. Once you find a thing you want to explore, tap on it to reveal all the places mentioned in the guide on Map. You can also scroll down to reveal a card view for all the spots mentioned in the guide, with details.
5. Apple Maps also allows you to save complete guides or individual places inside guides. To save the complete guide, tap on the “Save Guide” button. For individual locations, tap on the + button next to the location name.
6. Once you tap on either save or + button, you will get an option to create your guide (or choose from guides you have created). I like the option to create lists for personal guides as it lets me organize the guides that I save.
7. Finally, you can find all the guides you have saved by swiping up the homepage of Apple Maps under the “My Guides” section.
Well, that’s about it. Now you know how to use Guides on Apple Maps, so make use of it when this pandemic allows you.
Use Apple Maps Guides to Explore New Places
The new Guides feature in Apple Maps is an excellent resource to find all the best locations to explore in a city when you visit it. If you don’t go out much, it can help you find less-traveled spots even in your city.
If you liked this article, don’t forget to read our other articles on Apple Maps where we show how you can share live route ETA and avoid tolls and highways during navigation. Lastly, do use the guides feature next time you are out and about, and let us know if it was useful or not.
I love guides but they lack functionality. It’s great that you can set up lists and have them function as a “guide” to different places. What’s lacking is the ability to get directions to each place listed in each guide. This can only be done manually. This is a huge oversight and defeats the purpose of setting up guides to begin with.
I have no interest in places abroad- most are in the USA & I am in the UK. Can you advise how to delete or better still remove “guides”
It’s annoying & takes up a lot of screen space unnecessarily
Thanks