
With Voicemail service, communicating through voice messages on iPhone is as easy as it can ever get. Times when you are on the go or unable to contact a person through a phone call, Voicemail comes into play. Though it’s pretty reliable and works efficiently on iOS, at times it tends to hit miscellaneous issues. That’s why we have jotted down 13 tried and tested tips to fix iPhone Voicemail not working issue. Do give these hacks a try if you are looking for ways to troubleshoot Voicemail issues.
13 Tips to Fix iPhone Voicemail Not Working Issue
As usual, let’s first take a brief look into the possible causes of the problem! Once that’s done, we will try out the trusted solutions.
Why is Voicemail Not Working on My iPhone?
More often than not, the Voicemail issues on iOS crop up due to the ill-functioning of the cellular network that you are using. And on some rare occasions, the problems occur due to a bug or outdated software. These usual suspects aside, you should ensure that your carrier supports Voicemail and it’s set up the right way on your device. Having got a brief insight into the possible causes, it’s time to get started with the workable tips.
Check Out the Availability
I know it may sound out of the context for some. But hey, it always pays to have the needed clarity about whether or not a specific feature is available.
Do note that not all carriers support Voicemail, Visual Voicemail, and Voicemail transcription. Also, note that these features are not available everywhere. So, first and foremost, make sure Voicemail is available for you to use.
Ensure That Voicemail is Set Up Perfectly on Your iPhone
It’s worth pointing out that the first time you launch Voicemail, you are prompted to create a password and also record your voicemail greeting. Yeah, it’s pretty basic but the one thing that needs to be done upfront. So, ensure that you have set it up the right way.
- Open the Phone app on your iOS device -> Voicemail -> Set Up Now and then create a voicemail password.
- After that, select a greeting: Default or Custom. Keep in mind that if you select Custom, you will need to record a new greeting.
Turn Off/On AirPlane Mode
Whenever I run into any network-related issues, the very first trick that I try out to fix the problems is to turn on/off airplane mode. Many a time, it does work well in sorting out the problems. Therefore, give this handy tip a try if your iPhone’s voicemail is not working.
- On a Face ID-equipped iPhone: Swipe down from the top right corner of the screen and tap the airplane mode icon to turn it on. Now, wait for a few seconds and then tap the airplane mode icon again to turn it off.

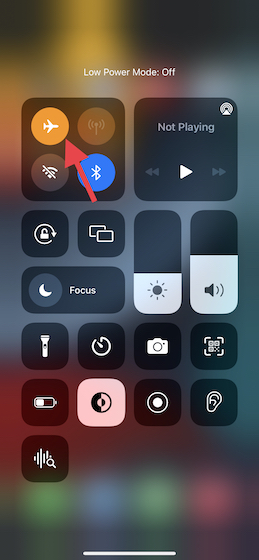
- On the Touch ID-equipped iPhone: Swipe up from the bottom of the screen to bring up control center and then tap the airplane mode icon to turn it on/off.
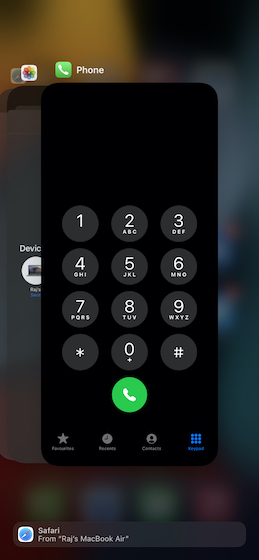
Force Kill Phone App
Another simple yet efficient solution that you should try to resolve the Voicemail issues on your iOS device is to force kill the app. If there is any random software glitch, it can fix the issue right away.
- On iPhone with Face ID: Swipe up from the bottom of the home bar and hold along the middle of the screen. Then, swipe up on the app card to force quit the Phone app.
- On iPhone with Touch ID: Double-press the home button and then swipe up on the app card to force kill the Phone app.
Now, launch the Phone app on your device and try to use Voicemail as usual.
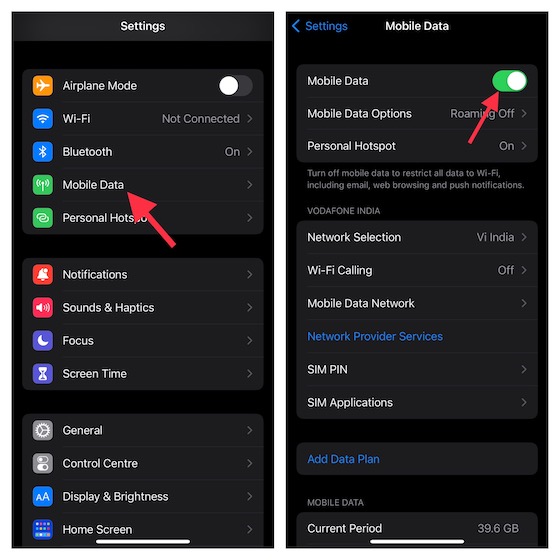
Turn Off/On Cellular Service
Since the problem is mostly related to the carrier network, turning off/on cellular could do the trick. Open the Settings app on your iPhone and tap Mobile /Cellular Data. After that, turn off the switch for cellular data. Then, force restart your iOS device.

- On iPhone 8 or later: Press and quickly release the volume up button. Then, press and quickly release the volume down button. After that, hold down the side button until the screen goes black and the Apple logo shows up on the screen.
- On iPhone 7 and 7 Plus: Press and hold the side button and the volume down button at once until the Apple logo appears.
- On iPhone 6s/6s Plus (or earlier models): Press and hold the side/top button and home button simultaneously until you see the Apple logo on the screen.
Once your iPhone has rebooted, head into the Settings app -> Cellular and then turn on Cellular Data. Now, check out if Voicemail has started to work normally.
Ensure that Call Forwarding is Disabled
If you have enabled Call forwarding on your iOS device, there is a good chance that it’s causing the “voicemail not working issue” on iPhone. Therefore, make sure to turn it off.
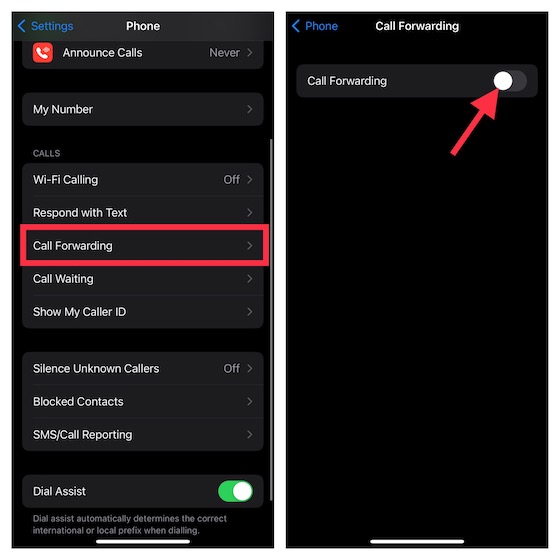
- Head over to Settings app -> Phone -> Call Forwarding and then ensure that the Call Forwarding toggle is disabled.
Reset Time Zone/Set Date & Time Automatically
If the date and time are not set correctly, Voicemail may ill-function. So, make sure to reset the time zone.
- Open the Settings app on your device -> General -> Date & Time. Now, turn on the toggle next to Set Automatically.
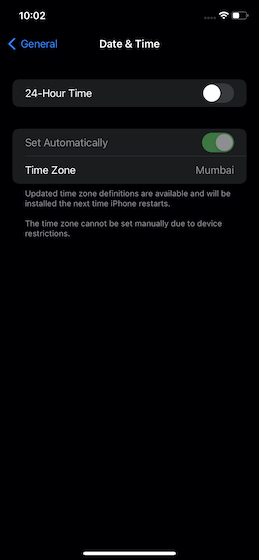
- To help your device set the time zone correctly, make sure location services is enabled. To get it done, go to Settings app -> Privacy -> Location Services and then turn on the toggle.
Update Carrier Settings
Carrier providers roll out frequent updates to fix network-related issues and also enhance performance. So, if there is any update, make sure to update the carrier setting on your iPhone. Sometimes if your carrier settings are out of date, it can cause iPhone voicemail to stop working.
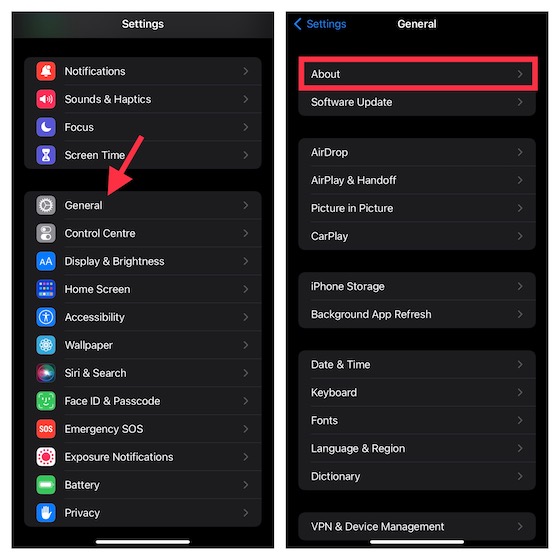
- Open Settings app on your iPhone -> General -> About. Now, check out if there is any update available. If it’s there, update the carrier.
Reset Voicemail Password
At times, you can troubleshoot the Voicemail problem on your iPhone by just resetting the password. There are multiple ways to do so. For instance, you can get it done via the mobile app of your carrier network, visiting the carrier network’s website, and even from the Settings app of your iOS device.
- Navigate to the Settings app on your iPhone -> Phone -> Change Voicemail Password and then reset it.
- Bear in mind that if you forgot your voicemail password, you will need to contact your carrier provider to reset the password.
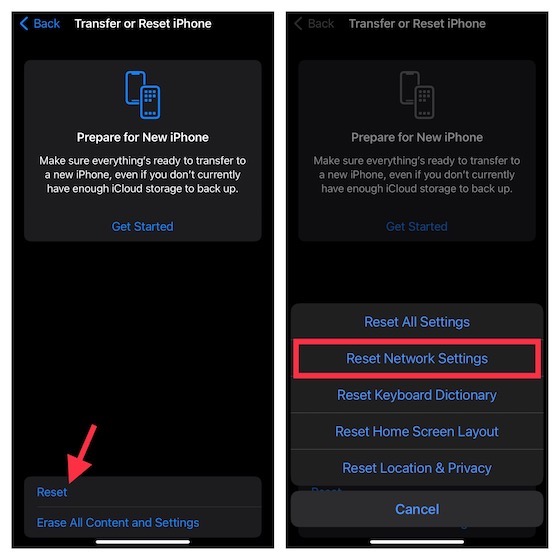
Reset Network Settings
When nifty tricks don’t seem to fix network-related issues on iPhone, putting the network settings to factory default comes to the rescue. So, if you are yet to bring Voicemail back on track, do not miss out on this one.
- On iOS 15 or later: Open Settings app -> General -> Transfer or Reset iPhone -> Reset -> Reset Network Settings.
- On iOS 14 or earlier: Open Settings app -> General -> Reset -> Reset Network Settings.
Contact Your Carrier
If Voicemail is still not working, it would be better to contact your carrier. There might be some issues on the carrier side. So, without any further ado, contact the carrier to enquire about the problem.
Reset All Settings
Factory reset has a pretty solid track record of fixing complex iOS issues. When you reset your device to factory settings, it wipes out all the existing settings including Wi-Fi and VPN, returning them all to a clean slate. If you are concerned about losing any data, be assured that it won’t touch your media and data.
- On iOS 15 or later: Head into the Settings app -> General -> Transfer or Reset iPhone -> Reset -> Reset All Settings.

- On iOS 14 or earlier: Navigate to Settings app -> General -> Reset -> Reset All Settings.
Update Software
If Voicemail is still not working on your iOS device, there is a good chance that the problem could be due to a software glitch. And in this situation, the software update is the most effective solution to troubleshoot the problem.
Since Apple keeps refining the operating system with frequent updates targeted to fix bugs and improve performance, we hope it will put the issue to rest.
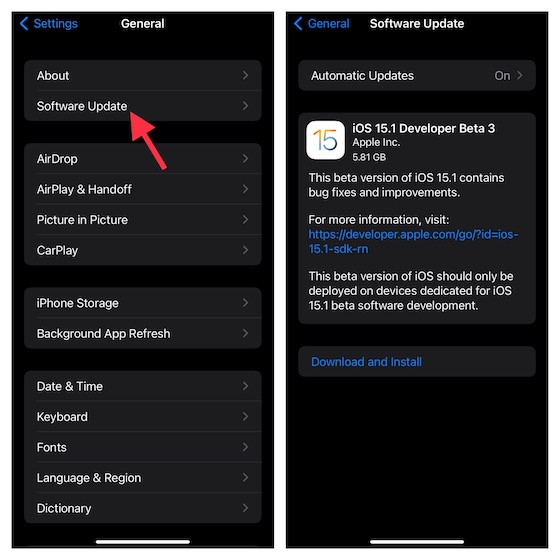
- To update iOS, dive into the Settings app -> General -> Software Update and then download and install the latest version of the software.
Easily Fix Voicemail Issues on iPhone
That’s it! I guess Voicemail has started to work normally again on your iOS device. As I said above, the problem is mostly related to the carrier network. So, you can get rid of the issue by resetting the network or updating the carrier setting. And on some rare occasions, if none of the nifty hacks work, you shouldn’t fail to contact your carrier. That said, which one of these solutions has worked for you? It would be great to have your feedback in the comments section below.


