Ever been in a position where you lost your patience while explaining certain steps of a tutorial to your friends or family members? Well, Apple now has a solution for that. That’s right, with iOS 11, you’ll be able to record your screen natively and share it with your friends, so that they can understand what you’re trying to convey, instead of adding confusion by sending them a barrage of screenshots. While you could record the screen on previous versions of iOS, you’d need to connect your iPhone or iPad to a Mac or PC. Thankfully, iOS 11 brings a native screen recording solution. So, without further ado, let’s take a look at how to screen record in iOS 11:
Enable Screen Recording in iOS 11
Note: I tried this on an iPhone 7 Plus and an iPhone 6s running the latest iOS 11 beta 1 for developers, so this should work for you too.
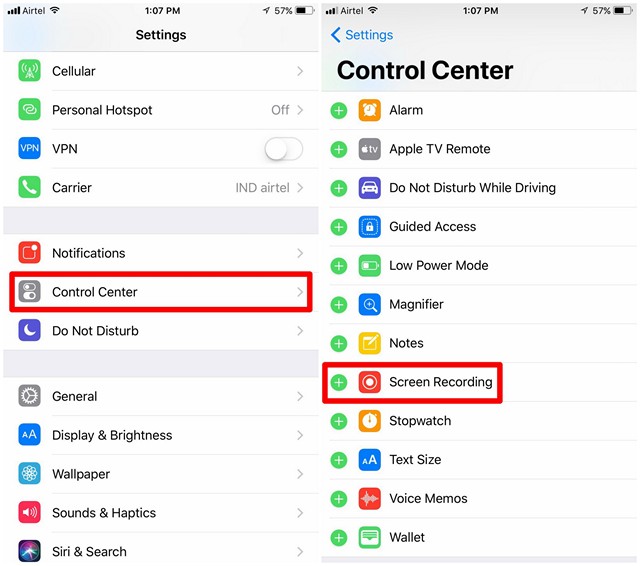
The screen recording feature is built right into the iOS 11’s Control Center. By default, the toggle doesn’t show up, and therefore, you have to add it to the Control Center before you can start using this nifty feature. So, simply follow the steps below to get it done:
Go to Settings app on your iOS device and tap on “Control Center”. Once you’re in there, just scroll down a little bit and tap on the “+” icon right next to Screen Recording in order to add it to your Control Center.

Record Screen in iOS 11
Once you have enabled Screen Recording in the Control Center, you can swipe up from the bottom of your iPhone to invoke the Control Center. You’ll notice that there’s a toggle for screen recording, as shown in the screenshot below. Tap on it once, in order to start recording whatever you want.
While it’s recording, the screen record icon will be red and a blue bar will be displayed at the top of the screen that shows the elapsed time. If you want to stop recording, you can either tap this blue bar and press “Stop” or tap on the toggle again.
If you’re using an iPhone 6s/6s Plus or iPhone 7/7 Plus, you can make use of the 3D Touch feature that’s available for the screen recording toggle. You can force touch on the toggle, in order to enable or disable your device’s microphone audio. So, if you want to record something with your voice, you can certainly do that.
The recorded video file can be accessed from the Photos App. In this app, you can even crop out the unnecessary portions of the recorded video. This is pretty important, as every single recording starts with your Control Center.
SEE ALSO: How to Enable Hidden Dark Mode In iOS 11
Easily Record Screen in iOS 11 on Your iPhone or iPad
Well, once you’ve added the toggle to your Control Center, this will pretty much be the easiest way you’ve recorded your device’s screen. With easy control over the microphone’s audio and video’s length, the user has complete control over what they’re recording. We’ve been waiting so long for Apple to implement this feature right into iOS and it certainly looks like the feature is definitely worth the wait.
So, are you ready to try out screen recording for yourself? Do let us know how the process went by shooting your opinions in the comments section down below.
This is awesome! Great find. Since I’m a gamer, I need to capture my gameplay on iPhone for my YouTube channel. Currently, I’m using a desktop app call Acethinker iPhone screen recorder that mirrors my iPhone screen to the computer and use its screen recording function to make videos. It’s not that direct, but it works. Now, I can do that straight on iPhone, that’s cool.
This feature is definitely really important for many iOS users, especially Snapchat or Instagram users to record live videos. It’s one of the best additions on iOS 11. I actually use one Android app called AZ Screen Recorder and it’s working quite nicely.