- A DNS cache is a memory on your device's OS that stores information about all the previous requests made to the DNS server from your device.
- You can clear the DNS cache on Mac using Terminal.
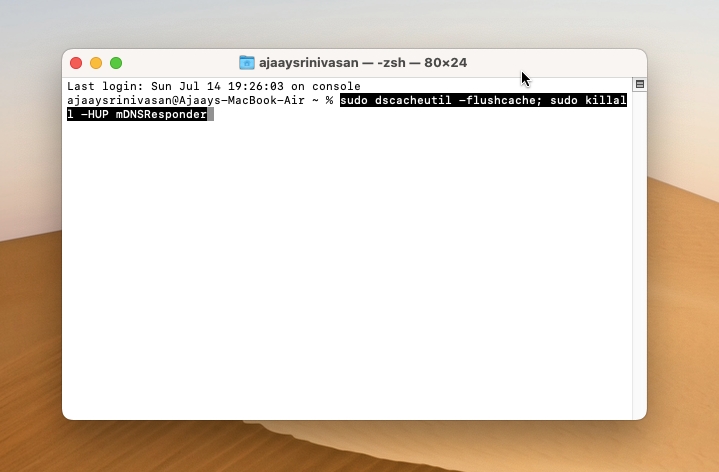
- Use Spotlight to search for Terminal and then enter the command "sudo dscacheutil -flushcache; sudo killall -HUP mDNSResponder".
If your Mac is unable to load a website that’s working fine on other devices, there are some issues with the DNS cache. When you’re stuck with connectivity issues, you should clear the DNS cache on your MacBook and the website should start loading for you. If you don’t have much idea about what DNS cache is and how it impacts your Mac’s functionality, you need not worry, as we’re here to help you. Read on to learn why flushing the DNS cache is important and how to clear the DNS cache on your Mac. No matter which macOS you’re using, this guide will surely come in handy. Without any ado, let’s begin!
What is DNS Cache?
DNS (Domain Name System) is like a phone book of the internet. It translates domain names into IP addresses, allowing you to access the website you need. A DNS cache is a memory on your device’s OS or browser that stores information about all the previous requests made to the DNS server from your device or browser.
Your Mac uses this information to fulfil your requests in the future. The browser doesn’t have to make a new request every time, instead, it can use the DNS cache and access the saved information to load the website quickly. Since your browser doesn’t have to communicate with a remote DNS server, this saves time and delivers faster results.
How to Clear DNS Cache on Mac
It’s relatively simple and quick to clear the DNS cache on your Mac. You can easily do it, even if you don’t have sound technical knowledge. All you have to do is open Terminal and then paste a command. Here’s how to flush the DNS cache on Mac with the Terminal Command.
- Open Terminal on your Mac. The quickest way is to press Command + Space to open Spotlight and then search for “terminal”. Alternatively, you can open Launchpad from the Dock and then search for Terminal or go to Finder > Applications > Utilities > Terminal.
- Now, enter the following command:
sudo dscacheutil -flushcache; sudo killall -HUP mDNSResponder
- Press Return. Enter your Mac’s password and press Return again. It’s worth knowing that the password won’t appear in the Terminal as you type it.
- Once you’ve done this, the DNS cache on Mac will be reset immediately. You won’t see any confirmation message. When you see a new line, it indicates your command has been carried out.
How to Clear DNS Cache on Older macOS
The DNS flush command is different in the older macOS. The overall process is the same, but you have to copy/paste different Terminal commands for different macOS versions.
| macOS Version | Terminal Command |
|---|---|
| macOS Sonoma macOS Ventura macOS Monterey macOS Big Sur macOS Catalina | sudo dscacheutil -flushcache; sudo killall -HUP mDNSResponder |
| macOS Mojave macOS High Sierra macOS Sierra OS X Mountain Lion Mac OS X Lion | sudo killall -HUP mDNSResponder |
| Mac OS X El Capitan OS X Mavericks | sudo dscacheutil -flushcache;sudo killall -HUP mDNSResponder |
| OS X Yosemite | sudo discoveryutil mdnsflushcache;sudo discoveryutil udnsflushcaches |
| Mac OS X Snow Leopard | sudo dscacheutil -flushcache |
| Mac OS X Leopard | sudo lookupd -flushcache |
| Mac OS X Tiger | lookupd -flushcache |
What does DNS Flushing Do? Why is it important?
Over time, the DNS cache could be corrupted or outdated. This happens due to older website information (some websites may change their IP addresses), technical glitches, or malware. When this happens, your Mac uses inaccurate local cache information to load the requested webpage. Your web browser checks the DNS cache to look up an IP address for the website’s URL you’ve entered, it will find the wrong or an unusable address. This prevents the browser from loading a website. Even if it does, the process is slow and specific web page elements, like videos, won’t load. You may even see a 404 error.
When you face such connectivity issues, you must flush the DNS cache on your Mac. When you do this, your Mac will delete its local DNS records. So, next time you wish to open a website, your web browser will retrieve the fresh information from the DNS server. This will improve your browsing experience and will make your browser much faster.
You must flush the DNS cache on your Mac if you can’t access a website or are stuck with a 404 error. It also prevents DNS spoofing (or DNS cache poisoning), an attack where someone manipulates DNS records with false or incorrect information. With the false information, users are redirected to wrong, fraudulent, or malicious websites.


