
Raspberry Pi is one of the best single-board computers out there. You can build your own Android TV Box with Raspberry Pi or set up a RPi web server. There are limitless possibilities with Raspberry Pi, and we simply love this tiny computer. To showcase its utility, we have built an audio streaming device with Raspberry Pi and brought you another cool tutorial. With balenaSound and a Raspberry Pi board, you can turn your old speaker into a smart Bluetooth-compatible speaker. In addition, you can then cast music from Spotify, and it’s also compatible with Apple’s AirPlay. So without wasting any time, let’s get started with the guide.
Build an Audio Streaming Device with Raspberry Pi
In this Raspberry Pi project, we have detailed instructions to build an audio streaming device. Even if you are new to this, worry not, as we have covered everything from flashing the OS to customizing balenaSound to stream music to your old speaker wirelessly. You can expand the table below and move to the desired section if you already know the requirements or how to flash BalenaOS.
Requirements to Build Audio Streaming Device with Raspberry Pi
Before we move to the steps of setting up our audio streaming device, here are the hardware and software requirements for this Raspberry Pi project:
1. Balena Sound is compatible with Raspberry Pi 4, 3, 2, and v1. Additionally, it supports Raspberry Pi Zero, Zero W, Zero 2 WiFi, CM4, and the latest 400.
2. Next, you will need a power adapter for your Raspberry Pi.
3. An SD card with 8GB or more storage.
4. Lastly, you will need an audio connector. If you already have a 3.5mm cable on your speaker, no need to buy an aux cable.
Download and Flash BalenaOS on Raspberry Pi
1. First, go ahead and download BalenaEtcher (Free) on your PC, Mac, or Linux machine. It will allow you to flash balenaOS onto the SD card.
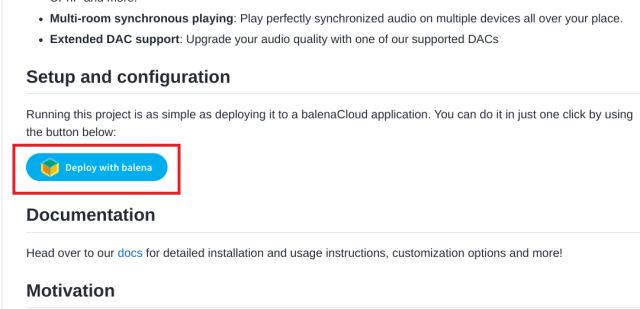
2. Next, we need to download balenaOS. Open the GitHub page of Balena Sound and click on “Deploy with balena”. This is an extremely important step. There is currently a bug on BalenaSound’s official page, where it does not deploy the OS correctly. That’s why I recommend you to go through the GitHub page to avoid any issues further in the process.

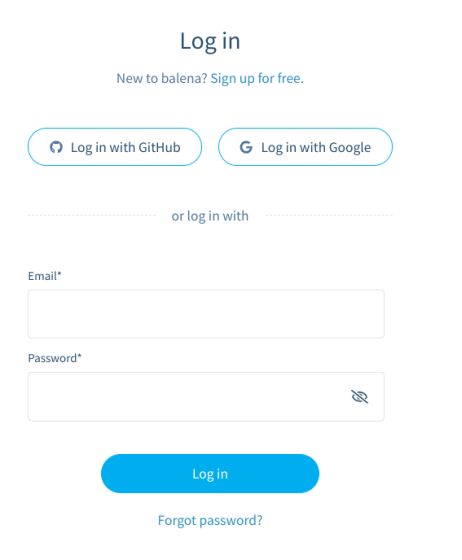
3. Once you click the “Deploy with balena” button, it will take you to the balena login page. Here, create a free account and sign in.

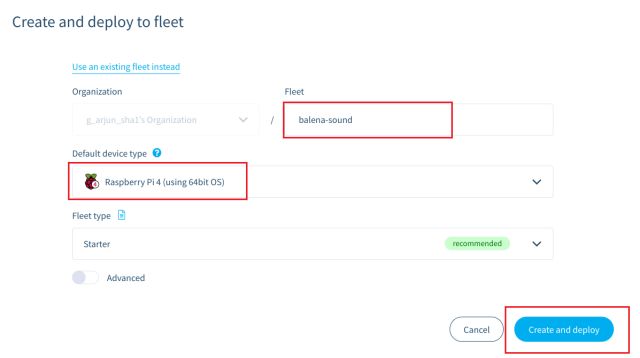
4. Next up, give a name to your Fleet. After that, select the Raspberry Pi version you have from the “Default device type” drop-down menu. And remember to keep the Fleet type as “Starter”. Finally, click the “Create and deploy” button.
Note: Make sure the “Create and deploy” button appears here instead of the “Create new fleet”. If you have the latter, go to the GitHub page again and click on the “Deploy with balena” button.

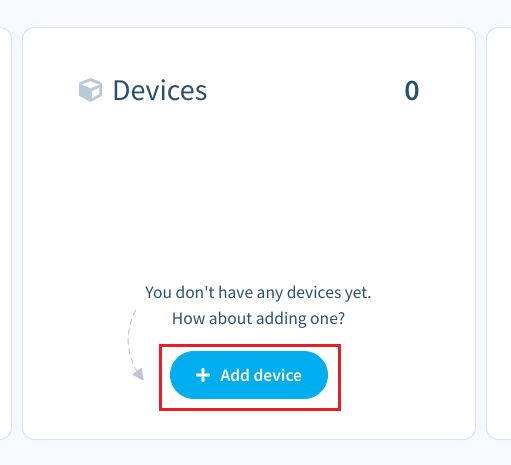
5. On the next page, click on “Add device“.

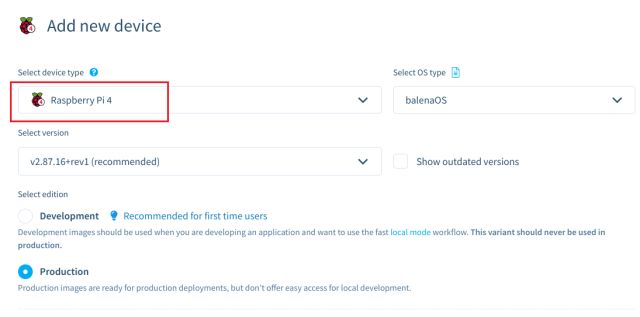
6. Here, confirm your Raspberry Pi device type and choose the balenaOS version you wish to install. I suggest keeping everything as default.

7. Then, scroll down and choose “Wifi+Ethernet”. Here, enter your WiFi name and password. Keep in mind that WiFi name (SSID) and password are case-sensitive, so provide the credentials exactly as they are. It will enable your Raspberry Pi to automatically connect to WiFi once it boots up. Finally, click on “Download balenaOS”. By the way, you also have the option to connect your Raspberry Pi via the Ethernet port.

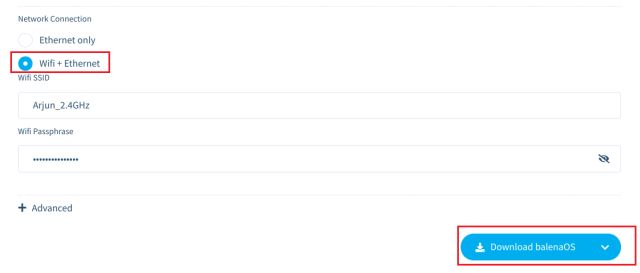
8. Now, a ZIP file with a size of around 160MB will be downloaded on your PC. Next, open the balenaEtcher program we downloaded in Step 1 and choose the ZIP file.

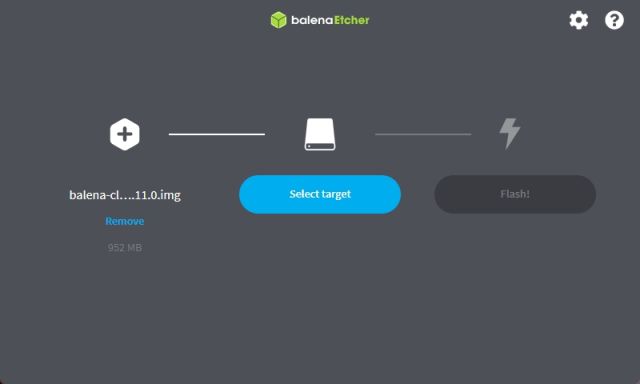
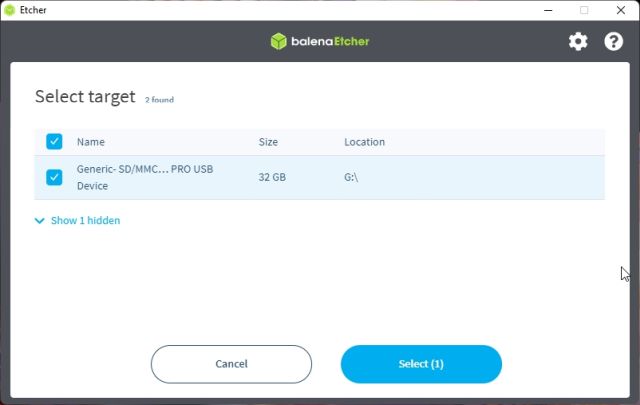
9. After that, plug the SD card into your computer and click on “Select target“. Here, choose your SD card.

10. Finally, click the blue”Flash!” button, and the SD card will be ready with balenaOS within a few minutes.

Create a Raspberry Pi Audio Streaming Device With Balena Sound
1. Once you have flashed the SD card, insert it into your Raspberry Pi board and power it on.
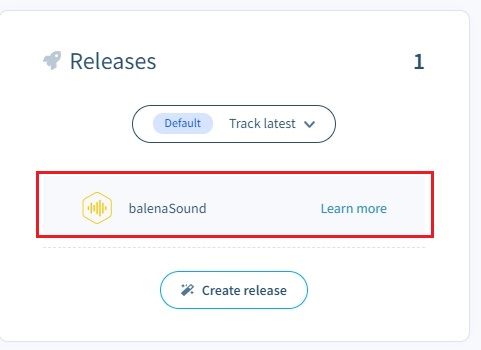
2. Move to the web dashboard where we downloaded balenaOS. Here, on the right corner, you will find a “Releases” section with the mention of “balenaSound” below. If nothing shows up here, you again need to go back to the GitHub page and start with the “Deploy with balena” button.

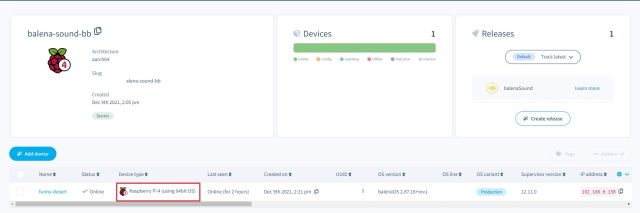
3. Now, wait a while as Raspberry Pi tries to connect to your WiFi network. After a few minutes, reload the web dashboard, and you will find your Raspberry Pi has been added to the device list and is communicating with Balena’s cloud server.

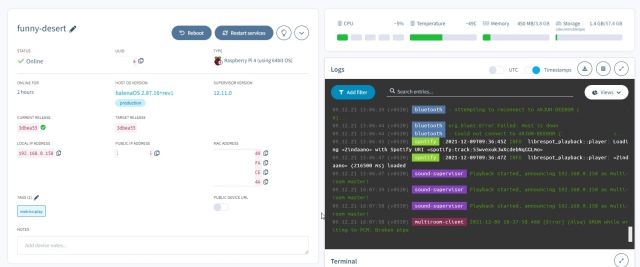
4. Next, click on Raspberry Pi, and it will show you all the details, including the operations it’s performing in real-time. You don’t need to do anything here. On the right side, you will find the log that shows all the packages it’s downloading and updating. After a good 10-15 minutes, balenaSound will be up and running.

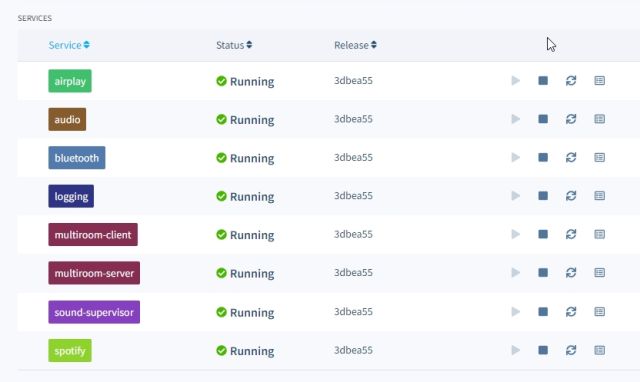
5. To confirm everything is running fine, you will find a list of services with “Running” status at the bottom. If everything is marked green and “Running”, it means your Raspberry Pi-powered audio streaming device is ready for use.

6. Now, connect your speaker to Raspberry Pi’s 3.5mm headphone jack and open Spotify on your phone or computer. Under the device selection screen in Spotify, a new “balenaSound Spotify XXXX” speaker will appear. Tap on it, and you will be able to cast the song on your speaker just like that. Keep in mind that Chromecast or casting from an Android device is not supported yet.
Note: You may need Spotify Premium to use the Spotify Connect feature.

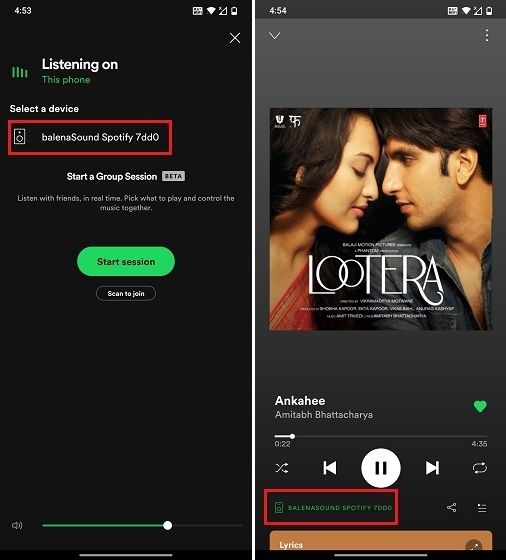
7. However, there is support for Bluetooth. You can easily connect your Android device or computer to the audio streaming device with Bluetooth. Then, you can play songs from your favorite music streaming app, including Spotify, YouTube Music, Apple Music, etc. Make sure to disconnect Spotify Connect before making a Bluetooth connection.


8. The best part is that there is native support for AirPlay. Basically, on iPhone and other Apple devices, you can simply cast your music without having to rely on Bluetooth. That’s awesome, right?
Low Audio Output with Balena Sound on Raspberry Pi? Here is the Fix!
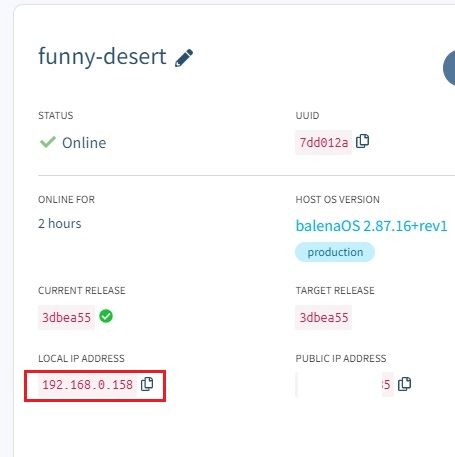
1. If the sound output is low on your old speaker that now serves as the audio streaming device, don’t worry, as there is an easy fix. On the balena web dashboard, copy the local IP address.

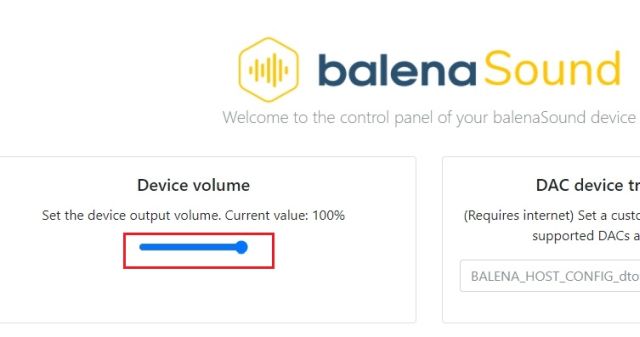
2. Then, open it in a web browser and increase the device volume to “100%“.

3. If you still think the volume output is low, go to “Device Variables” from the left sidebar on the web dashboard and change the device value of “SOUND_VOLUME” to “100”.

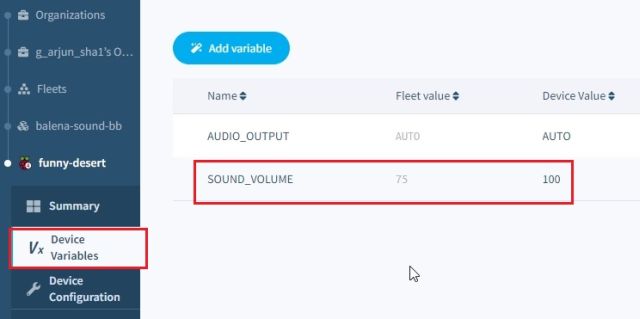
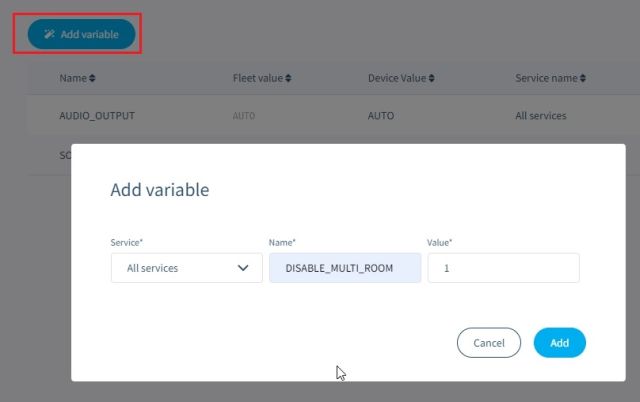
4. Next, create a new variable named DISABLE_MULTI_ROOM and change the value to “1“.

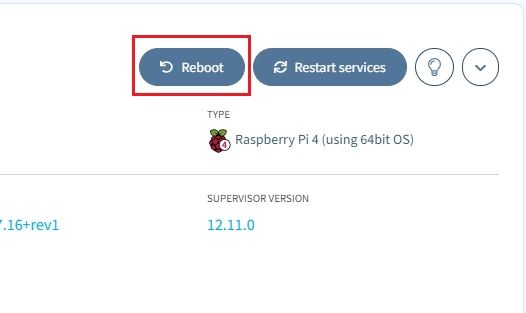
5. Now, reboot your Raspberry Pi, and the low audio issue should have been eliminated this time around.

Add Bluetooth, AirPlay, and Spotify Connect Support to Your Old Speaker using Raspberry Pi
So that is how you can build an audio streaming device with Raspberry Pi. While there are countless other utilities of Raspberry Pi, I love this project particularly. It allows me to repurpose my old speakers and stream music from Spotify, YouTube, or any other platform from anywhere inside my house. The best part is that you don’t need a powerful Raspberry Pi 4 to create an audio streaming device. You can do so with older and cheaper boards like RPi 3 and 2 as well. Anyway, that is all from us. If you want to set up Pi-hole on your Raspberry Pi, follow our linked tutorial. And if you have any questions, let us know in the comments section below.

