
From being a relatively novice virtual assistant in iOS 5 to being a versatile personal assistant in iOS 15, Siri has come a long way. With a wide variety of skills as well as awesome Siri tricks including translation, the ability to control smart home devices, and the repertoire to enhance conversation with natural sound, Apple’s virtual assistant has vastly improved. However, there are still areas where Siri continues to struggle and fumble much to everyone’s annoyance. Beyond the age-old downsides, the virtual assistant has also had its fair share of issues. So, if ‘hey Siri’ is not working on your devices, here are 26 solutions to fix Siri not working on iPhone, iPad, Apple Watch, and Mac.
How to Fix ‘Hey Siri’ Not Working Issue on iPhone and iPad
While trying to fix Siri issues on Apple devices, you need to keep several things in mind. For instance, you have to check off compatibility and ensure that your country or region supports a specific Siri feature. That’s not all, you also have to make sure your device is connected to a strong Internet connection for the virtual assistant to work.
Apart from these usual suspects, you should never rule out a random software glitch or bug that may be preventing Apple’s virtual assistant from working normally. With that said, let’s try out the possible solutions to resolve Siri not working problem on iOS, iPadOS, watchOS, or macOS!
1. Check if your Device Supports ‘Hey Siri’
Not every device that supports Siri also supports the hands-free ‘Hey Siri’ command. The first thing you should do, therefore, is check whether your device supports Hey Siri.
The following devices support “Hey Siri”:
- iPhone 6s or later
- iPad Air 3 and later
- iPad mini 5 and later
- iPad Pro 12.9-inch (2nd generation or later)
- iPad Pro 11-inch (1st generation or later)
- iPad Pro (10.5-inch)
- iPad Pro (9.7-inch)
- iPad (6th generation) or later
- AirPods Max
- AirPods Pro
- AirPods (2nd generation)
- All Apple Watch models
- Beats Powerbeats (2020 model), Powerbeats Pro Solo Pro
- MacBook Pro introduced in 2018 or later
- MacBook Air introduced in 2018 or later
- iMac Pro/ iMac introduced in 2020
- Compatible Mac computers connected to Studio Display
If your devices are compatible with ‘Hey Siri’, read on to find a way to fix the problem.
2. Make Sure Your iPhone and iPad are Compatible with Offline Siri
With iOS 15 and iPadOS 15, you can use Siri offline with some limitations. The following iPhone and iPad models support offline Siri.
- iPhone 13, 13 mini, 13 Pro, and 13 Pro Max
- iPhone 12, 12 mini, 12 Pro, and 12 Pro Max
- iPhone 11, 11 Pro, and 11 Pro Max
- iPhone XS, XS Max, and iPhone XR
- iPhone SE 2nd and 3rd gen
- iPad mini 5th gen and later
- iPad Air 3rd gen and later
- iPad 8th gen and later
- iPad Pro 11-inch 1st gen and later
- iPad Pro 12.9-in 3rd gen and later
3. Know What Does and Doesn’t Work with Offline Siri
Since the offline Siri works with limitations, you should keep in mind what does and doesn’t work when the iPhone is not connected to the Internet.
What Works with Offline Siri?
- Controlling system settings like adjusting volume, turning on/off airplane mode, enabling/disabling Low Power Mode, turning off/on dark mode, etc.
- Opening apps
- Playing the next or previous song in the Music app
- Setting and changing alarms
What Doesn’t Work with Offline Siri?
- Bear in mind that offline Siri won’t work with any requests that require continually updated information like reminders, weather, calendar, HomeKit, and more. Yeah, anything that needs an active internet connection won’t work when your device is offline.
- Playing music or podcasts (unfortunately, doesn’t work with even downloaded content).
- Phone calls, FaceTime, and Messages
- Most specific actions in apps.
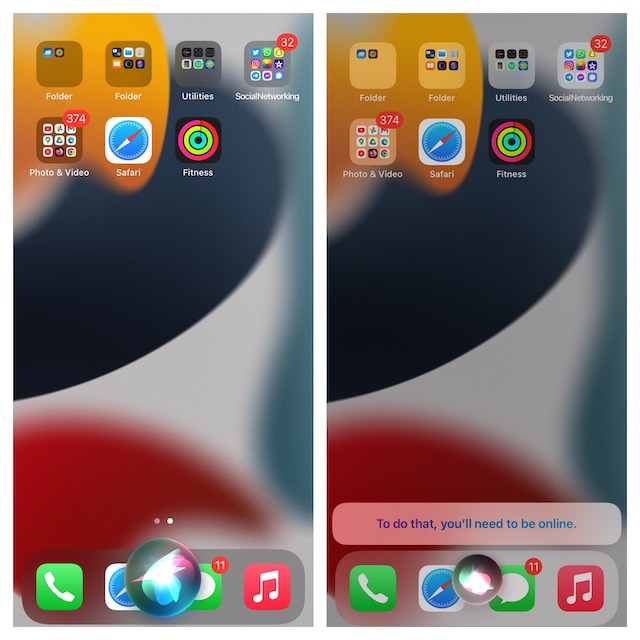
When you are offline and ask Siri to do something, you will get an alert saying something like ” I can help with that when you are connected to the Internet” or “To do that, you need to be online” at the bottom of the screen.

4. Be Sure Siri is Enabled for Supported Third-Party Apps
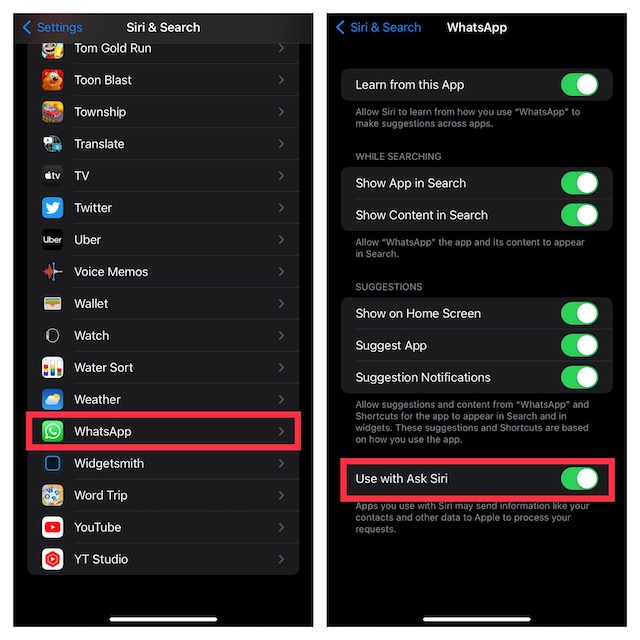
If you are trying to use Siri with a supported third-party app like WhatsApp and Spotify, make sure you have enabled Siri to work with the app.
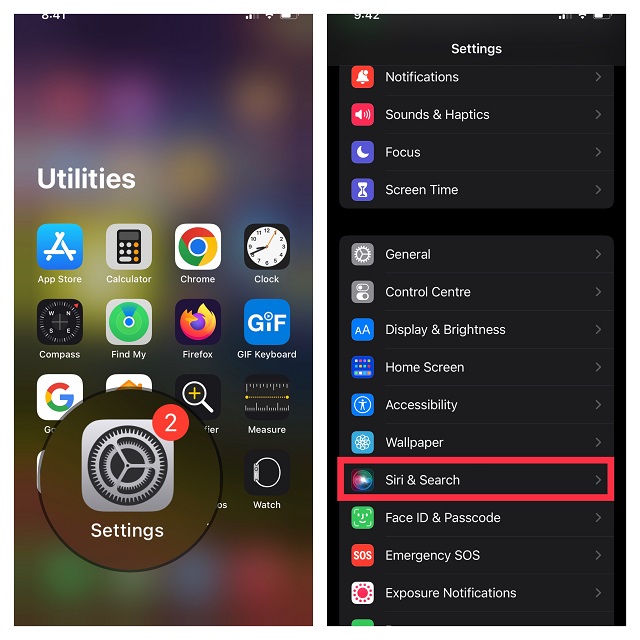
- Navigate to the Settings app on your iPhone or iPad and tap Siri & Search.

- Now, scroll down to find the app with which you want to use Siri, and then turn on the toggle next to Use with Ask Siri.
5. Fix ‘Hey Siri’ Not Working with Third Party Apps
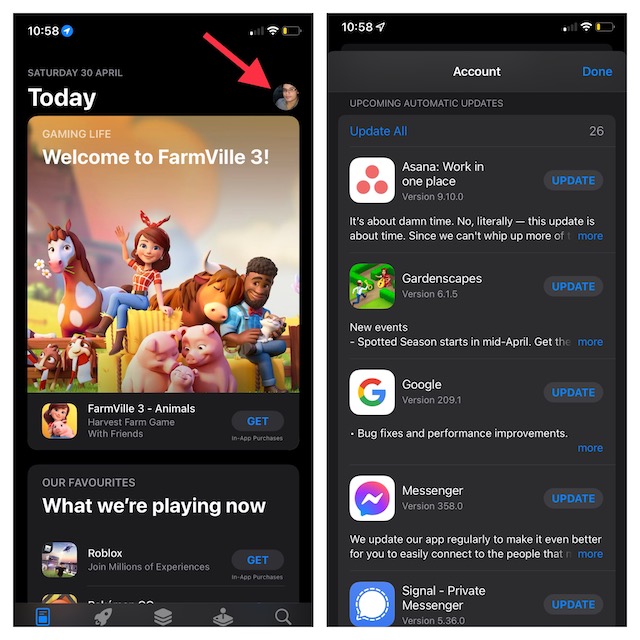
If you can’t use Siri with a third-party app, make sure the app is updated.
- On iPhone and iPad: Open the App Store and tap your profile. After that, find the app you want to update and hit the Update button next to it.
- On Apple Watch: First off, launch the App Store. Next, scroll down to the bottom and tap Account -> Updates. Next up, head over to the app you wish to update and then do the needful.


- On Mac: Open the App Store on your Mac and then click on Updates in the sidebar. Now, locate the app you wish to update and then hit Update.


6. Make Sure Siri Supports Certain Features in Your Country or Region
It’s worth pointing out that Siri’s availability, commands, and features vary by language and country/region. For instance, the Siri restaurant reservations feature works only in the United States, Canada, and Mexico. Besides, Siri translation and Neural text-to-speech voice features are yet to be rolled out everywhere. To find out whether or not your country/region supports a specific Siri feature, navigate to Apple’s comprehensive feature availability page.
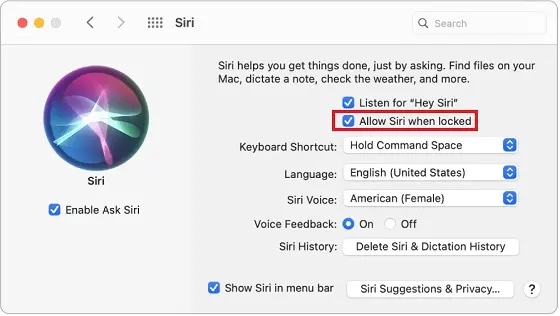
7. Ensure That Allow Siri When Locked is Enabled
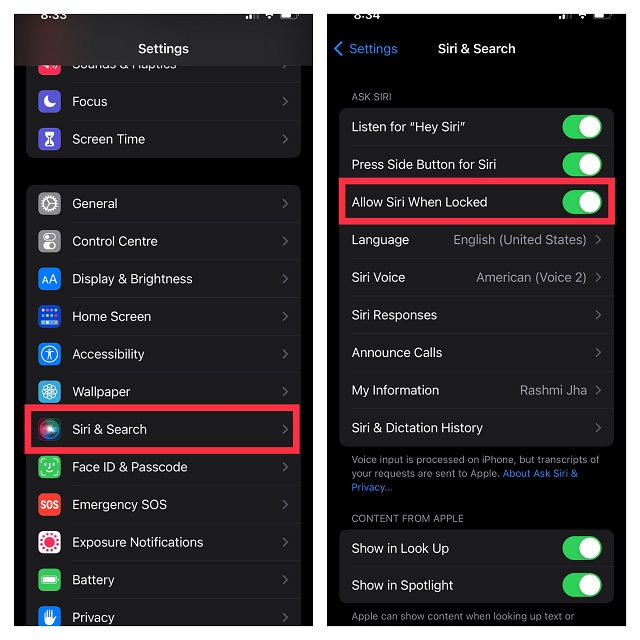
If you are trying to activate Siri when your device is locked and Hey Siri is not working for you, make sure the “Allow Siri When Locked” option is enabled. If it is turned off, you can’t invoke the personal assistant when your iOS/iPadOS or macOS device is locked.
On iPhone/iPad: Open Settings -> Siri & Search. Now, be sure the toggle for Allow Siri When Locked is turned on.
On Mac: Open System Preferences -> Siri. Now, ensure that the box to the left of Allow Siri When Locked is checked.

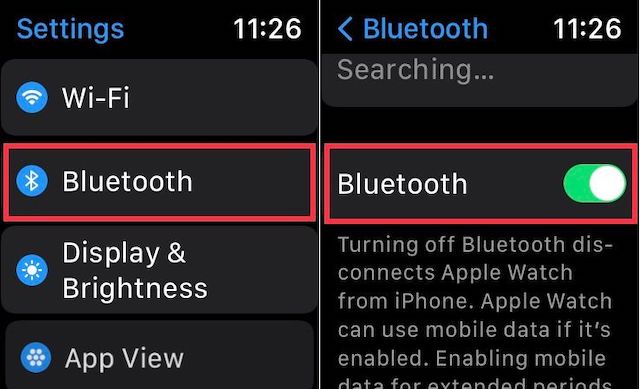
8. Enable Bluetooth If Using Multiple Devices with ‘Hey Siri’
If you have multiple Hey Siri devices, ensure that Bluetooth is enabled on all the devices. It is needed because when you invoke Siri around several compatible devices, they communicate with one another using Bluetooth and decide which device should respond to your request. And the device that is able to hear your words clearly or the one that you used/unlocked recently gets into action and responds to your Hey Siri command.
- On iPhone and iPad: Swipe down from the top-right or swipe up from the bottom edge of the screen to access Control Center and then tap the Bluetooth icon to turn it on.


- On Apple Watch: Go to Settings app -> Bluetooth and then turn on the toggle.
- On Mac: Click the Bluetooth icon in the menu and make sure the Bluetooth toggle is turned on.


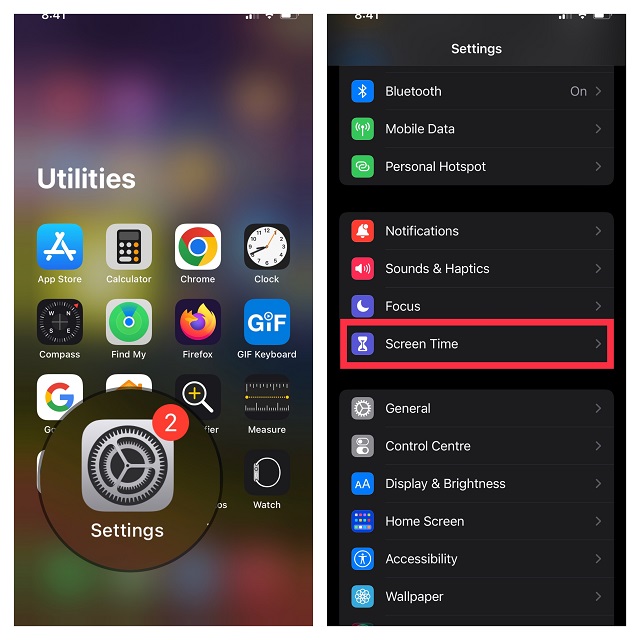
9. Make Sure Siri is Not Restricted on Your Device
Another important thing to keep in mind is to ensure that Siri is not restricted on your device. Screen Time lets you not only stop Siri from performing web searches but also block explicit language. So, be sure Siri has got the license to work without any restriction.
- To remove the restriction, go to the Settings app and choose Screen Time.
- Next, tap Content & Privacy Restrictions and turn on the toggle for Content and Privacy Restrictions. After that, tap Content Restrictions.
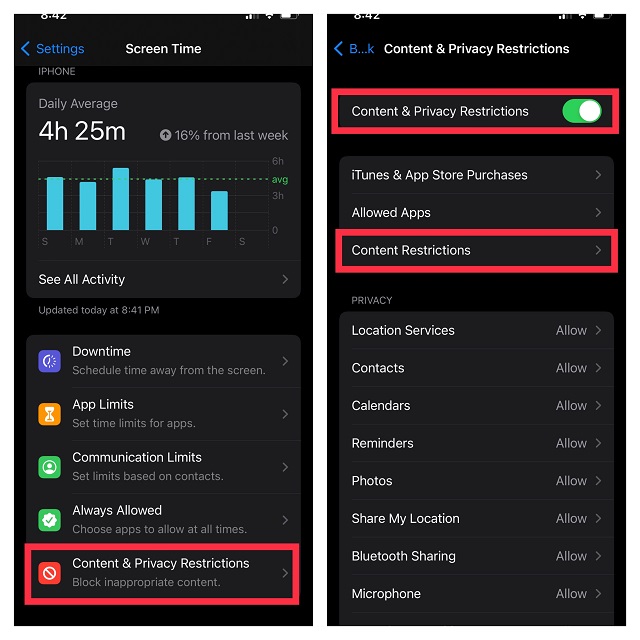
- Next, go to the Siri section and make sure you have allowed Siri to perform tasks without any limitations (if that’s what you are looking for).

10. Get Your Commands Right
Ensure that your commands are short and precise. If the commands aren’t precise, Siri will find it difficult to understand them. We’ve created a massive roundup of the Siri commands. Whether you want to get the most out of the virtual assistant or wish to master famous commands, head over to the roundup.
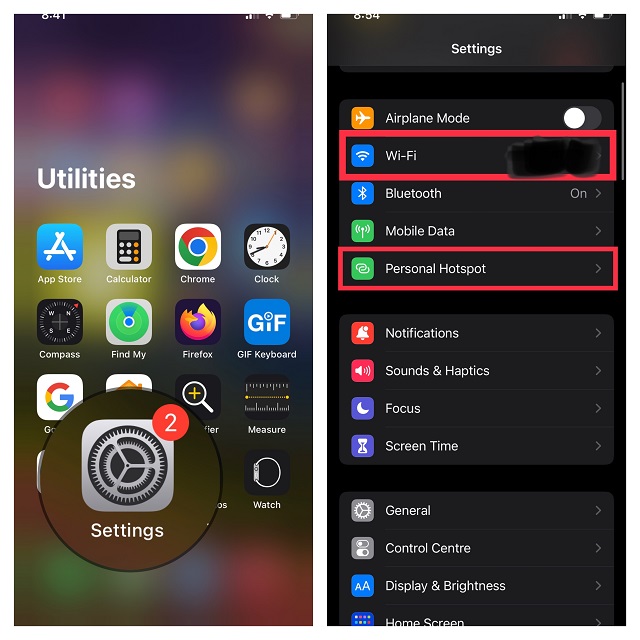
11. Toggle Wi-Fi and Cellular
It’s no secret that Siri requires strong and stable Wi-Fi/cellular connection. If your Internet connection is weak, this could be (most probably) the culprit. Thus, chances are pretty high that fixing the sluggish Wi-Fi or cellular connection will help you fix the problem of Siri not working on your iPhone, iPad, Mac, or Apple Watch.
- On iPhone and iPad: Open Settings app -> Wi-Fi/Mobile Data. Now, turn off the switch. After that, wait for some time and then turn on Wi-Fi/Mobile Data.
Note: You can also try to Reset Network Settings and see if that solves any WiFi issues your iPhone may be encountering.
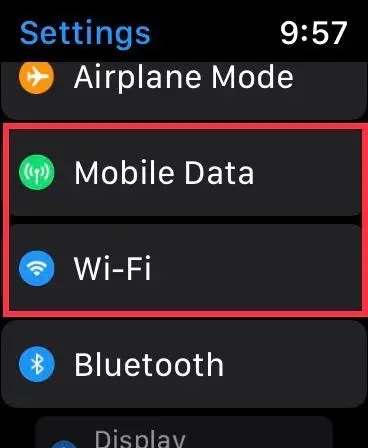
- On Apple Watch: Go to Settings app > Wi-Fi/Mobile Data. Then turn off the toggle. Next, turn on the switch again after a few seconds. (To fix other common Apple Watch problems, navigate to our extensive Apple Watch troubleshooting guide.)

- On Mac: Click on the Wi-Fi menu and then turn off Wi-Fi. Now, wait for a few seconds and then turn on Wi-Fi again.

12. Ensure That Always Listen for “Hey Siri” is Enabled
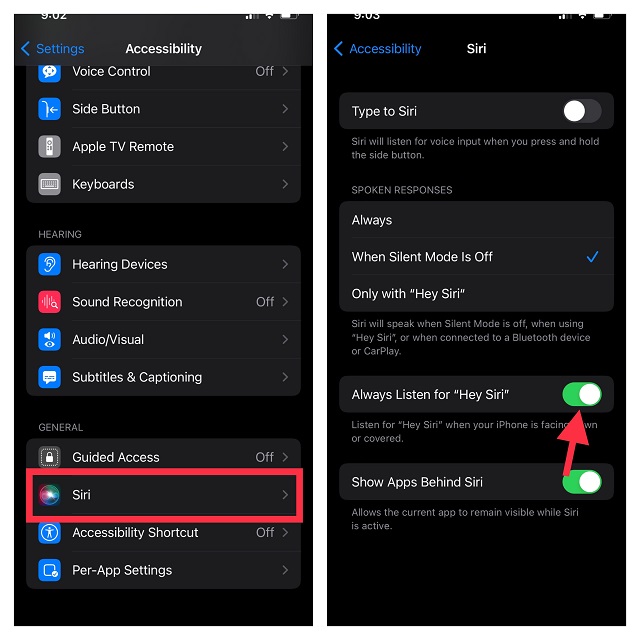
By default, Siri doesn’t respond when your iPhone is placed face down or covered. If you want the virtual assistant to always respond even when your device is covered or facing down, ensure that you have enabled Always Listen for Hey Siri.
- Go to the Settings app on your device and choose Accessibility.
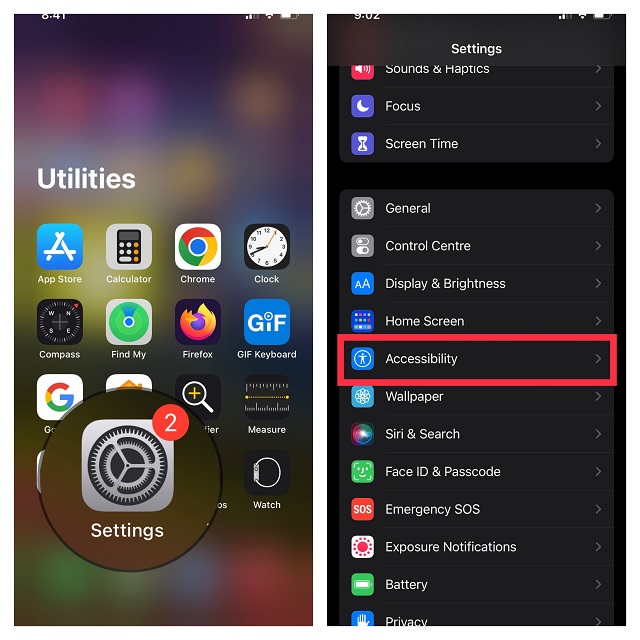
- Then, scroll down to the bottom and select Siri. Finally, make sure the switch right next to Always Listen for “Hey Siri’ is turned on.
13. Make Sure the Case is Not Blocking Microphones
If you are using a bulky case, ensure that the case is not coming in the way of the microphones. Remove the case and then trigger Siri to check if the virtual assistant works. If it does, your case, and not Siri, is at fault.
14. Clean the Microphone Grille on Your iPhone
If it’s been a while since you cleaned your device, there is a good chance that dust or debris may have clogged up. Hence, use a soft cloth to clean the microphones. Then after, invoke Siri to check if you have overcome the issue.
15. Disconnect AirPods/Beats Branded Headphones When Not Using Them
If your device is connected to wireless headphones, it may not respond to your Hey Siri command. Put your headphones in the case, wear the headphones or disconnect them. Then, try to activate Siri to figure out if the virtual assistant has begun to respond to your queries.
These wireless earphones from Apple support Hey Siri.
- AirPods 2nd and 3rd generation
- AirPods Max
- AirPods Pro
- Beats Fit Pro
- Beats Studio Buds
- Powerbeats (2020 model)
- Powerbeats Pro
- Solo Pro
16. Ensure That Your iPhone isn’t Stuck in Headphone Mode
At times, the iPhone tends to get stuck in the headphone mode, thinking it’s connected to headphones even though you have already disconnected the headphones. When this issue occurs, the built-in speakers and microphones may not work. The easiest way to fix this problem is to restart the device.
17. Restart Your Device
If the issue persists, reboot your device. When dealing with a common problem like this, a restart often comes in super handy. Therefore, do not miss out on this one.
- On iPhone and iPad without the home button: Press and hold the side/top button and either volume button. After that, drag the power off slider to turn off your device. Then, press the side/top button to reboot your device.
- On iPhone and iPad with the home button: Press and hold the side/top button and then drag the power off slider to shut down your device. After that, press the side/top button to turn on your device.
- On Apple Watch: Press the side button and then drag the power off slider to shut down your Apple Watch. Next, press the side button to reboot your Apple Watch.
- On Mac: Click the Apple menu at the top-left corner of the screen and choose Restart.
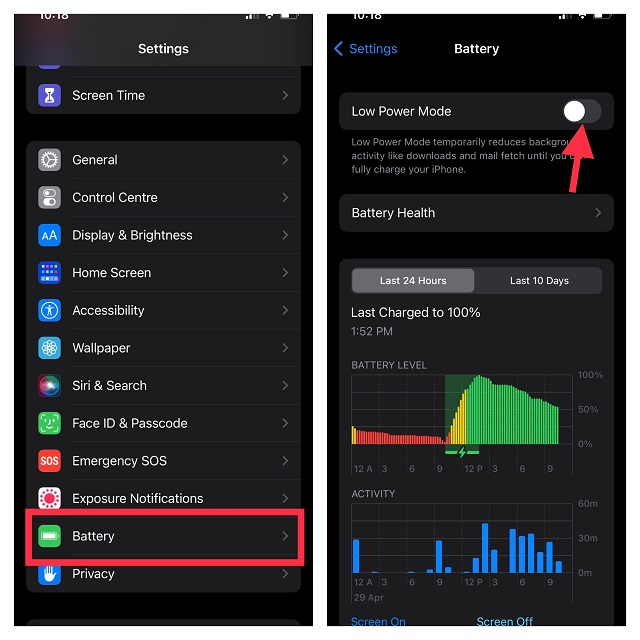
18. Turn Off Low Power Mode
When Low Power Mode is enabled, your device temporarily reduces background activity like downloads and mail fetch. Though Siri works even when this power-saving mode is enabled, at times, it might hinder the virtual assistant from working properly.
On iPhone and iPad (running iPadOS 15 or later): Navigate to the Settings app and choose Battery. Then, turn off the toggle next to Low Power Mode.
On MacBook or MacBook Pro (early 2016 and later) Running macOS Monterey or later: Head into the System Preferences app and click Battery. After that, click the Battery option in the sidebar and then uncheck the box for Low Power Mode.
19. Hard Reset Your Device
Frankly speaking, the hard reset aka force restart is my go-to troubleshooter, especially when dealing with common iOS 15 issues. Knowing how reliable it has always been, it’s wise to give it a try.
Hard Reset iPhone 8 or later and iPad with Face ID: Press the volume up button. Then, press the volume down button. After that, you need to hold down the power/side button until the Apple logo shows up on the screen.
Hard Reset iPhone 7/7 Plus: Hold down the side button and volume down button simultaneously until the Apple logo appears on the screen.
Hard Reset iPhone 6s or earlier and iPad with Touch ID: Hold down the home button and the power/side button at once until you see the Apple logo.
Hard Reset Apple Watch: Press and hold both the Digital Crown and the Side button at once until the Apple logo shows up on the screen.
20. Check Siri’s Language
Be sure you have set up Siri’s language correctly. For instance, if you have set the US as your country, make sure to choose English (United States) as your language. And if India is set as your country, select English (India) as the preferred language. Else, Siri may not be able to understand your accent.
- Open the Settings app on your iPhone or iPad and choose Siri & Search.
- Now, tap Language and then choose the correct language from the list.

- Next, reboot your device and try to use Siri to check if the issue is gone.
21. Disable Siri and Set It Up Again
At times, you can troubleshoot Siri issues on your devices just by completely disabling the personal assistant and then setting it up again. So, give it a try as well.
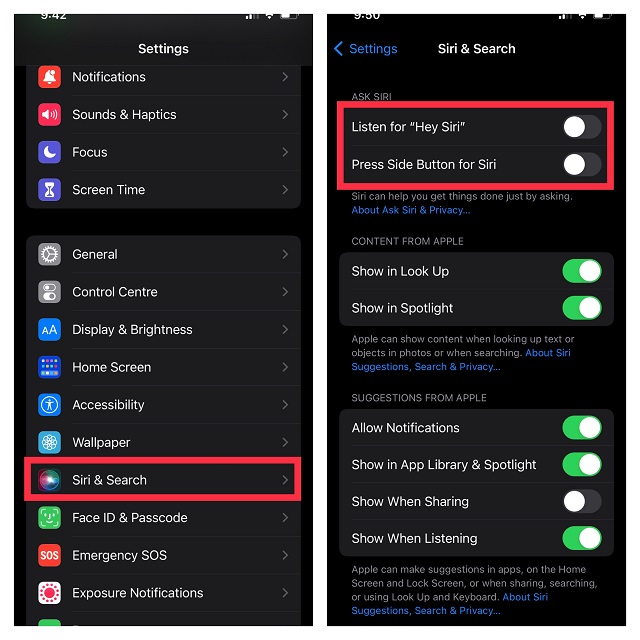
On iPhone/iPad: Head over to the Settings app and choose Siri & Search. Then, turn off the switch right next to “Listen for Hey Siri”. Also, turn off the toggle right next to the Press Side/Home/Top button for Siri. After that, restart your device and then turn on these toggles. Make sure to set up Siri in a quiet environment to ensure it is able to understand your language and accent properly.
On Apple Watch: Open Settings -> Siri. Now, turn off the toggles for Listen for Hey Siri, Raise to Speak, and Press Digital Crown. After that, restart your Apple Watch. Then, turn on all these toggles.
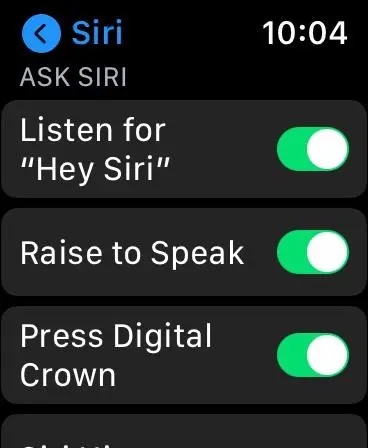
Note: Introduced in watchOS 5, the Raise To Speak feature enables you to activate the virtual assistant without saying ‘Hey Siri’ or pressing any button on your Apple Watch.
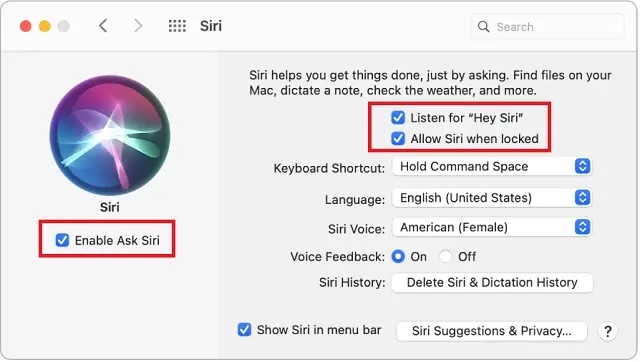
On Mac: Navigate to System Preferences on your Mac and choose Siri. Now, uncheck the box to the left of Enable Ask Siri. Also, uncheck the boxes to the left of Listen for Hey Siri and Allow Siri When Locked. After that, restart your Mac and then enable all these features.

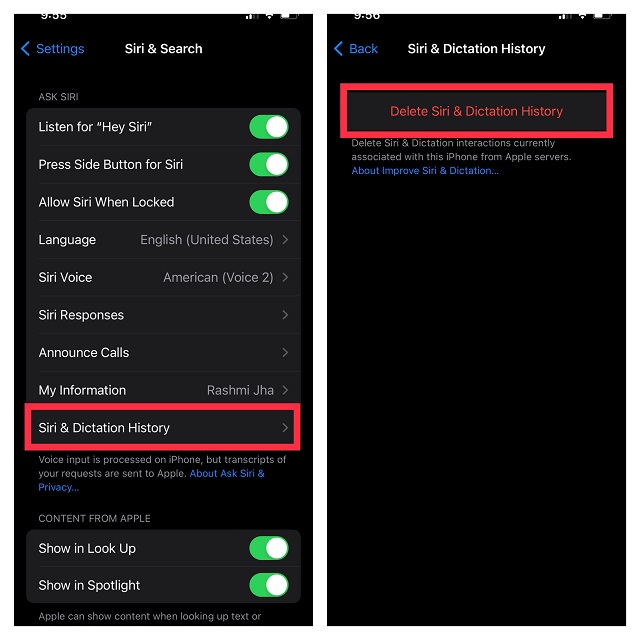
22. Delete Siri and Dictation History
Still no solution? There is no need to panic as we still have quite a few effective tricks left. Now, we will delete Siri and dictation history. A complete cleanup of history might help Siri learn your preferences from the scratch and provide a more personalized experience.
- Open the Settings app on your iPhone or iPad and choose Siri & Search.
- Now, tap Siri & Dictation History. Then, tap Delete Siri & Dictation History and confirm.
23. Reset All Settings on Your iPhone or iPad
I can’t remember how many times factory reset has rescued me. Whenever my iPhone or iPad seems to be struggling to fix complex issues, I make sure to try it out. Thankfully, it doesn’t let me down on many occasions. So, I would recommend you try out this reliable solution.
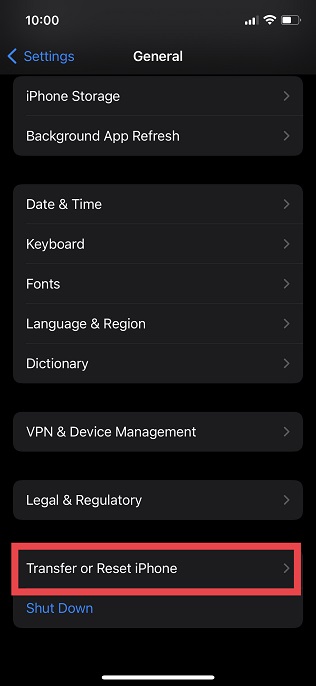
- Head over to the Settings app and choose General.

- Now, scroll down to the bottom and tap Transfer or Reset iPhone/iPad.

- Next, tap Reset. Then, hit Reset All Settings and confirm.
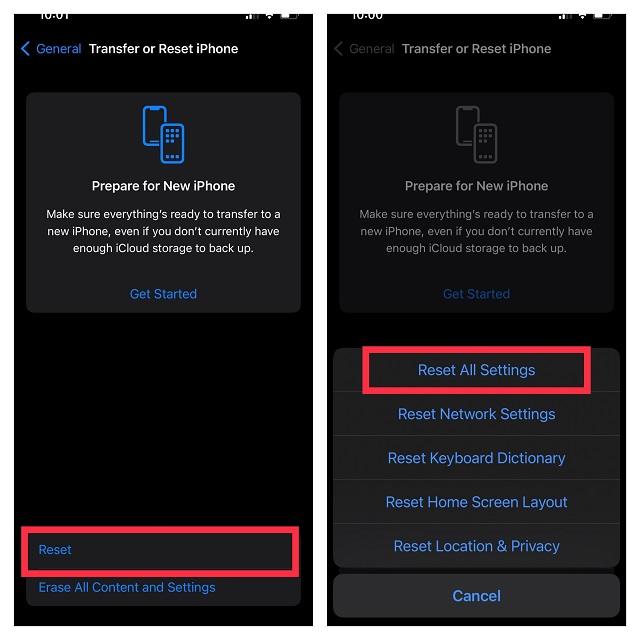
If asked, enter your device and Screen Time passcodes. After that, set up Siri again. Then, activate Siri to check if you have finally got the better of the problem.
Note:
- In iOS 14 or earlier, you will need to tap Settings -> General -> Reset -> Reset All Settings.
24. Check Apple’s System Status
If you are yet to fix Siri not working issue on your iPhone, I guess the problem could be with Apple’s system. Whenever Apple’s system faces an outage, a number of important services and features including Siri stop working. Therefore, navigate to Apple’s system status page and ensure that the circle to the left of Siri is green.
25. Update Software
The software update is quite reliable in terms of fixing bugs and miscellaneous issues that are often hard to explain. So, if none of the tricks has worked in resolving Siri not working issue on your iOS/iPadOS/watchOS or macOS device, I suspect the problem might be due to a bug. Thus, there is a high chance that the software update can help you troubleshoot Siri problems.
- On iPhone/iPad: Go to the Settings app and tap General.
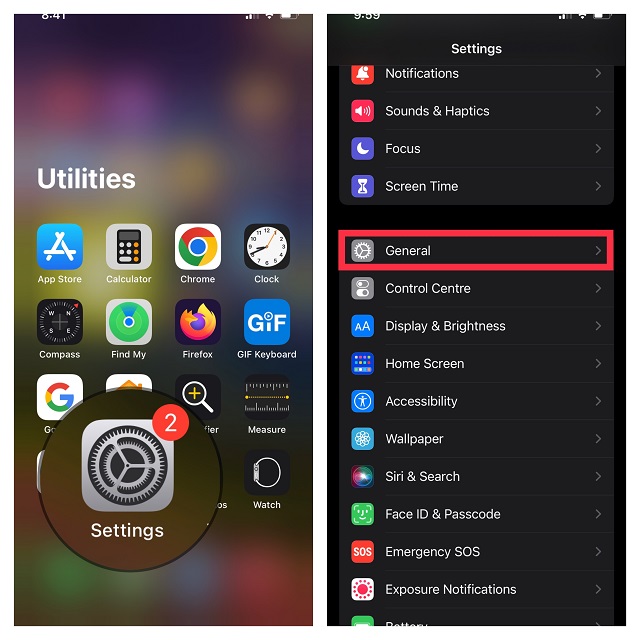
- Now, tap Software Update and download and install the latest version of iOS/iPadOS on your device.

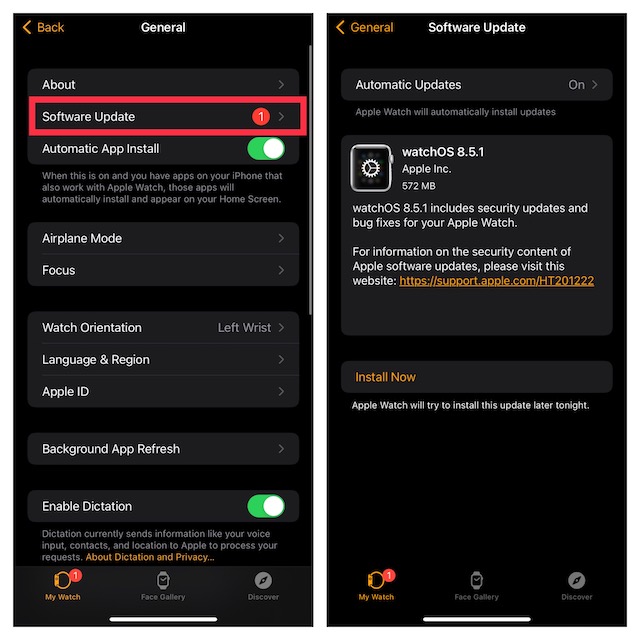
- On Apple Watch: Head over to Settings app -> General -> Software Update. Then, update the software on your Apple Watch. Alternately, open the Watch app -> General -> Software Update and then download and install the latest version of watchOS.
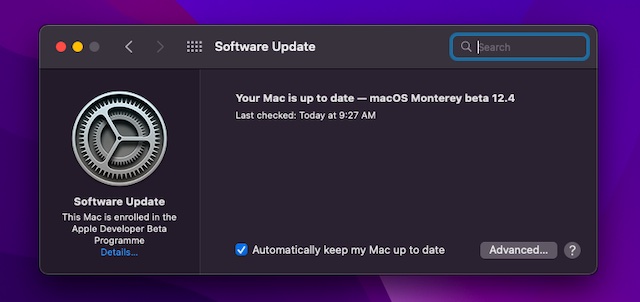
- On Mac: Navigate to System Preferences -> Software Update. After that, download and install the latest version of macOS.

26. Restore Your Device As New
It is highly unlikely that you may have to reach here. But if none of the steps above worked in fixing the Siri issues on your device, go for this last-ditch solution. As it will completely erase your device, make sure to back up your data in advance.
Restore Your iPhone and iPad
- Connect your iPhone or iPad to your computer and launch Finder/iTunes.
- After that, select your device. Then, click Restore iPhone/iPad and then follow the instructions to complete the process.

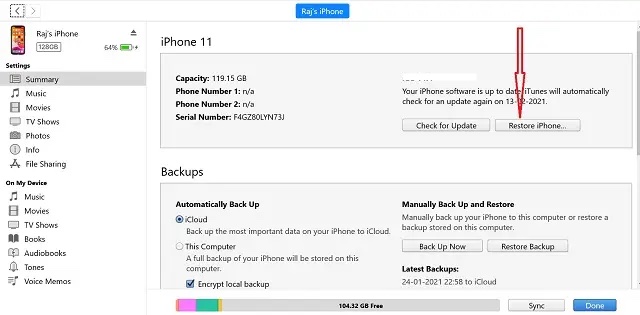
- Once your device has been restored, set it up again.
Erase Your Apple Watch and Repair It With Your iPhone
At the time of erasing data, watchOS automatically backs up the Apple Watch and lets you restore the backup during the setup process. Therefore, you shouldn’t worry about losing the important data stored on your Watch.
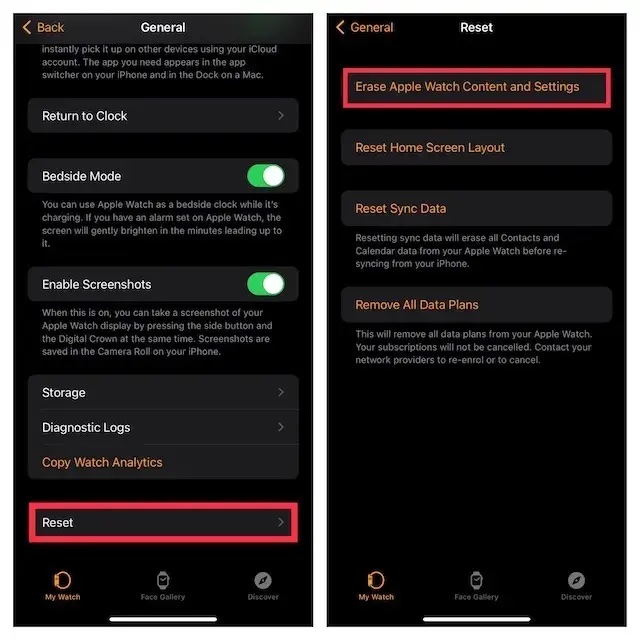
- Open the Watch app on your iPhone and choose General.
- Now, scroll down and tap Reset. Then, tap Erase Apple Watch Content and Settings and confirm.
Erase Your Mac with Apple Silicon or Apple T2 Security Chip
With macOS Monterey, Apple has made it more convenient to reset a Mac with Apple silicon or Apple TV Security Chip.
- Click the Apple menu in the upper-left corner of the screen and choose System Preferences.
- Now, click the System Preferences menu in the menu bar and select Erase All Content and Settings. After that, follow the instructions to reset your Mac.


Reset Your Mac with Apple Silicon Running macOS Big Sur or Earlier
- Turn on your Mac and hold down the power button until the ‘Startup Options’ appear on the screen.
- You may now be prompted to enter your admin and Apple ID password.
- Next, click on Disk Utility and choose ‘Continue’.
- Next up, choose your SSD (typically called ‘Macintosh HD) and hit the ‘Erase’ button.
- Up next, select a name for the drive and the format.
- Name: Macintosh HD
- Format: APFS
- Now, click Erase. Do note that if the Erase Volume Group button appears, you will need to click on this button instead.
- Once you have successfully erased your Mac, you can activate it. After that activation is done, click Exit to Recovery Utilities.
- To start up again from the disk you have erased, choose Reinstall macOS in the utilities window. Then, click Continue and go ahead with the instructions to reinstall macOS.
Reset Your Intel Mac without T2 Security Chip
The process of resetting an Intel Mac is almost the same as the M1 Mac. The only major difference lies in the way you activate Recovery Utilities.
- Turn on your Mac and then immediately hold down the “Command+R” on the keyboard. Make sure to press and hold the keys until the Apple logo shows up on the screen.
- From the utilities window, choose Disk Utility and hit Continue. Then, follow the same steps mentioned above to reset your Mac.
Easily Fix “Hey Siri” Not Working on iPhone, Mac, Apple Watch, and iPad
Well, that’s the end of this troubleshooting guide! I hope Siri has once again started to work normally on your devices. As outlined above, sluggish Wi-Fi/cellular connection is often the main culprit behind the problem. So, you can resolve Siri issues on your iPhone, Apple Watch, or Mac by fixing the weak Internet connection in most cases. If that doesn’t help, you can go for other reliable solutions like the software update and factory reset to get rid of the issue.
So, which solution fixed the Siri problems on your devices? Let us know in the comments.

