
Kodi, the media server and player system does not really need an introduction but if you are unaware, Kodi is an open source media center software or home entertainment system, previously known as XBMC (Xbox Media Center). The very powerful software has the ability to open almost all types of audio, video, and image formats, plus it lets you stream movies, live TV, shows, sports, and more.
Also, it lets you organize all your media in a streamlined way and supports various official and third party add-ons (all thanks to an amazing community) that surely enhance its functionality, making it much more than just a simple media center software. However, if you have just started using it on your Mac or PC, chances are, you’ll know that it’s not the most easiest software to use.
The various options and features can be a little overwhelming. So, if you’ve used Kodi in the past, only to let it go because you found setting it up tough, well, we are here to your rescue. We bring you a complete step-by-step guide on how to use Kodi on your PC or Mac in the best way possible.
Install Kodi on Your Device
We will first start with the installation guide. The good thing about Kodi is that it’s available for almost all platforms you can think of, including Windows, macOS, Linux, Android, iOS, Raspberry Pi and more. If you want to learn how to install kodi on any of the above-mentioned devices, click on the link to check it out. In this article, we are only going to focus on Kodi installation on Windows and macOS devices.


Installation process is quite simple. Head over to Kodi’s official download page, where you can download a build for any of the aforementioned platforms. Also, at the time of writing, the latest stable build of Kodi is v18.7 Leia. Even if the build changes in the future, the installation process will be the same. You can also install Kodi from Microsoft Store. We have mentioned all the steps below:
-
Install Kodi From the Microsoft Store
The best way to install Kodi on Windows is through the Microsoft Store. You can install Kodi just by making a quick search on Microsoft Store and installing it then and there. No need to download an offline installer and manually installing it. The best part is that you can update Kodi through the Microsoft Store seamlessly without losing your favorite add-ons and repository.


Install Kodi from the Microsoft Store (Free)
-
Install Kodi Using an Offline Installer on Windows PC
In case, your device is running Windows 7 or lower, you can download the offline installer from the Kodi’s official website. Just choose the architecture of your device and you can install it just like any other application.


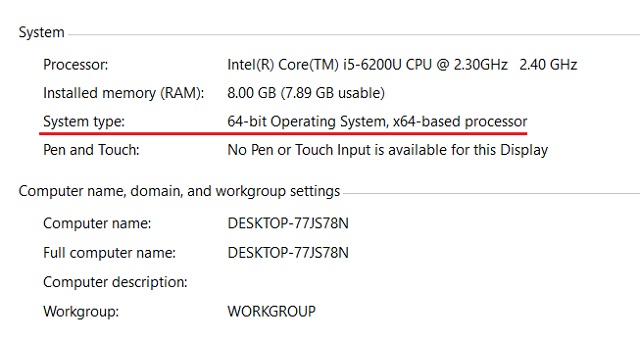
If you are not sure which build to choose, then right click on “My Computer” and open “Properties”. Here, you will find the device architecture next to “System Type”.

-
Install Kodi Using an Offline Installer on macOS
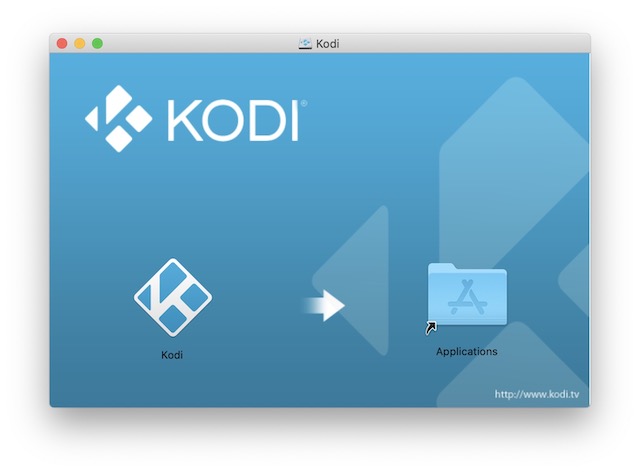
You can install Kodi on your Mac by downloading the DMG file from the Kodi’s official website. Just follow the link and click on “Installer(64bit)” to download it.

Keep in mind, macOS blocks installation from unknown sources by default. So you have to change the desired setting to allow the installation. To do so, open the Apple menu on the top-left corner and navigate to System Preferences-> Security & Privacy-> General. Here, change the “Allow applications downloaded from” option to “Anywhere” and you are good to go.


Next, open the Kodi DMG file and drag the Kodi app icon into the Application folder.

How to Use Kodi
User Interface
Kodi’s interface might not seem very easy or modern but it certainly is very functional. The home page of Kodi features sections for Pictures, Videos, Music, Programs and System. You can simply hover over each of these sections with your computer’s mouse for more options like files, add-ons, system info, settings and more. Note that the appearance changes depending on Kodi skin you are using. That’s why we are only going to talk about the default skin that Kodi comes with.


As you can see in the picture above, you will find the power menu, settings, and search field right at the top of the side menu. Even if you scroll down the side-menu, that top bar remains visible, allowing you to easily access them. Scroll down the side-menu and in the the bottom left you will find the favorites and weather button. 

Favorites is a good place to quickly find things you like. To set a movie, tv-show, or any other media file as your favorite, right click on it and choose favorite.


You can easily navigate the interface using mouse and keyboard shortcuts. You will find Kodi very easy to navigate with a keyboard. There are a number of cool keyboard shortcuts that Kodi supports. The one I would like you to remember is the “Esc” button. It lets you go back from anywhere. If you ever feel lost, on Kodi’s interface, just keep hitting escape button until you go back to home.
Options and Settings
-
Create Multiple Profiles
The Kodi home page features the various sections and sub-sections for Pictures, Videos, Music, Programs and System. Before you head over to the Settings page and play with the various options, you should create a profile or just set a lock on the Master profile, so that no one else gets access to your private content collection.


You can do this by going to Settings->Profiles. Here, you can enable the login screen and set the lock preferences of a profile.

-
Check out all Settings


Then, you can head over to the various Settings options. Here’s what each of options offer:
Appearance: Here you can change the skin of the Kodi interface to totally revamp its looks.

You can choose from available skins or download new Kodi skins. Also, you can change the fonts, startup window, sounds, edit the RSS Feed that scrolls down at the bottom, change the language & region, screensaver and more.


Add-ons: If you plan on using Kodi extensively, you will be visiting the Add-ons Settings page all the time. Here, you will find options to install the various add-ons from ZIP files or repositories.

Services: Want to stream your Kodi content to a TV or want to control your Kodi system via your smartphone? Well, you will find all the options for that here.

System: The System Settings pack in a lot of important actions. Here, you can configure the video & audio output, set up a master lock, enable power saving mode and more.

All of these pages pack in a ton of options that you can play with and if you are someone who loves to tinker around with video & audio playback settings, you are going to have a lot of fun. Now that you are well accustomed with various Kodi settings, let’s get the content, right?
Access Locally Stored Media in Kodi
If you a have a lot of music, videos, TV shows, podcasts etc. stored locally on your device, you can easily access it on Kodi and also organize it better. Firstly, you will have to add all your media to Kodi. Here’s how to do it:
1. Just select the Movie shows, TV shows, or music, in the side-bar and click on the “enter files section”.

2. Then, just tap on “Add Music” or whatever section you selected.

3. Enter the path where your media is stored on your device or just click on the “Browse” button and select the path.

4. Once you have added a path, all the media from that folder will available for you to play in Kodi. While you can add as many paths as you want, we will recommend you to store all your media files in unified single folders for a better organized experience.

Although accessing your local media from Kodi is cool, the real fun lies in the various Kodi add-ons and repositories. So, here’s how you can install them on Kodi:
Install Repositories and Add-ons in Kodi
I know you must be wondering, what exactly is a repository? Well, repositories are a group of add-ons that can be installed in Kodi, so that you can access the various add-ons it offers with ease. Kodi offers its very own official add-on repository, plus you can always install various third party repositories and add-ons.
Official Add-ons can be installed and enabled in Kodi directly. On the other hand, unofficial add-ons can be installed through different sources or repositories that you will have to add manually or through ZIP files that are available to download.
-
Install Official Kodi Add-ons
First, let’s talk about how you can install the official Kodi add-ons like YouTube, Dbmc for Dropbox, Trakt, Vine etc. Here are the steps to do it:
1. You can just head over to Settings->Add-ons. Here, click on “Install from repository”.

2. Here you will find different types of add-on categories like look & feel, music, lyrics, videos, subtitles and more.

3. You can just head to an add-on type, for instance, you can just click on Video Add-ons and click on an add-on of your choice and the hit “Install“, after which the add-on will be downloaded and you should get an “add-on enabled” notification.

Once you’ve installed the add-on, you will find them in their respective sections, like YouTube will be available in Videos->Add-on page.
While there are a ton of great official add-ons, there are some great unofficial ones too, which make Kodi’s complexity worthwhile. So, let’s take a look at how you can install third party repositories and add-ons:
-
Install Third Party Unofficial Kodi Add-ons
Some of the best unofficial Kodi add-ons are part of repositories like Fusion, Xfinity, Superrepo and more. So, first let’s see how you can install a repository in Kodi. Well, to install a repository, you will have to add its source and every source comes with its own unique link, which you can easily find through a Google Search. For instance, we are going to show you how you can install the Fusion repository:
1. Head to System->File Manager and double click on “Add Source” .


2. In the resultant pop-up window, double-click on “<None>”.
- Now you’ll be asked to type in the exact path of the third-party repository you’re trying to install. You can just copy and paste the URL and click on “OK”.


3. Now type in a name so that you can start using the repo. I chose to name it SuperRepo before clicking on “OK”.

4. You can also install addons using downloaded zip files. Head to Settings -> Addons and click on “Install from ZIP”. Here browse and select the downloaded file.

Use Kodi from your Phone
Kodi brings a great media center experience and chances are, you would not always want to control it via the usual mouse and keyboard combo, right? While Kodi supports TV remotes, game controllers and more such devices. The good news is, you can control Kodi with your phone. The official remote app from Kodi available for Android and iOS lets you do that.
1. To use it, you will first have to go to Kodi Services Settings. Here, go to Control and turn on the option that says “Allow remote control via HTTP”.

4. Once done, you can open the remote app (download from here) and make sure your Kodi system and smartphone are connected to the same network. Tap on “Next” and the Kodi remote app will start looking for media centers. If the media center is found, you can just select your system and start controlling Kodi on your phone. However, if the app is unable to find the media server then click on “Next” to manually set up the remote.


5. Here, give a name to your media center, it can be anything. After that, enter the IP address of Kodi under the “Address” field. You can find the IP address from Kodi Settings -> System Information -> Network. Next, enter “8080” in the “Port” field and “kodi” in the “Username” field. Apart from that, keep everything as it is. Finally, tap on “Test” and the smartphone remote will be connected to Kodi.

The Kodi remote app even lets you see all the music, videos, pictures and other media inside your Kodi system. Moreover, you can even check out all the add-ons installed in your Kodi system.
Well, now you have set up Kodi, installed various add-ons and repositories and you even know how you can control Kodi from your phone. So, how about streaming your Kodi system from your device to a TV via Chromecast?
Frequently Asked Questions
Q. Can You Run Kodi on PC?
Yes, absolutely. In fact, there are multiple ways to run Kodi on Windows PCs. Just go through the guide that we have mentioned on the top.
Q. Is Kodi on PC Legal?
Yes, using Kodi on PC or for that matter, any platform is legal. The question of illegality only arises when you use a third-party addon that contains pirated content. You can learn more about how to use Kodi safely from our linked article.
Q. How do I Update Kodi Without Losing Build?
You can easily update Kodi without affecting your custom build setup. You just need to follow the steps that I have explained above for various platforms. However, keep in mind, with every major release of Kodi, new APIs and changes are released which often break the compatibility.
In that case, you will lose your Kodi Build setup. I would recommend you to wait for the maintainer to update the Build and then only proceed to update Kodi. Also, you can take advantage of backup if you Build supports it.
Stream Kodi to TV via Chromecast
Well, if you are using Kodi on a PC or Mac, you can use the Google Cast Chrome extension to stream Kodi on a TV easily. If you are using Kodi on your Android smartphone, you can use the Google Cast app or LocalCast app to stream Kodi to a TV. We have already published a detailed article on how you can stream Kodi from Chromecast to a TV, so you should definitely check it out.


All set with your Kodi configuration?
Once you have set up Kodi on your device, make sure to install the Backup Add-on, so that you can take your profile to any other system you want. Also, after you are accustomed to Kodi, you should check out our article on the various Kodi tricks. Well, we hope our guide has helped you set up your Kodi configuration but if you have any questions or doubts, feel free to let us know about it in the comments section below. You can surely expect a swift reply from us. However, if you still find Kodi complex and tough to use, you can check out some Kodi alternatives you can use.

