The other day I ran into a guide about setting any song as a ringtone in Android, and I couldn’t help but laugh at the agony or the rather tedious workaround that iOS users need to follow to set any song as a custom ringtone. Unlike iOS, Android offers you a pretty straightforward way of choosing any track as your ringtone. Though there is no denying that Apple has simplified many things, setting a custom ringtone on an iPhone has been a pain-point for ages. And it still is. But fret not as we detail an easier way to set any song as an iPhone ringtone without iTunes or PC in this article. Let me guide you through the steps.
Set Any Song as iPhone Ringtone without iTunes or Computer
Before jumping into the process, make sure to check off the requirements for making your favorite track, be it Billie Eilish’s You should see me in a Crown or Queen’s We Are the Champions, an iPhone ringtone.
Pre-requisites to Set Any Song As iPhone Ringtone
There are a couple of requirements for setting any song as a ringtone on iOS. First and foremost, ensure that you have already downloaded the song and saved it either in your music library or the Files app.
Second, you need the GarageBand app to edit the song and export it as your iPhone ringtone. The app is available for free and requires iOS 14 or later. So, make sure to download this stock app if it is not already available on your iOS device.
Now, let’s make our custom ringtone right on the iPhone without the use of iTunes or PC. Follow the steps below:
Create a Custom Ringtone on Your iPhone
- Launch the GarageBand app on your iPhone.

2. Now, ensure that the Tracks tab is selected if it’s not already. After that, select the desired instrument from a handful of options like a drummer, keyboard, guitar, and more. For this guide, I’m going with the drummer.

3. Next, tap on the project icon at the top left corner of the screen.

4. Then, Select the loop icon at the top right corner of the screen.
![]()
5. Now, go to the Files tab located at the top. After that, tap on Browse items from the Files app. If you’ve downloaded a ZIP/compressed file, learn how to extract files on your iPhone right here.

6. In the Files app, navigate to the song you want to use as your iPhone ringtone and tap on it. The song will be imported into Garageband.

7. Drag and drop the imported track after the instrument which is set as the first track in the audio editing interface.

8. Now, it is time to edit the song to your heart’s content and create a ringtone without using iTunes or a PC.
- Choose the starting point of the song: Touch and hold the track and then drag the handle to select the starting point of your ringtone.

- Split the track: Touch and hold the track to access the hidden editing tools and then choose Split. After that, drag the tiny scissor icon down to cut the song.
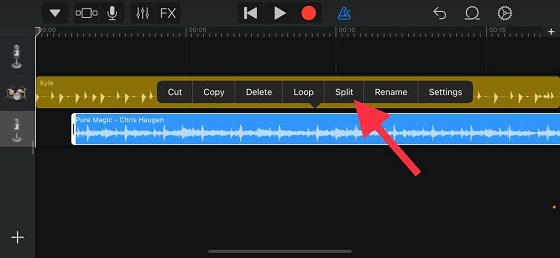
- Delete unwanted part of the song: Select the unwanted part of the song and then choose the Delete option in the pop-up menu.

- Undo changes: Tap on the reverse arrow icon at the top right corner of the screen to undo changes.

- Play your edited ringtone: Once you’ve edited the track, tap on the play button at the top to check whether or not the ringtone is in line with what you are looking for.

Set a Custom Ringtone on Your iPhone
1. Once you’re happy with your custom ringtone edit, tap on the tiny downward icon at the top left corner and choose the My Songs option.

2. Next up, touch and hold your project and choose Share.

3. Then, tap on ‘Ringtone’ to export your project as the iPhone ringtone (.m4r or .m4a file type).

Note: Bear in mind that your custom iPhone ringtone must be 30 seconds or less. If it is longer, the GarageBand app will automatically shorten its length at the time of exporting the track as an iPhone ringtone. Tap on Continue to proceed.

4. After that, give a suitable name to your ringtone and hit the Export button at the top right corner of the screen.

5. Once you have successfully exported the song as a ringtone on your iPhone, tap on the “Use sound as …” option that pops up.

6. Finally, choose ‘Standard Ringtone’ in the menu to set your favorite song as the custom iPhone ringtone.

It’s worth mentioning that you can also set it as a standard text tone or assign the ringtone to a preferred contact. Do note that if you don’t want to use the song as the ringtone right now, tap on Done to finish. Later, you can head to Settings app -> Sounds & Haptics -> select your ringtone and choose the custom ringtone from the list.

Set Your Favorite Song as an iPhone Ringtone without iTunes
So, that’s the way you can make and set any song as your ringtone on iOS 14. While the entire process may not seem to be downright simple, it does work reliably and fills up the void. Therefore, until Apple comes up with a better way, make the most of this trick.
Interestingly, there is also a way to turn any voice memo into a ringtone on iPhone. If you wish to try out this hack as well, head over to this hands-on guide. Do you have any questions or feedback regarding this guide? If yes, feel free to share it in the comments section below.