
Thinking of upgrading the internal SSD of your PS5? If you answered yes, you have come to the right place. The PlayStation 5 arrived with support for installing PS4 games to external storage, but the support for adding another high-speed SSD internally to download more PS5 games came later. Today, many users have expanded their system storage by upgrading their consoles with a suitable M.2 internal SSD for next-gen PS5 games. While you can get it done through a professional, we are here to guide you through the step-by-step process to easily install a new internal SSD in your PS5 console. With that said, let’s look at how to upgrade your PS5’s storage.
Prerequisites to Upgrade PS5 Internal Storage
1. Buy an SSD Compatible With PS5
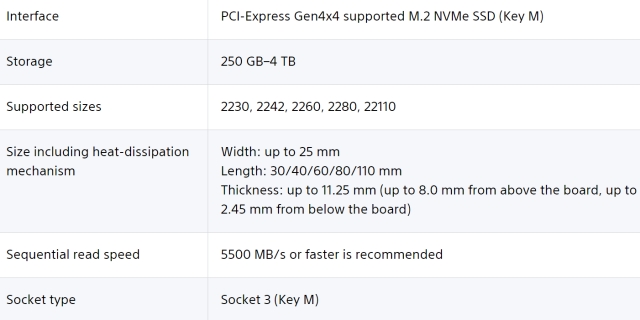
Most PCIe Gen 4 M.2 SSDs available in the market are compatible with the PS5. Sony has published the below details in a support article that lists the M.2 SSD requirements for PS5. As you can see below, Sony recommends a sequential read speed of 5500 MB/s or faster. As per the experience of many users, slightly slower SSDs (below the recommended speed but around the same range) work fine as well. You can read about the experience of other users to confirm how the experience will be.

We are using the Western Digital Black SN770 ($39.99 on Amazon) in this guide, which is an affordable Gen 4 M.2 SSD supported on the PS5, albeit it is slightly under the recommended speed.
2. Make Sure Your PS5 Is Updated
The PlayStation didn’t come with support for storage expansion out-of-the-box. Sony released an update back in September 2021 to enable gamers to install an M.2 internal SSD in their PS5 consoles. Now, even though it has been a long time since the update release, make sure to update your PS5 to the latest firmware update.
3. Heatsink and Other Essential Tools
Finally, the PS5 also requires a heatsink on the SSD, which can comfortably fit within the size requirements below. We recommend buying a suitable SSD that fits within these margins and also includes a heatsink. However, if you already have an SSD, buy a heatsink compatible with your SSD’s size and install it using the instruction manual included with it.


Further, to perform the SSD upgrade, you will need a standard Philips Head screwdriver (cross-head). Also, ensure you do this procedure on a clean surface, which won’t scratch the body. You can also place a cloth or desk pad over the working area.
How to Install or Upgrade SSD on Your PS5
With all the basic preparations out of the way, it’s now time to turn off your PS5 and unplug it. Make sure you’re grounded before you start this process and then follow the steps below.
1. First, you need to remove the side panel on your PS5. For that, place the console horizontally, such that the PS logo is facing down. Then, you need to stand towards the bottom of the console. After that, grip the edge next to the power button with your left hand and the diagonally opposite corner with your right hand.
2. After that, carefully lift the cover up with your right hand and pull the cover towards the direction of the blu-ray disk (or towards you). It should start sliding off now. Put the cover somewhere safe until you need to put it back in.


3. Next, locate the SSD expansion slot in your PS5, located next to the cooling fan and covered with a metal plate. Remove the cover using a cross-head screwdriver, as shown below. After that, the SSD slot cover will come off. Store the screw and SSD cover safely.


4. Removing the cover will reveal the M.2 SSD slot with markings for the different sizes. Here, you need to remove the screw from the hole marked 110 at the end of the slot. You also need to remove the ring-shaped ‘spacer’ underneath that screw. We will move the spacer and screw to the correct location depending on your SSD’s length. As for what the spacer does, it ensures the SSD you install in your PS5 is positioned perfectly.

5. Now, place/ hold your SSD in the cavity and analyze the M.2 port based on your SSD’s size. Next, place the spacer (removed in the step above) in the correct hole. For example, the WD SN770 is an M.2 2280 SSD, so we have placed the spacer in the hole with the “80” marking.


6. Now, align your SSD against the M.2 port at about a 45-degree angle, and confirm that the notches on your PS5’s M.2 port and SSD align. After that, proceed to install your SSD into the slot on your PS5.

7. When fully inserted, place one finger on the tail side of your SSD, so that it lays flat on the hole and the spacer that we previously placed in the hole. Next, screw in the SSD using the screw we removed in the third step.

8. If you have bought a heatsink for your SSD, it is time to install it now. Ensure that it will seat perfectly with the SSD cover attached. Do refer to the compatibility section at the start if you aren’t sure about the heatsink being slim enough. You could also attach the heatsink on the SSD prior to installing it in your PlayStation 5.
Note: It’s mandatory for the SSD cover to be attached as well. You cannot use an SSD with a larger heatsink – those are unsupported. If you leave the SSD cover out, it compromises the airflow design and your drive may overheat.

9. Next, place the expansion slot cover over your newly installed PS5 SSD and screw it back into place using a screwdriver.

10. After that, you need to re-attach the PS5 side panel by lining it up with the hooks underneath, as highlighted below. Slide it back into place using it towards the right, which would make the hooks go into their designated locations. You will hear an audible click sound, indicating the panel is securely attached.

11. That’s it. Your PS5 SSD installation is now complete. You have successfully upgraded the storage, but there is something left for us to do. Finally, connect the power cord and HDMI cable to the console and turn on your PS5 through the power button on the front. Then, you will see the screen below, which means the SSD has been detected by your PS5. Here, select the “Format M.2 SSD” option after turning on the controller, and shortly after, the PS5 will show your SSD read speed.


Upgrading the storage on your PS5 wasn’t so hard, right? After following the instructions above, you will have installed a new internal SSD in your PS5. You can now easily store more PlayStation 5 games on your console! Now that you have upgraded the storage, check out the 20 best PlayStation 5 games to play right now. Also, if you play FPS multiplayer games with friends, learn how to set up and use Discord on the PS5 console. To wrap it up, if you have any doubts, do let us know in the comments below, and we will help you out.
In the PS5, navigate to “Settings -> Storage -> Installation Location” to set up installing games on your new drive and the built-in 825GB SSD selectively, as per your needs. To move games from internal storage to the SSD, navigate to the game and press the “Options” button. Then, select the “Move Games and Apps” option. You can easily transfer games between your M.2 SSD storage and 825GB SSD.
No, upgrading your PS5 storage with a new M2. SSD will not voice the console’s warranty. As long as no physical damage has been caused to your PS5 while installing the M.2 SSD, the warranty will be honored.
Yes. Sony asks you to remove your internal M.2 SSD before submitting the PlayStation 5 console for warranty claims and repairs.
No. The PS5 console’s native storage might be faster than the SSD you install, depending on the storage drive you purchase. However, the difference between game load times is not very noticeable.


