
Windows 10 was supposed to bring superior performance to PCs and laptops running previous iterations of Windows. However, if the various reports are to be believed, that doesn’t seem to be the case. According to various forum threads and posts, Windows 10 users are facing performance issues due to high CPU/memory usage. Apparently, there are a number of issues that are resulting in high CPU usage in Windows 10.
Before we tell you how you can fix high CPU usage in Windows 10, let’s divulge into the details of what might be causing this, shall we?
What causes high CPU & memory usage in Windows 10
If you have this perception that devices featuring lesser RAM might be facing high CPU usage issues on Windows 10, you are wrong. In fact, most of the people facing these issues have systems with 8 or 16 GB RAM and high-end Intel Core i7 chipsets. We are using a Windows 10 PC, which packs 4 gigs of RAM and is powered by the fairly modest Core i3 processor and we can personally assure you that Windows 10 works like a charm (well, at least most of the time).
So, low memory or lower end chipsets are certainly not the problem here. Now that we have cleared that doubt, here are some things that might be causing your Windows 10 PC to use up all the CPU power and RAM:
- Driver Incompatibility Issues: Some hardware makers are yet to update their Windows drivers to play well with Windows 10 and that results in performance issues. Due to driver incompatibility, there might be a memory leak, which results in high CPU & memory usage.
- Windows 10 updates: We are going to go ahead and say that Windows 10 updates are a headache. While Microsoft has tried to make things seamless, the regular prompts to update aren’t helping. Plus, there are various updates that are downloaded in background automatically, resulting in slowing down of the PC.
- Registry Bugs: Windows 10 seems to feature a few bugs in its Registry that are resulting in the high CPU usage.
- CPU hogging processes: There are various unnecessary processes that run in the background and take up all the CPU usage. Moreover, there are processes that automatically start up when you turn on your PC.
There might be several other reasons for the high CPU usage in Windows 10 but these are the key ones for sure. Don’t worry though, as we are going to help you fix things up. Here’s how you can fix high CPU and memory usage in Windows 10:
Ways to fix high CPU/Memory Usage in Windows 10
Note: You can check out your PC’s CPU and memory usage by going to the Task Manager. You can open up Task Manager by pressing Ctrl+Alt+Delete or by right clicking on the Start menu and selecting “Task Manager”. So, after you try out the following methods, don’t forget to check the Task Manager for changes in the CPU and memory usage.
1. Disable start up apps and services
As we mentioned, there are various apps and services that start running in the background, as soon as we start up the computer. Well, there’s a way to stop these apps and services to start running at start up. To do it, open Task Manager and go to the fourth tab “Startup”. Here, the apps will be listed along with their impact on the CPU and memory. To disable an app or service, just select it and click on the “Disable” button or right click on the app and select “Disable”.


Note: Make sure to only disable third party apps and services because there might be apps & services that are part of Windows and disabling them might result in problems.
2. Disable Superfetch and other services
There are a few Windows 10 services that are the main culprit in eating up your CPU resources. Superfetch is a Windows 10 system service, which makes sure that the most accessed data is available right from the RAM. However, if you disable the service, you will notice a huge decrease in CPU usage. Here’s how to do it:
- In the Windows Task Manager, go to File->Run new task. In the Create New Task dialog box, type “services.msc” and click “Ok”.


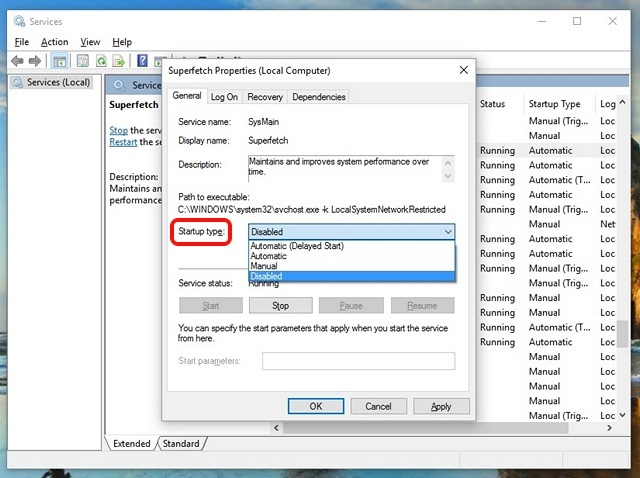
- The whole list of Windows services should open up, scroll down below and find “Superfetch”. When found, right click on the service and select “Properties”.


- When the service properties opens up, you will find a “Startup type” option in the General tab. Change that to “Disabled” through the drop-down menu and press “Ok”

You can use the same process to disabled other CPU intensive services like “Background Intelligent Transfer Service Properties” and “Windows Search Properties”.
3. Make changes to the Registry to disable RuntimeBroker
RuntimeBroker is a Windows process, which is supposed to help you manage permissions of the Windows Store apps. Ideally, it should not take up a lot of memory or CPU resources but faulty apps results in the process using GBs of memory, thus causing performance issues. As you might have guessed, you can disable the process through the Registry Editor. Here’s how you can do it:
- Open Run through the Win+R key combo and type “regerdit.exe” and press Enter to open Registry Editor.
- In Registry Editor, go to HKEY_LOCALMACHINE\SYSTEM\CurrentControlSet\Services\TimeBroker and double click on “Start” to change its DWORD value from 3 to 4.


- Once done, reboot your PC for the changes to take effect. After which, you will see that there’s no process dubbed RuntimeBroker.
Note: The value 2 means automatic start up, 3 means manual, while 4 means disabled.
4. Fix Driver Issues
We have already mentioned that incompatible drivers can result in memory leak on Windows 10, so it’s important you fix all the driver issues. You can install apps like Driver Booster, DriverPack, DriverTalent etc. These apps automatically detect outdated drivers and update them from inside the app. So, you won’t have to go and search for them manually.
5. Turn off Windows 10 Tips
If you are new to Windows 10, the cool tips that pop up to show you the way can be pretty helpful. However, if you have been using Windows 10 for a while now, you should know that these tips might be the cause of your PC’s high CPU usage. Moreover, some people even think that turning off Windows 10 tips disabled the RuntimeBroker process. Either ways, it’s best to disable it.
To turn off Windows 10 tips, go to Windows Settings->System->Notifications and actions. Here, turn off “Show me tips about Windows”.


6. Change Windows 10 Update Settings
Windows 10 updates were supposed to be seamless but the fact is, they have become a nuisance. Windows 10 keeps on downloading updates automatically and even installs it on will. This not only hinders the experience, it also takes up a huge chunk of CPU resources and memory. So, it’s important to change Windows 10 update settings, so that they play well with your PC’s CPU and RAM.
Firstly, you need to turn off automatic downloading and installation of updates. To do that, go to Settings->Update & Security->Windows Update->Advanced Options and check “Defer upgrades”.

Windows also tends to share your update with other PC’s over the internet. You can either totally disable it or choose to share your updates with PCs on your network. We’ll recommend you to turn it off in Settings->Update & Security->Windows Update->Advanced Options->Choose how updates are delivered.


7. Disable “Ok Google” in Chrome and “Hey Cortana”
Google’s Chrome browser has made a name for itself for being a fast, responsive browser, as well as a resource hog. So, it’s no surprise that Chrome might be one of the key reasons for your PC’s high CPU usage. Reportedly, disabling Chrome’s “Ok Google” feature brings a pleasant impact on CPU usage. To disable it, you can go to Chrome Settings and in the “Search” section, uncheck “Enable Ok Google to start a voice search”.


The always-on hotword “Hey Cortana” should also be disabled to bring a positive impact on a PC’s CPU and RAM. To disable it, open Cortana and hit the hamburger menu. Then, go to Notebook->Settings and turn off “Hey Cortana”.


8. Adjust Windows 10 Performance
Animations and various cool transitions look good but they also take a toll on your PC’s CPU and memory. Thankfully, Windows lets you optimize the effects for the best performance. To optimize Windows 10’s performance, go to Control Panel and in the search box, type “performance”. From the search results, click on “Adjust the appearance and performance of Windows”.
The “Performance Options” dialog opens up and in the “Visual Effects” tab, you can either “Let Windows choose what’s best” or “Adjust for best performance” or “Adjust for best appearance” or you can disable/enable any effects manually under “Custom”. In the “Advanced” tab, you can even choose to allocate processor resources for best performance of either “Programs” or “Background services”.


9. Turn off Windows Spotlight
Windows Spotlight is the Windows 10’s lockscreen that brings you stunning wallpapers from Bing along with suggestions. It also learns from your feedback to bring you backgrounds that you will like. It does look cool but it also runs in the background, taking up resources, so it’s best to turn it off. To disable it, go to Windows Settings->Personalization->Lockscreen and change the background from Windows Spotlight to a Picture.

10. Defragment Drives
Another way to fix high CPU & memory usage in Windows 10 is by making your PC’s hard disk more efficient. You can do that by defragmenting your PC’s drives. To start defragmentation of drive, search for “defragment” in Cortana and you should find “Defragment and Optimize Drives” desktop app. You can then select the drive you want to defragment. To start the process, click on “Analyze”, which will tell you if the drive needs to be defragmented or not.


Once it’s analyzed, you will get the percentage of fragmentation on the drive. If it’s above 10%, you should start defragmentation by clicking on “Defragment Disk”.
Note: The defragment process can take several minutes to hours, however you will be able to use your PC in the mean time.
SEE ALSO: 10 Common Problems in Windows 10 (With Solutions)
Try these methods to fix high CPU/memory usage in Windows 10
If you have been facing issues with high CPU and memory usage in Windows 10, you should try out all of these methods to optimize your PC’s performance for the best. We are pretty sure you won’t face any issues once you carry out these steps. So, try them out and let us know if the performance issues on your PC are fixed or not. Also, tell us if you have any more methods to optimize CPU and memory usage in Windows 10. Sound off in the comments section below.


